
Earlier this year, we talked about what was coming for Nitrux for 2019, and we mentioned that some of our plans had to do with gaming. After weeks of testing, we are confident to announce it.
Introducing VMetal
Over the past weeks, we have published videos about a new feature that we want to add to Nitrux 2.0 called VMetal. With VMetal, we hope to bring our users the ability to run Windows software to their Nitrux systems.
Although we mainly want to add VMetal to Nitrux for the gaming aspect of it, it is, without a doubt, the best way to make use of Windows software without the need for dual-booting Microsoft’s operating system.
What is VMetal
VMetal allows users to run Windows in parallel to Nitrux with the aim to provide users of access to Windows software meanwhile they can still use their Linux desktop at the same time.
With znx, we provide users of a way to boot multiple Linux distributions by deploying them on one go. Since Windows is not Linux, this makes it incompatible with znx. However, we want to provide our users of a way to bridge this gap where some software is still not available in Linux natively.
In the video, we have Windows 10 build 1809 running at full-speed the Unigine Superposition DX12 benchmark on a Ryzen 7 2700X and a GTX 1080. The performance when compared to a bare-metal Windows installation is pretty close, allowing for the full-hardware acceleration of 3D software, without the need for any compatibility layer.
In summary, VMetal is, as its name suggests, a virtualization feature built into Nitrux.
How does VMetal work?
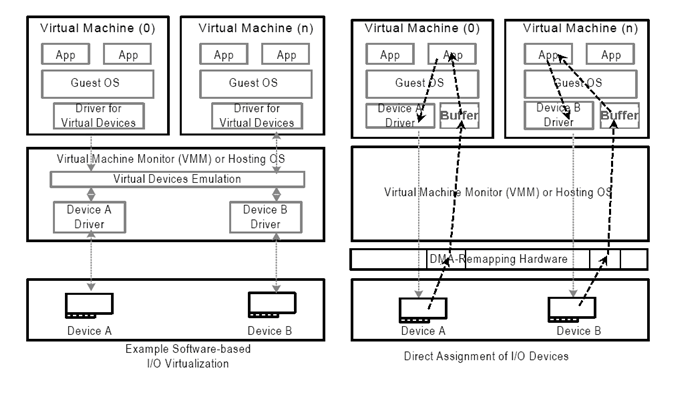
VMetal is not a wrapper or a compatibility layer; it makes use of QEMU and KVM (Kernel-based Virtual Machine) on the software side and of VFIO and IOMMU on the hardware side, meaning that Windows is accessing directly the hardware that it utilizes.
QEMU is a generic and open source machine emulator and virtualizer. When used as a machine emulator, QEMU can run OSes and programs made for one machine (e.g., an ARM board) on a different computer (e.g., your PC). By using dynamic translation, it achieves outstanding performance.
KVM (for Kernel-based Virtual Machine) is a full virtualization solution for Linux on x86 hardware containing virtualization extensions (Intel VT or AMD-V). It consists of a loadable kernel module, kvm.ko, that provides the core virtualization infrastructure and a processor specific module, kvm-intel.ko or kvm-amd.ko.
The VFIO driver is an IOMMU/device agnostic framework for exposing direct device access to userspace, in a secure, IOMMU protected environment. In other words, this allows safe, non-privileged, userspace drivers.
An input-output memory management unit (IOMMU) is a memory management unit (MMU) that connects a direct-memory-access–capable (DMA-capable) I/O bus to the main memory.
Utilizing VMetal is also possible thanks to AMD-Vi and Intel VT-d.
AMD-Vi, Intel VT-d. AMD-Vi/VT-d is a processor feature that enables the virtualization of I/O resources (directed I/O).
The IOMMU extends the concept of protection domains (or domains, for short) first introduced with the AMD64 DEV. The IOMMU allows each I/O device in the system to be assigned to a specific area and a distinct set of I/O page tables.
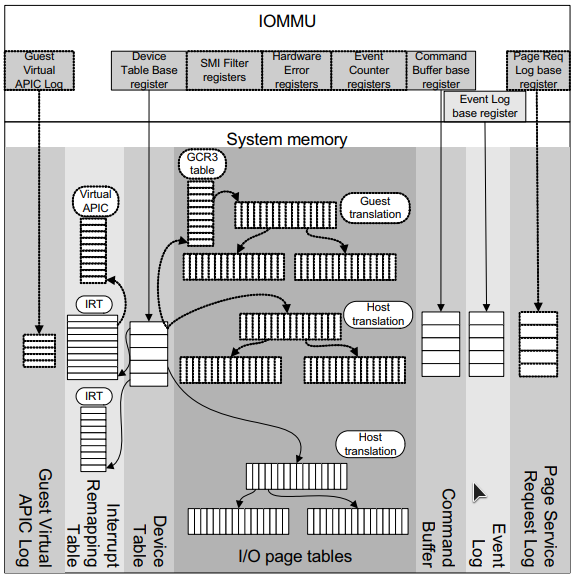
The I/O Memory Management Unit (IOMMU) extends the AMD64 system architecture by adding support for address translation and system memory access protection on DMA transfers from peripheral devices. IOMMU also helps filter and remap interrupts from peripheral devices.
In addition to this, VMetal is aimed to support UEFI operating systems and computer hardware such as Nitrux and Windows 10 utilizing OVMF.
OVMF is an EDK II based project to enable UEFI support for Virtual Machines. OVMF contains sample UEFI firmware for QEMU and KVM.
Requirements for VMetal
- CPU must support virtualization extensions (Intel VT-x, AMD-Vx)
- CPU must support Directed I/O (VT-d for Intel or AMD-Vi, generically known as IOMMU)
- The motherboard must support VT-x and VT-d (or AMD equivalents).
- The motherboard and the graphics cards must support UEFI. When buying new hardware, check the motherboard’s, User Manual.
- The computer should have one or more discrete PCIe graphics cards. A combination of an iGPU and a discrete GPU is also usable.

UEFI + Nitrux

As noted, the support for UEFI is a must to utilize this new feature; it’s a must to use Nitrux in the first place.
Just as we indicated in our previous articles and our FAQ, the need for hardware that has UEFI support and, therefore, the lack of support for Legacy BIOS motherboards is a choice.
And we made this choice with all of these developments in mind. It’s not about leaving users out in the cold, but about building an operating system that presents users with new features and a new approach.
Nitrux doesn’t support MBR (or Master Boot Record) drives for the very same reason; for znx to do its work, the storage device should be using the GUID Partition Table (or GPT). And as we have indicated previously,
It is theoretically possible to use the ESP on an MBR device. This method, however, is untested and it seems to produce more problems related to bootloader naming and NVRAM entries managed by efibootmgr.
As we determine in the wiki of znx, our operating system deployment manager.
znx will work only on 64 bit UEFI systems, this is not a bug, but by design. Feel free to fork the project, if our goals don’t address your needs.
Improvements to znx
znx is a tool that lets you deploy operating systems and keep them updated without having to repartition the drives.
znx is not:
- A hypervisor (what creates virtual machines).
- A container technology.
It’s designed to work on UEFI systems. znx will create a GPT partition table on a device and write a bootloader into the EFI System Partition. From that moment, you can deploy, update, and remove operating systems as single-file ISO images. The bootloader (GRUB2) will make them available on boot. znx will help you keep them updated while making the update process safe.
znx consists of basically three files:
- bootx64.efi: This is a GRUB2 image that is suitable for booting in x64 UEFI machines.
- grub.cfg: A GRUB2 file that detects the available images in the system during boot.
- znx: This is a shell script responsible for image management (deployments, removals, updates, etc.).
+------------------------+-------------------------------+
|         ESP            |             Data              |
|------------------------+-------------------------------|
| - Size: 64MB.          | - Size: Device size - 64MB.   |
| - Filesystem: FAT32.   | - Filesystem: BTRFS.          |
| - Label: ZNX_BOOT.     | - Label: ZNX_DATA.            |
+------------------------+-------------------------------+
The ZNX_BOOT partition has the following contents:
/efi
/efi/boot
/efi/boot/bootx64.efi
/boot
/boot/grub
/boot/grub/grub.cfg
The ZNX_DATA partition has the following contents:
/STORE
When the user deploys an image (see the commands section for more information), znx will create a subdirectory in /STORE: /STORE/<VENDOR>/<RELEASE>. Inside this directory, one ISO image will be stored, and another subdirectory will be created: /STORE/<VENDOR>/<RELEASE>/DATA. This directory will serve as the root mount point of the writeable overlays that are mounted at boot time. So, after an image is deployed, the contents of the ZNX_DATA partition will be:
/STORE
/STORE/<VENDOR>
/STORE/<VENDOR>/<RELEASE>
/STORE/<VENDOR>/<RELEASE>/IMAGE.0
/STORE/<VENDOR>/<RELEASE>/DATA
This is a lot more simple than the Filesystem Hierarchy Standard.
Thank You
Last but not least, we’d like to thank every single person who has supported Nitrux in one way or another.
Every single contribution helps make all of this possible, and we wouldn’t be here without you.