

In today’s tutorial, we’ll check all the filesystem, security, privacy, and anonymization features in Nitrux.
Difficulty: ★☆☆☆☆
📜 Table of Contents
Manage WireGuard VPN Connections
Nitrux supports WireGuard for high-performance encrypted tunnels. Users can either use Wirecloak (GUI) or wg-quick (CLI) to manage VPN tunnels.
- ⚠️ Important: Using Wi-Fi & Networking to import the VPN profile will not work. Wi-Fi & Networking (
plasma-nm) doesn’t fully implement the functionality necessary to add a WireGuard connection correctly. It does support displaying the connection in the UI; this isn’t a Nitrux bug, it’s a bug in plasma-nm.
Wirecloak
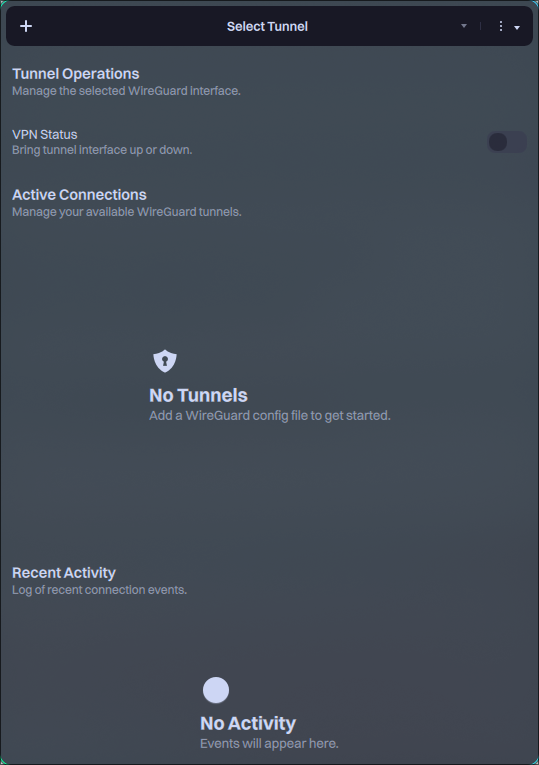
Wirecloak is a modern, native WireGuard VPN client for Nitrux, built with MauiKit. It provides a user-friendly interface for managing VPN tunnels while securely integrating with the system’s immutable root filesystem. To add a WireGuard VPN file to Wirecloak, do the following.
- Click the add (+) button.
- Browse for the file and click Open.
- Enter your user account password when requested.
Once the tunnel is available in Wirecloak, click the toggle to enable or disable it, and use the dropdown menu to switch tunnels.
Importing a WireGuard tunnel with wg-quick
Using the terminal is another valid way to import a WireGuard VPN tunnel.
To import a WireGuard connection properly using the VPN provider’s configuration file, do the following.
- From your provider’s dashboard, download the WireGuard configuration file.
- 🔰 Information: The connection name (tunnel) will be the name of the file you’ve downloaded.
- Remove or comment out the DNS directive using this command:
sed -i 's/^[[:space:]]*DNS[[:space:]]*=/# &/' <vpn-provider-configuration-file>.conf - Copy, move (or symlink) the profile into
/etc/wireguard/.- ⚠️ Important: The commands below create, copy, edit, or move files in the root directory; see System Management → NX Overlayroot → Usage.
sudo overlayroot-chroot

mount -t devtmpfs dev /dev

mount -t auto $(findfs LABEL=NX_HOME) /home

cp /home/$USER/<path-to-config-file> /etc/wireguard/

sync

umount /home /dev

exit
Since we’re adding the configuration file to the lowerdir (i.e., the lower directory), we need to reboot to load the changes into the overlay (i.e., the upper directory).
- Bring the tunnel down if it is already up.
sudo wg-quick down <connection-name> 2>/dev/null || true
- Bring the tunnel up.
sudo wg-quick up <connection-name>
- Verify WireGuard state and handshake.
- You should see:
latest handshakewith a recent timestamp- ⚠️ Important: If empty, the tunnel is not established.
- The
transfercounters increase after traffic flows.
- You should see:
sudo wg show <connection-name>
- Verify routing and external IP.
- Expected:
- Route via tunnel.
- External IP matches the VPN provider.
- Expected:
ip route get 1.1.1.1

curl -4 ifconfig.me
- Bring the tunnel down when finished.
- ⚠️ Important: Note that disconnecting from the tunnel may leave some web browsers in a stale state. Restarting the NetworkManager service isn’t enough; you need a full reboot.
sudo wg-quick down
Importing an OpenVPN connection in NetworkManager
Since Nitrux 2.7.0, the distribution includes the OpenVPN plugin for NetworkManager. To import an OpenVPN connection using a file, i.e., example-vpn.ovpn, do the following.
- Open Workspace Settings.
- Select Connectivity → Network.
- Scroll to Network Security.
- Click Import beside Import OpenVPN connection.
- Select your .ovpn file, such as example-vpn.ovpn.
- Activate the imported connection with NetworkManager. Open a terminal and list the available profiles:
nmcli -f NAME,UUID,TYPE connection show
Find the imported profile, then activate it:
nmcli --ask connection up id "VPN connection name"
--ask prompts for any credentials that are missing from the imported profile. Depending on the VPN provider, NetworkManager may request a VPN username and password, a private-key password, or both.
- To disconnect the VPN, run:
nmcli connection down id "VPN connection name"
Please note the following when importing an OpenVPN connection.
- ⚠️ Important: A VPN changes network routing and may expose services through the VPN interface or to other VPN participants. Keep your firewall enabled and verify that its rules also cover the VPN interface.
- ⚠️ Important: IPv6 support depends on the VPN provider. If the provider does not tunnel IPv6, IPv6 traffic may bypass the VPN. This is a limitation of the provider’s configuration, not a Nitrux issue. To disable IPv6 on the primary connection, open Workspace Settings → Connectivity → Network, configure the active wired or wireless connection, set IPv6 configuration to Disabled, and click Save.
Using Cinderward for Firewall Management
Cinderward is a simple utility built with MauiKit that provides an intuitive interface for managing day-to-day firewall rules without the complexity of firewalld’s command-line tooling.
Cinderward intentionally does not expose advanced or dangerous firewalld features. Its design goal is to stay approachable and safe for everyday users while remaining powerful enough for typical workstation and laptop use cases.
Here are Cinderward’s main features:
- Zone-based control:
- View and edit firewalld rules per zone
- Add or remove services, ports (TCP/UDP), and port forwarding rules
- One-click security toggles:
- Panic Mode (lockdown)
- Masquerading (NAT)
- Logging of denied packets
- ICMP reconnaissance blocking
- Always in sync:
- Real-time synchronization with firewalld over D-Bus
- Changes are applied immediately to the active firewall
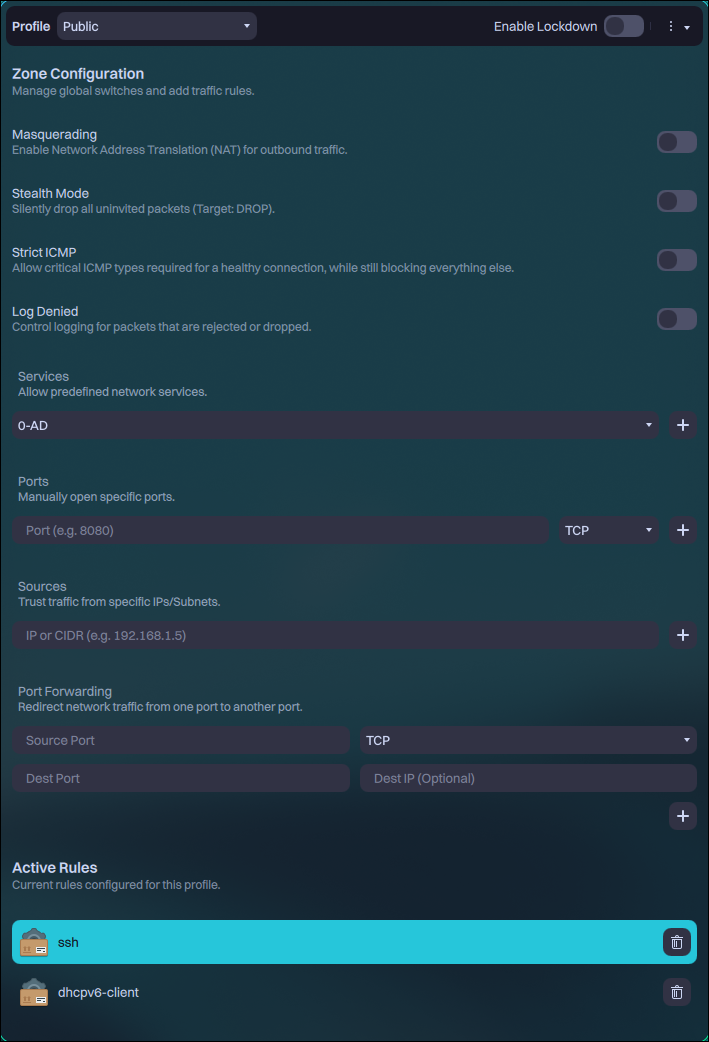
Unlike other popular firewall implementations, Firewalld works with zones. Users can assign connections to different zones, and each zone can have different rules. To learn more about Firewalld, check its documentation.
DNS Encryption in Nitrux
Nitrux uses dnscrypt-proxy by default with NetworkManager, which encrypts DNS queries between your machine and the DNS resolver.
Because of how NetworkManager works, users must edit their connections to use this feature.
- Open Workspace Settings → Network.
- Enable the toggle in DNS encryption.
- Edit the active network connection.
- Go to IPv4 DNS servers and enter:
127.0.0.1 - Go to IPv6 DNS servers and enter:
::1 - Click Save.
- Optionally, close any applications actively using the network, such as web browsers.
- Go to IPv4 DNS servers and enter:
- Disconnect from the network, reconnect, then open any application that requires an Internet connection. DNS queries will now be encrypted.
- 🔰 Information: To verify the functionality, visit a DNS leak test website, such as https://www.dnsleaktest.com/, https://surfshark.com/es/dns-leak-test, or https://browserleaks.com/dns. The results should show only the DNS resolver (Nitrux uses AdGuard).
Please be aware that DNS query encryption does not hide IP addresses. To hide IP addresses, use a VPN.
Native File Encryption in F2FS
F2FS provides native encryption via fscrypt.
- ⚠️ Important: Users should use fscrypt over f2fscrypt; while both can manage F2FS native encryption features, f2fscrypt is missing many essential features and is no longer actively developed.
If using fscrypt (recommended), do the following.
- Run fscrypt to create its configuration file and work directory.
sudo fscrypt setup
- Then, run the following command.
- Where
$MOUNTPOINTis the mount point, e.g.,/home.
- Where
sudo fscrypt setup $MOUNTPOINT
- The command creates the
$MOUNTPOINT/.fscryptdirectory to store fscrypt policies and protectors.- ⚠️ Important: Never delete the hidden directory; otherwise, users will lose all access to encrypted files.
That’s it; this concludes today’s tutorial.