Upgrading Nitrux is easy. We even support two methods to achieve this: using a utility created explicitly for this purpose, i.e., the Nitrux Update Tool System, or using Calamares—yes, you read that right.
In today’s tutorial, we’ll check how to do this.
Difficulty: ★☆☆☆☆
📜 Table of Contents
Upgrade Process Information
Below is the information we’ve deemed important for users to understand about this distribution and its upgrade process.
- We aim to release new upgrade archives for the Nitrux Update Tool System during the first week of the month, usually the same week as the latest release. Sometimes, this period may extend for a couple more days. Either way, we will announce the availability of the update archive on our social media, in our chat groups, and in the PSA section on this website.
- The update archives for the Nitrux Update Tool System and the utility only support updating from the previous release to the latest release, i.e., 3.4.0 to 3.4.1 or 3.4.1 to 3.5.0, etc. To upgrade from an older installation (e.g., 3.4.0) to 3.5.0, see “Upgrade using Live media (Calamares).”
- 🔰 Information: Regarding the OTA archives, we delete the previous files whenever a new archive is uploaded. We do not maintain an online archive of these files or the ISOs.
- Starting with Nitrux 6.0.0, the Nitrux Update Tool System automatically checks for updates on launch. However, the utility doesn’t force updates (offline updates); users are still responsible for keeping their installations up to date.
- The Nitrux Update Tool System does not modify files in the user’s home directory, such as desktop configuration files, during upgrades or rollbacks.
- ⚠️ Important: Users can run the following command to update the desktop configuration files in their home directory to the updated default versions, then log out and log back in. However, this will replace their own files, so keep that in mind.
rm -r ~/.crystal-dock-2 && cp -R /etc/skel/.crystal-dock-2 ~/ && rm -f ~/.config/hypr/hyprland.conf && cp -R /etc/skel/.config/* ~/.config/
- ⚠️ Important: Users can run the following command to update the desktop configuration files in their home directory to the updated default versions, then log out and log back in. However, this will replace their own files, so keep that in mind.
- Likewise, the Nitrux Update Tool System does not create backups of the user’s home directory.
Upgrade using the Nitrux Update Tool System
The Nitrux Update Tool System is a simple, minimalistic update and rollback utility. It performs three steps:
- It creates a backup of the XFS partition using xfsdump and stores it locally.
- Then, it downloads an OTA-style archive and updates the system atomically.
- Rollbacks are handled offline and integrated into the Nitrux ecosystem through the Live session using xfsrestore.
See the steps below to use the Nitrux Update Tool System.
Update Nitrux
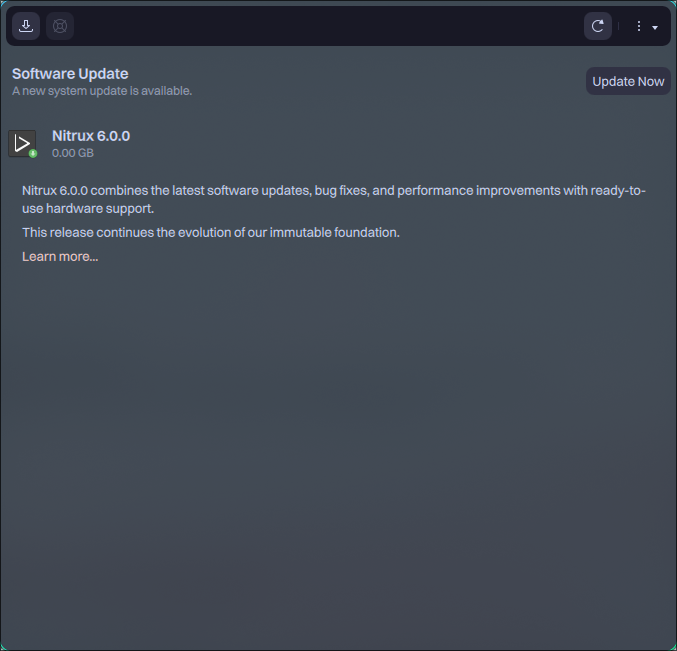
- Launch NUTS from the applications menu.
- Click the button “Update Now” to upgrade the distribution.
- 🔰 Information: Update completion time depends on various factors, such as system specifications, connection speed, connectivity to GitHub, and connectivity to SourceForge or their mirrors.
Rollback Nitrux using NUTS
- Boot a Nitrux Live ISO.
- Launch NUTS from the applications menu.
- Click the button “Rescue” to rollback the distribution.
- 🔰 Information: The user can only use this operation during a Live session.
Rollback Nitrux using Rescue Mode
- Boot Nitrux and press Escape after the manufacturer logo appears, but before the boot splash.
- Select “Nitrux Rescue Mode” from the menu and press Enter.
- Wait until the process completes.
- 🔰 Information: For further details about Rescue Mode, see System Management → System Administration → Nitrux GRUB Modes → Rescue Mode.
Upgrade using Live media (Calamares)
Using an installer like Calamares to perform a system update is uncommon. In this approach, the system replaces the NX_ROOT and NX_VAR_LIB partitions while preserving user and other state partitions. This results in a new system image with existing user data intact.
This procedure requires a separate root partition distinct from your user partitions. Most Linux distributions use a single partition that contains everything, making selective root replacement impossible. That’s why Nitrux uses a custom partition layout and emphasizes avoiding a single-partition layout during initial installation.
This process is a state-preserving root replacement. Unlike a conventional reinstall that replaces all partitions, this method installs a new root filesystem from updated installation media while preserving existing user and data partitions.
- ⚠️ Important: This procedure is not supported in encrypted setups due to limitations in the installer’s partition handling.
To upgrade from previous versions of Nitrux using Calamares, do the following:
- Download and flash the latest ISO.
- Boot to the Live session and start Calamares.
- After completing the locale, keyboard, and user configuration, select “Manual partitioning.”
- Select and delete the previous NX_ROOT partition and format NX_VAR_LIB. Do not modify other partitions unless explicitly desired; select “Keep” for them.
- 🔰 Information: For further details about manual partitioning, see Getting Started → Installation Guide → Install Nitrux → Non-automated Partitioning Options.
The table below defines our partition layout for EFI/UEFI-based computers with GPT (GUID Partition Table) storage devices.
- ⚠️ Important: Please be aware that the root directory is immutable. The system mounts it as read-only during normal operation. Do not use a single partition layout.
| Partition | Label | Mountpoint | Filesystem Type | Flags |
|---|---|---|---|---|
| EFI System Partition | ESP | /boot/efi | fat32 | boot |
| root | NX_ROOT | / | xfs | none |
| home | NX_HOME | /home | f2fs | none |
| /var/lib | NX_VAR_LIB | /var/lib | f2fs | none |
| swap | SWAP | none (automatically set up) | linuxswap | swap |
Finally, proceed with installing the new root.
- ⚠️ Important: Replacing the root does not modify files in the user’s home directory, including desktop configuration and user-specific settings. Users can run the following command to update the files in their home directory to the updated default versions, then log out and log back in. However, this will replace their own files, so keep that in mind.
rm -r ~/.crystal-dock-2 && cp -R /etc/skel/.crystal-dock-2 ~/ && rm -f ~/.config/hypr/hyprland.conf && cp -R /etc/skel/.config/* ~/.config/
Troubleshooting
Below is the information we deem necessary for users to troubleshoot problems.
Unable to Create Redundant Backup of Root Partition
Nitrux requires XFS for the root partition. The Nitrux Update Tool System depends on XFS features to create redundant backups. Systems installed on other filesystems cannot use Rescue or Rescue Mode.
Unable to Access GitHub
If your computer can’t reach the domain raw.githubusercontent.com, you cannot proceed with the update process. We recommend using a VPN or a proxy, or contacting your ISP if they block access to these domains.
Update Failed due to External Factors (Power Outage, Hardware Failure, etc.)
If the Nitrux Update Tool System is unable to apply an update due to an external factor, the built-in method is to restore the XFS backup to restore system integrity.
Persistent System State Conflicts (/var/lib)
NX_VAR_LIB stores persistent system state used by system services and applications, and it tightly couples this data to the specific software versions present in the root filesystem.
When performing a root replacement using Calamares, reusing an existing NX_VAR_LIB partition may introduce incompatibilities between the preserved state and the newly installed system.
These incompatibilities can result in:
- Service initialization failures
- Invalid or outdated internal data formats
- Inconsistent runtime state
Affected components may include:
- Distrobox
- greetd
- NetworkManager
- Other software relying on NX_VAR_LIB for persistent state
To ensure consistency, the NX_VAR_LIB partition must be deleted or formatted during the upgrade process.
- ⚠️ Important: Deleting this partition will remove stored system data such as saved wireless networks and Bluetooth pairings. Back up this data beforehand if needed.
That’s it; this concludes today’s tutorial.