
Close Search
Nitrux — #DisruptiveByDesign — Official WebsiteNitrux — #DisruptiveByDesign — Official Website
search
Menu
  • x-twitter bluesky facebook youtube github instagram telegram mastodon threads email
  • search
  • Menu
Nitrux — #DisruptiveByDesign — Official Website
  • Nitrux Core Concepts 9
    • Distribution Philosophy
    • System Architecture
      • Immutable Architecture
      • Rootless App Model
      • Aesthetic FHS
      • Init System
      • Language Stratification
      • Workspace Environment
    • Workspace Architecture
      • Workspace Compartmentalization
      • Nitrux Workspace Session Manager
  • Getting Started 20
    • System Requirements
      • Hardware Compatibility Validation Layer
      • Minimum Requirements
      • Recommended Requirements
    • Installation Guide
      • Download the ISO
        • ISO for AMD and Intel Hardware
        • ISO for NVIDIA Hardware
      • Validate the ISO
        • ISO Integrity Validation
        • ISO Authenticity Validation
      • Flashing the ISO
        • USB Flash Preflight
        • Rufus (Windows)
        • Ventoy (Windows/Linux)
        • dd (*nix)
      • Installing Nitrux
        • Nitrux Installation Process Information
        • Using Secure Boot with Nitrux
        • Automated Partitioning Options
        • Non-automated Partitioning Options
        • Full-disk Encryption in Nitrux
        • Single-booting Nitrux
        • Dual-booting Nitrux with Windows or other Linux distributions
        • Triple-booting Nitrux, Windows, and other Linux distributions
        • Report Installation Bugs
  • Workspace and UX 10
    • Workspace Applications
      • Default Software Selection
      • Workspace Settings
    • Workspace Defaults
      • greetd + QMLGreet
      • Hyprland
      • Valenz
      • Marina
      • Vicinae
      • QMLogout
      • NudgeOSD
      • Workspace Daemons
        • Default Session Daemons
  • Software Management 4
    • Graphical Software Manager (AppFinder)
    • User Application Delivery
      • NX AppHub and AppBoxes
      • Flatpak
    • Development Environments
      • Distrobox
  • Security and Privacy 6
    • Security Features
      • System Security Features
    • Security Policies
      • Identity and Access Management
      • Kernel and Memory Hardening
      • Network Security and Privacy
      • Session Hardening
      • Bluetooth Security
  • System Performance 4
    • Filesystem Optimizations
      • XFS Features in Nitrux
      • F2FS Features in Nitrux
    • System Optimizations
      • Advanced Memory Management
      • Performance and I/O
  • System Management 5
    • System Administration
      • Nitrux Update Tool System
      • NX Overlayroot
      • Nitrux GRUB Modes
    • System Configuration
      • SB Manager
      • Kernel Boot
  • Troubleshooting 21
    • FAQ
      • Is Nitrux right for me?
      • Is Nitrux eating my RAM?
      • NVIDIA Driver Information
      • Virtualizing Nitrux
      • Support for Other Desktop Environments
      • Flatpak Information
      • Energy Saving Information
      • Virtual Consoles (TTY) Information
      • GRUB Menu Information
      • KDE Wallet Information
      • NetworkManager Information
      • Backups Information
      • General Gaming Information
      • AppImage Information
      • MauiKit UI Framework Information
    • Installation Issues
      • ISO doesn’t boot or System installs, but there's no GUI
      • Can't install due to the MBR partition limit
      • Can't install due to mounted Swap partitions
      • Failure to install due to an issue with rsync error code 11
      • Failure to install GRUB on a computer with multiple storage devices or using the MBR partition table
      • Installation is successful, but user data isn't persistent
  • Resources 2
    • Tutorials
    • Get Involved

Ventoy (Windows/Linux)

1 min read

8 views

If you are using Windows or Linux and Ventoy, follow these steps:

  1. Download a Nitrux ISO file and install Ventoy and its GUI in the host operating system.
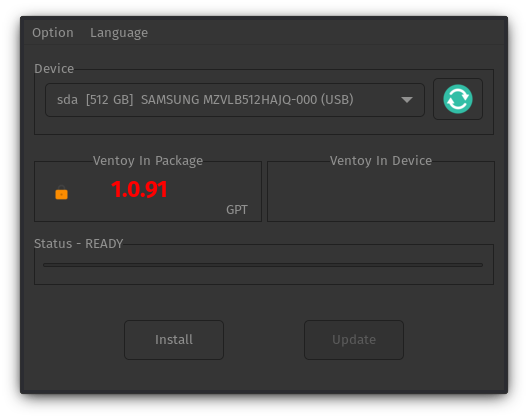
  2. Using the Ventoy GUI, install Ventoy on the USB drive; this will delete all the data on the selected drive.
  3. Copy and paste, or cut and move, the Nitrux ISO file from the download location to the Ventoy directory on the USB drive. The directory will appear in the file manager’s sidebar.
Troubleshooting

Below are recommendations for using Ventoy.

  • Always ensure you use the latest available version of Ventoy.
  • Ensure that Secure Boot is active in Option→Secure Boot Support.
  • Do not confuse this directory with VENTOYEFI.
  • When using Ventoy on Linux, run the command sync to flush the USB write cache. On devices with little or no cache (like most USB thumb drives), the user must flush the cache before data is properly stored and the kernel writes it to the NAND flash. Ventoy does not implement any file verification method before or after the user copies or moves the ISO to the USB device. Always verify the ISO file’s checksum after copying or moving it to the Ventoy directory.
  • When booting our ISO file with Ventoy, if the computer has less than 4GB of RAM, select the GRUB 2 boot option in the menu; otherwise, you will see an “out of memory” error.
    • For more information, see this issue on the Ventoy bug tracker.
    • Also, check the Ventoy documentation on using GRUB 2 boot mode.
Updated on 4 October, 2026
Previous - Flashing the ISORufus (Windows)Next - Flashing the ISOdd (*nix)
Close Menu
  • Documentation
  • Bug Tracker
  • Blog
    • Tutorial
    • News
    • Other
    • Blog Archive
      • News and Tutorial Archive
      • Maui Archive
      • ZNX Archive
      • VMetal Archive
      • PNX Archive
  • x-twitter
  • bluesky
  • facebook
  • youtube
  • github
  • instagram
  • telegram
  • mastodon
  • threads
  • email

© 2017-2026 Some Rights Reserved. Made with ♥ by Nitrux Latinoamericana S.C.