Nitrux is a Linux distribution that does things very differently than other distributions, or at least to what most people are accustomed to seeing in different Linux distributions, from the desktop workflow to software management and its underpinnings and, ultimately, many of its goals. As such, many people may need assistance getting to know this distribution, so in today’s tutorial, we will check out how to use NX Desktop.
After reading this tutorial, we expect users to understand this distribution better and be able to use the default layout in Nitrux more effectively. So, let’s begin.
Difficulty: ★☆☆☆☆
📜 Table of Contents
Get to Know NX Desktop
After installing Nitrux following our tutorial (and if the user selected the option to log in automatically), you’ll be greeted by NX Desktop on a Wayland session; this is the default graphical session.
🔰 Information: Since Nitrux 2.9.0, Latte Dock is no longer included in the distribution. NX Desktop will default to a similar layout but use Plasma panels instead.
What is NX Desktop?
We’ve covered what NX Desktop is on this website before, but in summary.
- NX Desktop is a customization layer on top of Plasma 5. While initially, it focused on made-from-scratch artwork, we’ve extended it over the years to include configuration for the window manager, dock, desktop settings, system settings, user configuration, etc.
- However, despite this extensive configuration of many different settings, NX Desktop is not a desktop environment (as we mentioned). NX Desktop does not provide a desktop shell or applications.

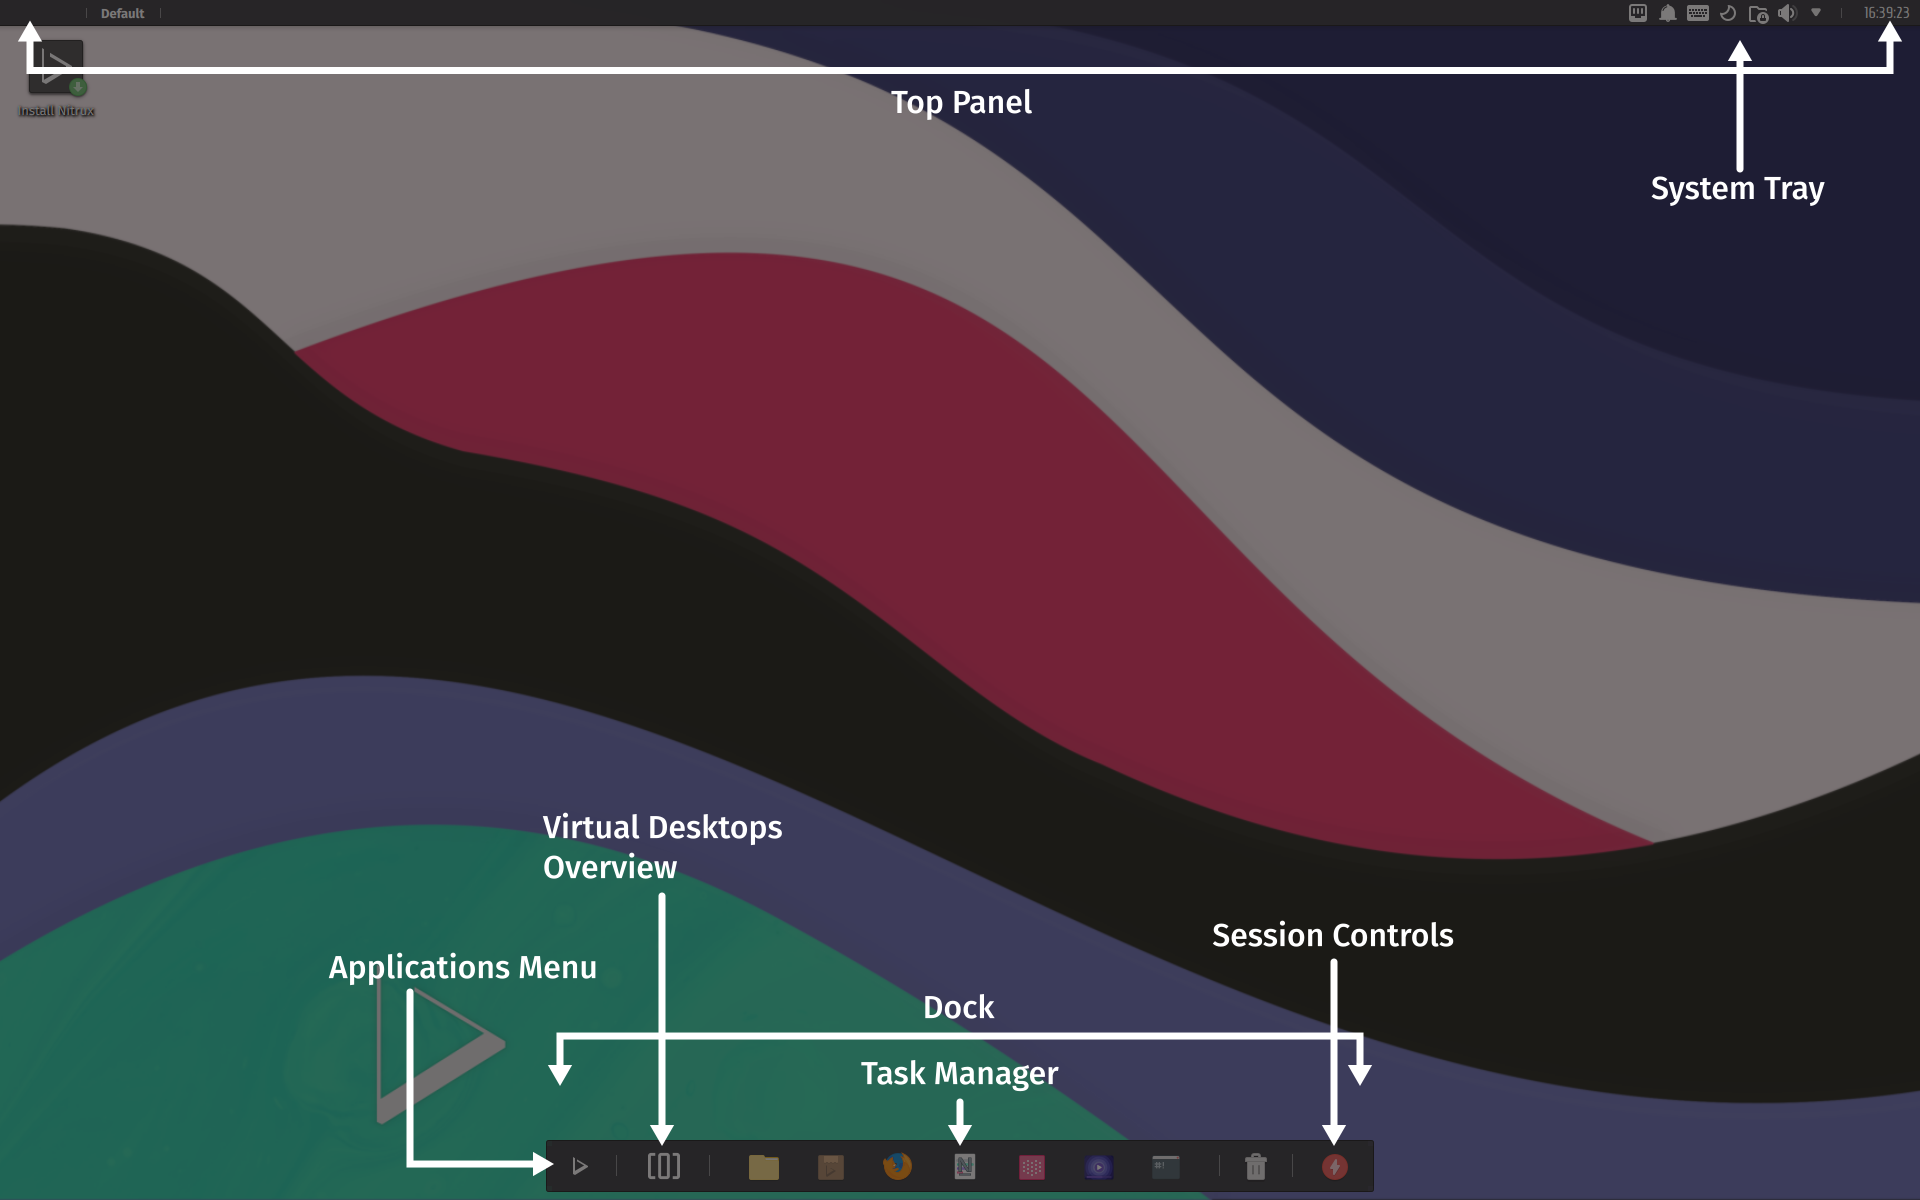
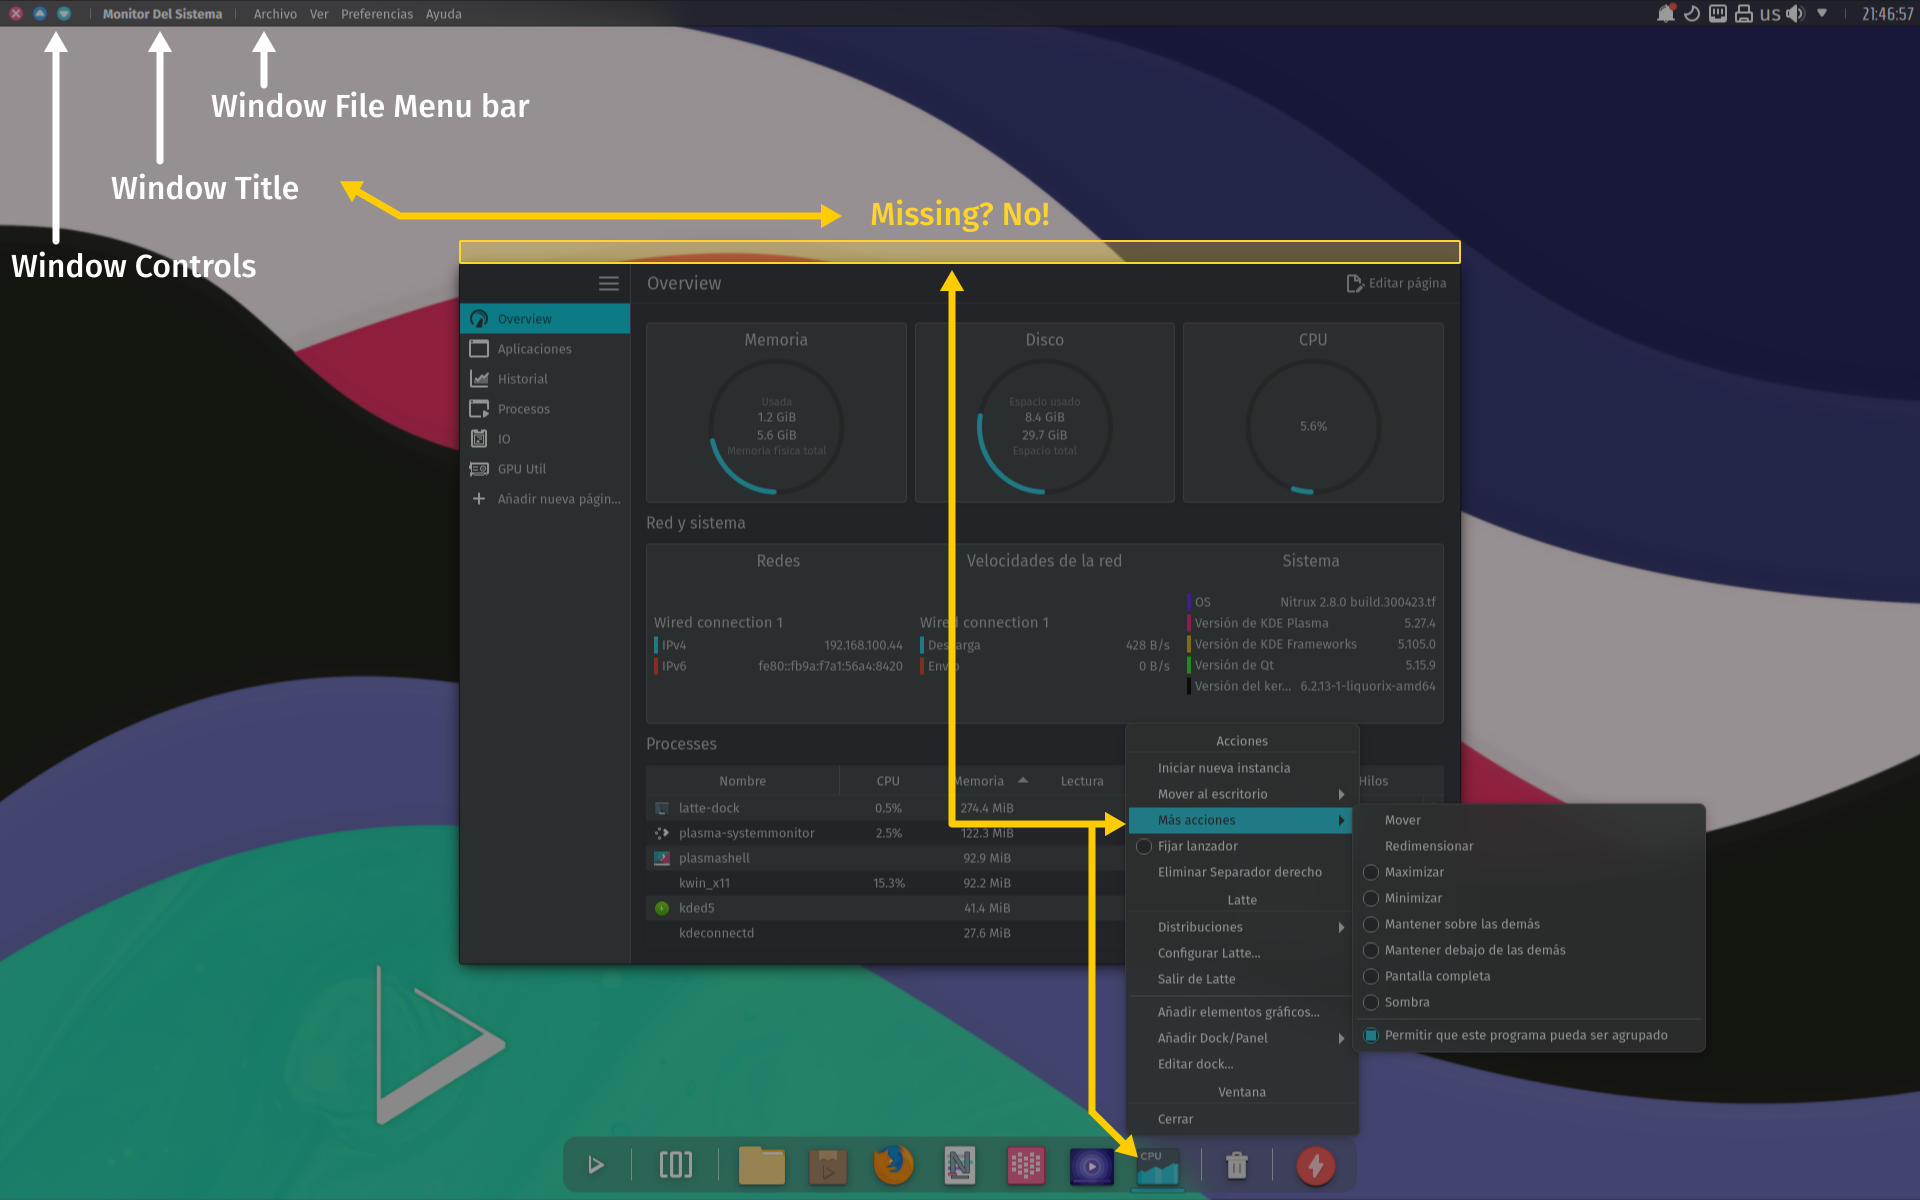
Now that we know what it looks like, what it is, and what it isn’t, let’s look at what things are called and what they do. Looking at the image below, we have the following items. From left to right and top to bottom.
NX Desktop layout (default)
- Top Panel
- Window Controls.
- This top panel area will always display the window controls in the following order.
- Close
- Maximize/Restore
- Minimize
- This top panel area will always display the window controls in the following order.
- Window Title.
- This top panel area will always display the application title.
- Window File Menu bar.
- This top panel area will always display the application’s menu items (or menu bar, as other OSes and desktop environments call these items) from applications that support exporting their menus.
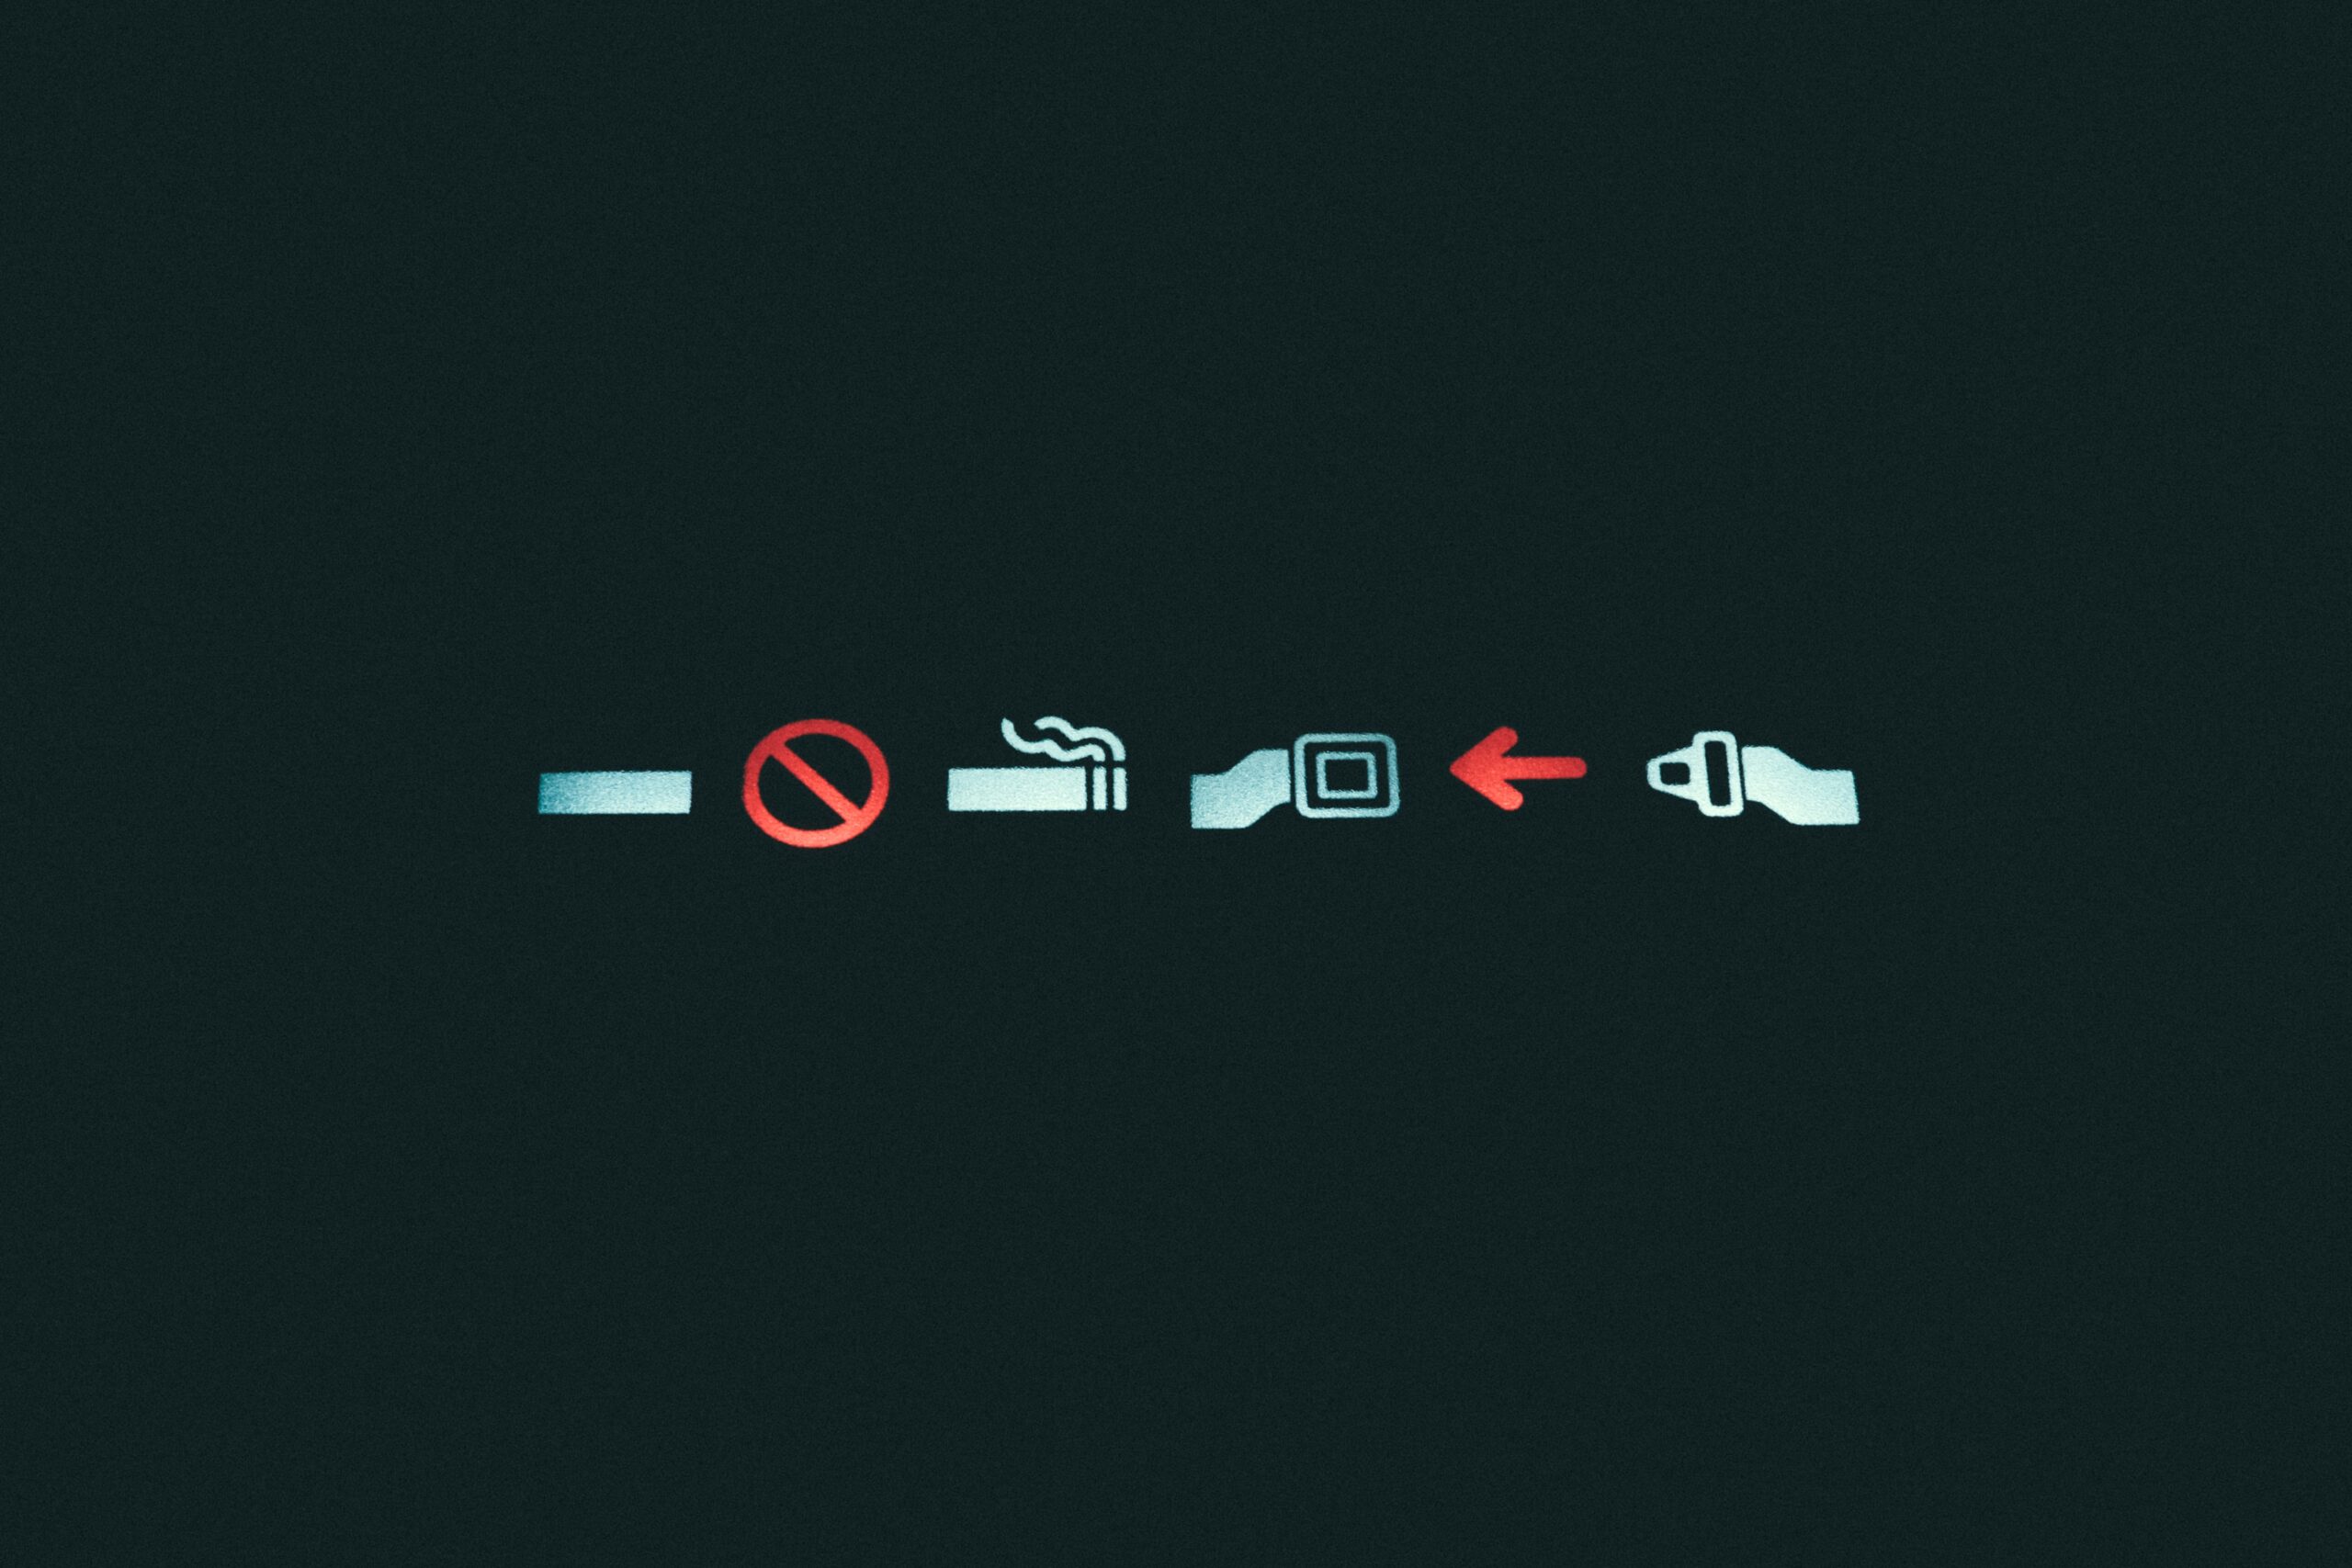
- System Tray.
- This top panel area will always display the desktop system tray applets where the user can view notifications, control night color, manage networks, manage supported printers, see clipboard history, change keyboard layout, control the volume, access other items with less priority, and lastly, see the clock and calendar.
- Window Controls.
- Dock
- Applications Menu.
- This item in the dock will display a grid with all the available applications.
- Virtual Desktops Overview.
- This item in the dock gives users quick access to the Overview, which allows for a general view of the current virtual desktop and other virtual desktops. Additionally, users can add or remove virtual desktops using the Overview and move windows from one virtual desktop to another.
- Task Manager.
- This item in the dock lists pinned application launchers and non-pinned but running applications. It also allows users to access certain application functionality, such as home directories (like in Index), recent files (most text editors), send application windows to other virtual desktops, or window controls (maximize, minimize, close, restore, etc.).
- Session Controls.
- This item in the dock will display the session controls, which allow the user to select an action such as shutdown, reboot, logout, suspend, etc.
- Applications Menu.
This covers everything about knowing NX Desktop; now, let’s move towards using NX Desktop.
Using NX Desktop
Interacting with application windows
Having said that, if the title bar is what users using other operating systems and desktop environments interact with to move windows around the desktop, and it’s hidden in Nitrux, how do users move windows? Well, that’s pretty easy: do the following.
Hold the modifier key ALT, then left-click the window and drag the application window by moving the mouse or using the touchpad/trackpad.
That’s it.
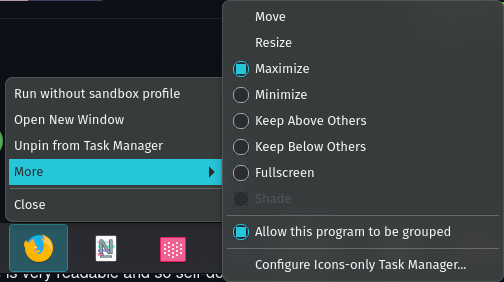
- ⚠️ Important: Some windows do not support moving the window if not from the window decoration, like Telegram when using native window decorations or Electron apps that use native window decorations, such as GitHub Desktop. In these cases, use the Plasma keyboard shortcut to drag a window or right-click on the bottom dock over the application icon, select More Actions, and click Move.
Disclaimer: We have not developed the KWin window manager. To request features or report problems, please create issues at its bug tracker here.
Using the HUD (plasma-hud)
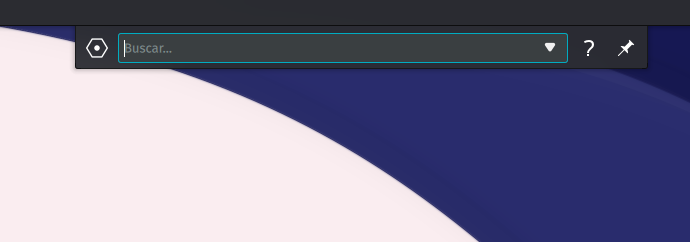
The HUD (provided by plasma-hud) or Heads UP Display uses an intelligent search-based approach to finding and accessing menu items you need. Instead of hunting through menus to find a command, type what you want (express your intent) and let the HUD show you precisely what you need. Rather than navigating menus to find an application function, press the MENU key and type what you want the application to do.
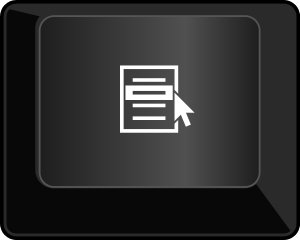
MENU key. The icon may differ from the picture.
To complete the action, press RETURN/ENTER or select one of the alternative functions presented in the auto-complete.
The application menu in the HUD provides a fast and efficient way to complete any journey. The HUD also makes functionality more discoverable by matching and displaying available options when the user types what they want; this includes options usually hidden in a sub-sub menu.
This new feature has extensive applicability; it provides a new way of working with any application compatible with the global menu applet on the Window File Menu bar area.
Enabling window tiling (Polonium)
We include Polonium, a tiling window manager for KWin 5.27 and newer, for window tiling functionality.
- Works in Wayland Plasma 5.27 and up.
- The tiling backend uses binary trees and decent enough code to mod independently.
- Edit tile sizes with the integrated KWin GUI.
- Move and tile windows with your mouse and keyboard.
- Set layouts independently of the desktop.
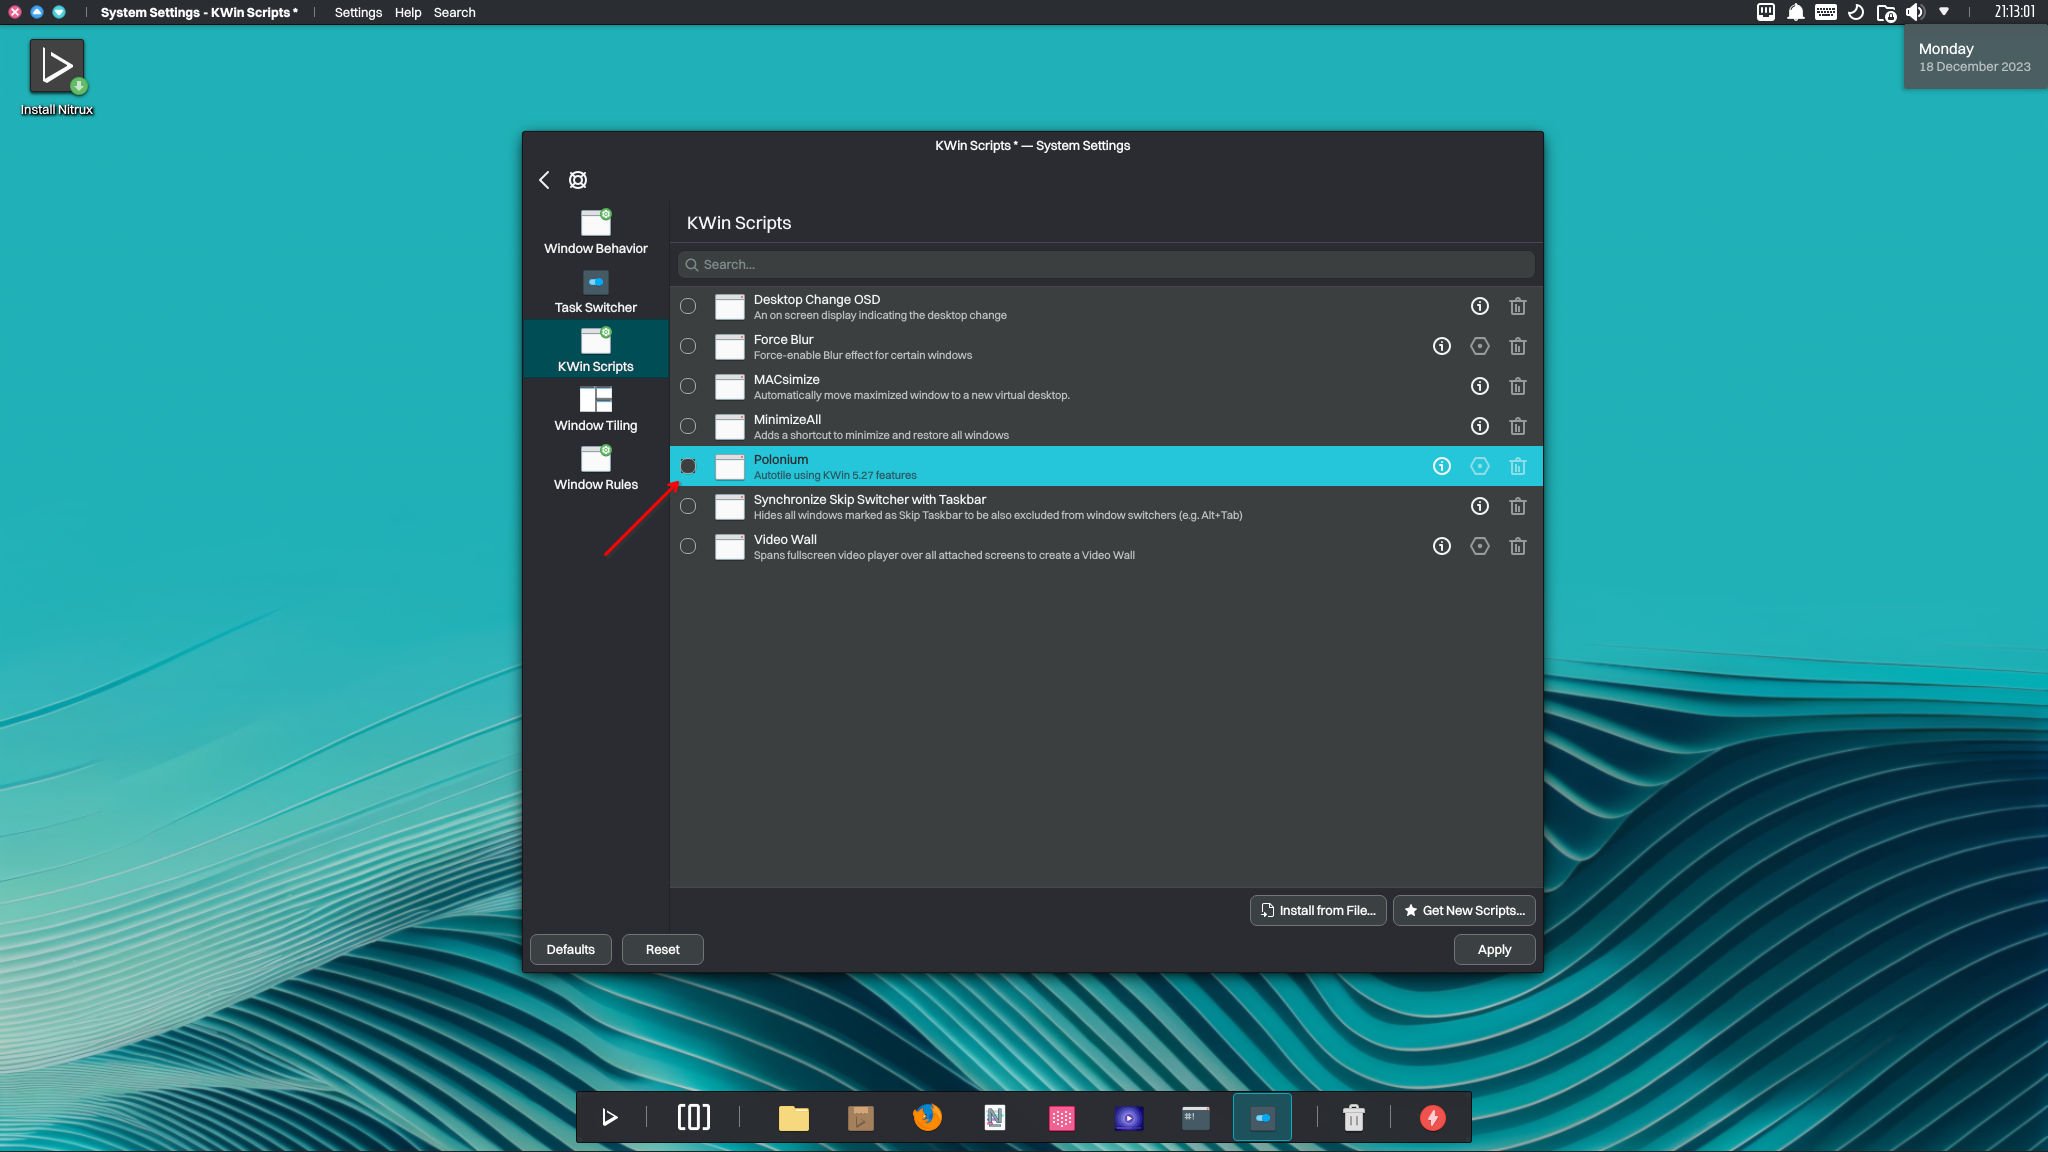
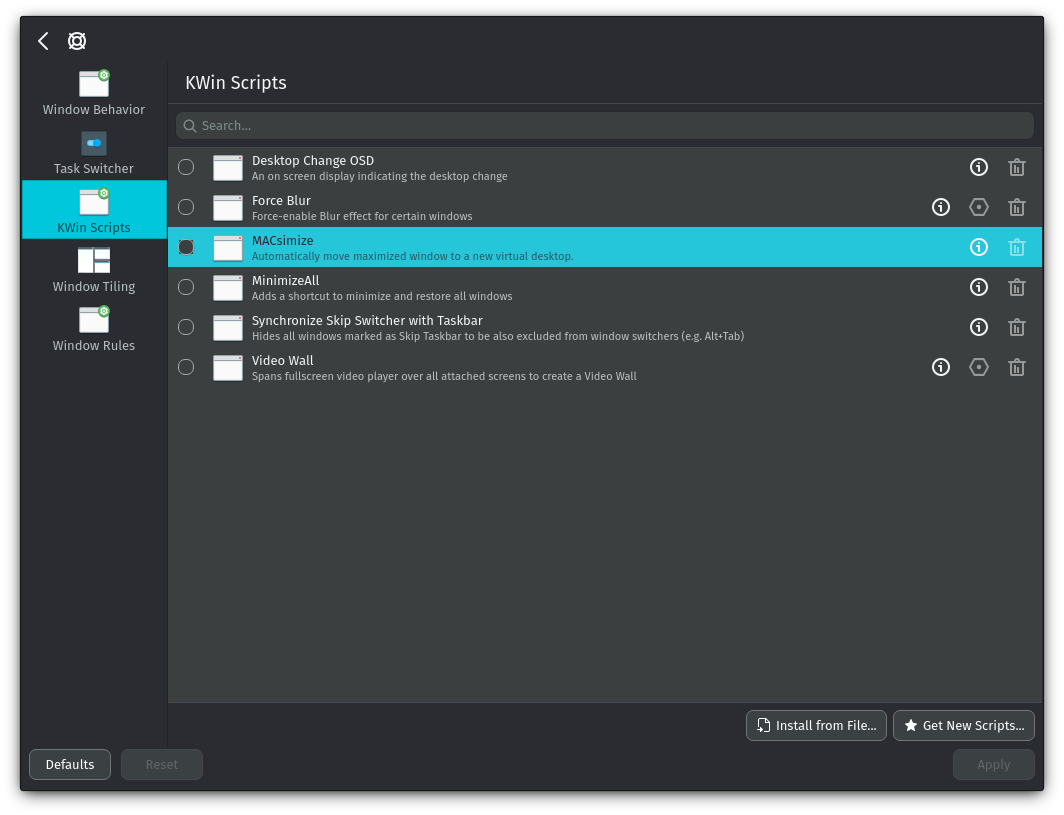
To enable Polonium, go to System Settings→Window Management→KWin Scripts and check Polonium, then click Apply.
Using Plasma KRunner
KRunner (launched with Alt+F2 or Alt+Spacebar) is the launcher built into the Plasma desktop. While its primary function is to launch programs from a mini-command-line, its functionality can be extended by “runners” to assist the user in accomplishing many tasks.
- 🔰 Information: For more information about its features, check its entry in the KDE Userbase.
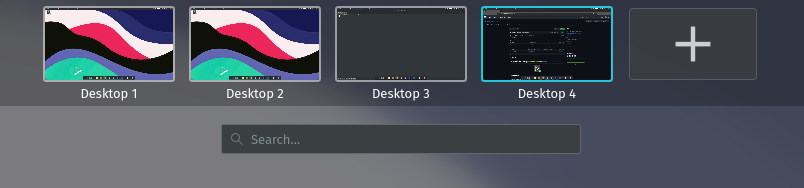
Virtual desktops in NX Desktop
The default configuration in NX Desktop provides four virtual desktops, which can be accessed by clicking the button to display the Virtual Desktops Overview or pressing Ctrl+F1-F4.
In NX Desktop, by default, when a window is maximized, it’s put into a new virtual desktop, which is a behavior similar to that of recent versions of macOS.
- 🔰 Information: To turn off this functionality, go to System Settings→Window Management→KWin Scripts and uncheck MACsimize.
Window management in NX Desktop
As mentioned, the top panel houses the window controls, title, and menu bar.
Our standard position for window controls. Image for reference, Plasma X11.
The current layout works by doing the following.
- Moving window controls to a location that (literally) never changes is good for muscle memory.
- Different apps use different technologies; the current layout integrates menu bars and window titles in a location that never changes.
- All windows now “look” similar.
- Windows are similarly manageable; they can be dragged from the same corners, have the same background shadow, and so on.
- Software with extensive menu bars fully utilizes the width of the top panel, as do applications that don’t and only display their window titles.
Additionally, by right-clicking the application icon in the task manager and hovering over it, users can access the same window management controls and other additional options, such as Move, Resize, Keep above or below other windows, Fullscreen, and Shade.
Additionally, we include KZones. KZones allows users to arrange windows across the desktop in different zones for easier window layout management; KZones is enabled by default. KZones is a great way to improve productivity by sharing many app windows on a single screen. Different layouts are available in many sizes, so you can get the most from your favorite apps when working on specific tasks.
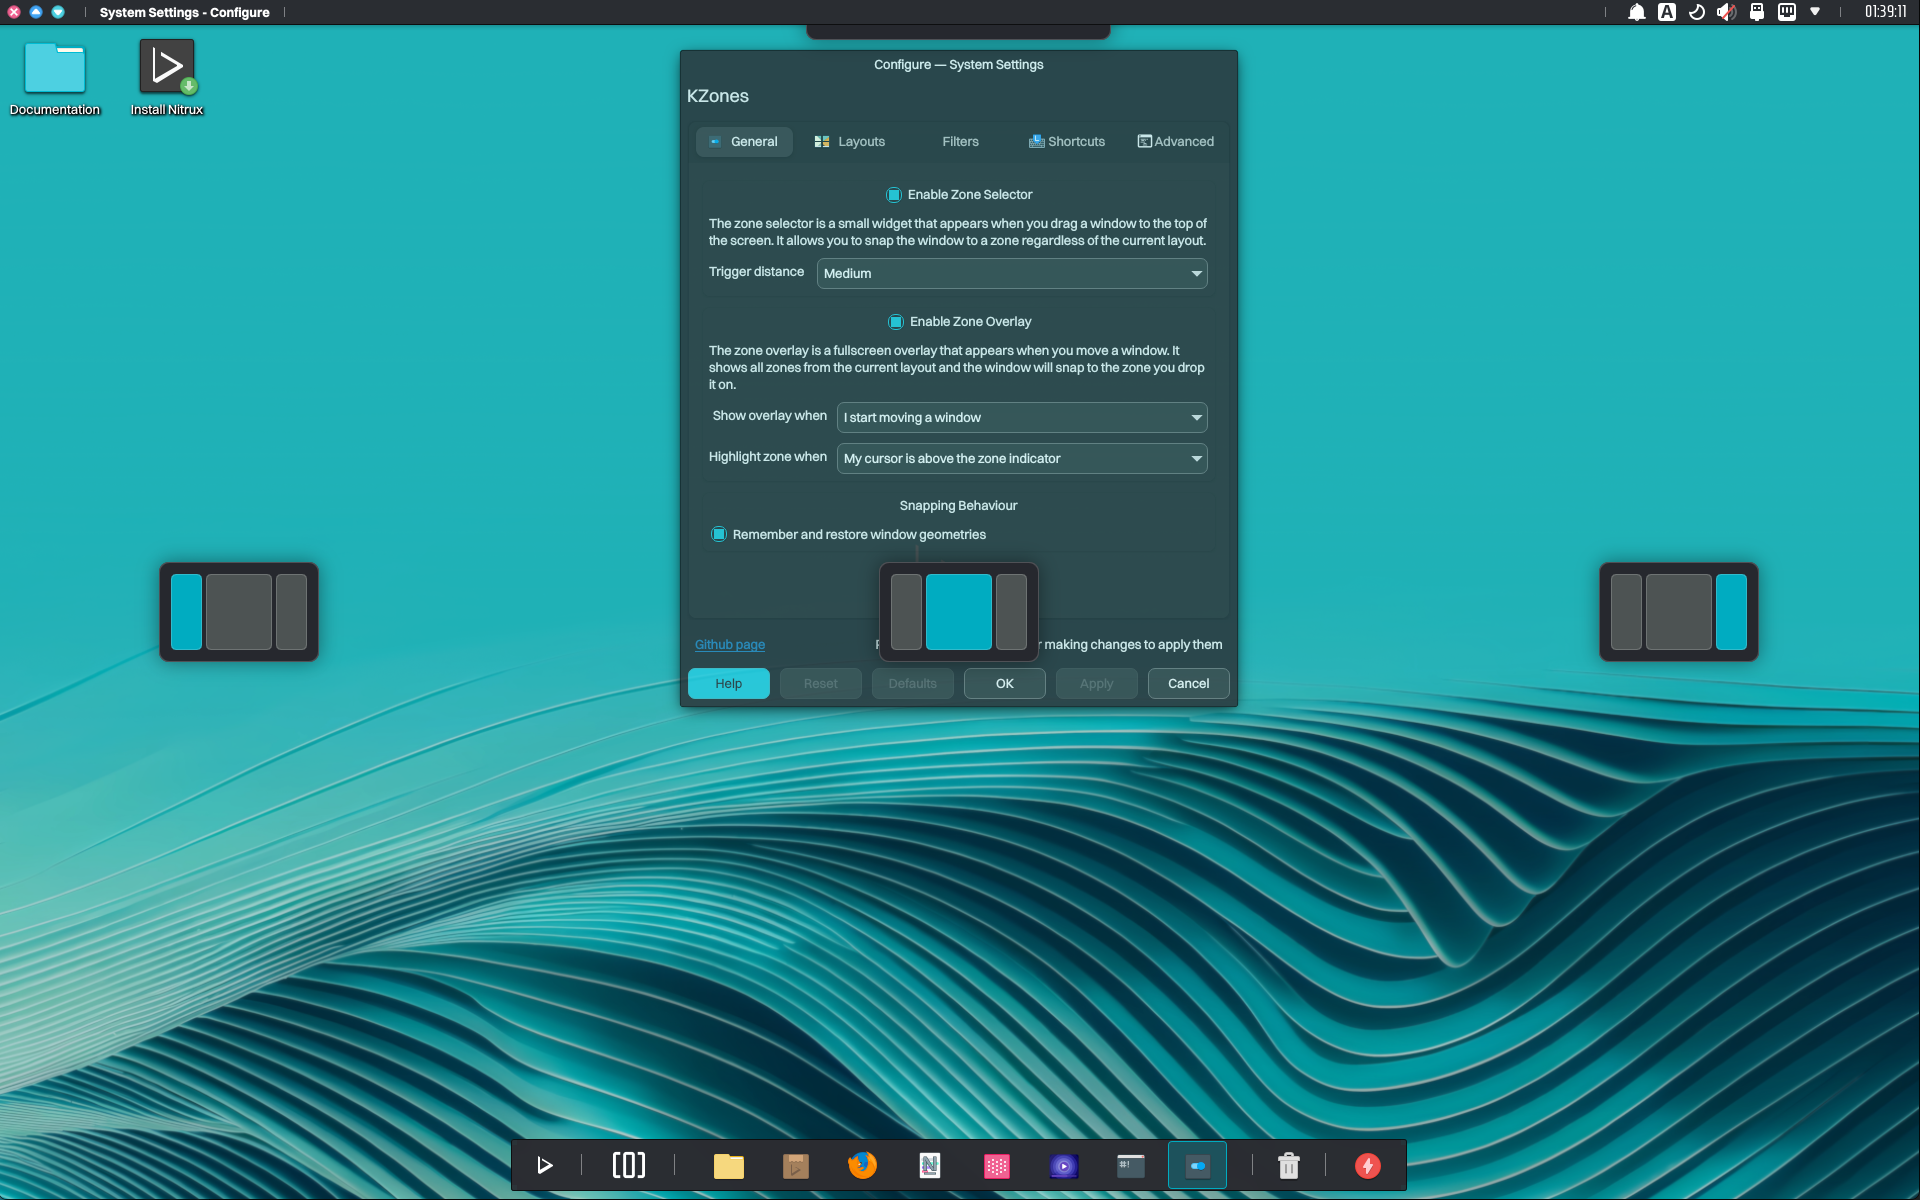
The window snapping feature provided by KZones has some predetermined layouts that you can choose from to snap all your open windows. Do the following to activate KZones.
- Select and drag the window you’d like to snap to the side or edge of your screen. The snap layout box will display automatically.
- Drop the app into the layout you want to use.
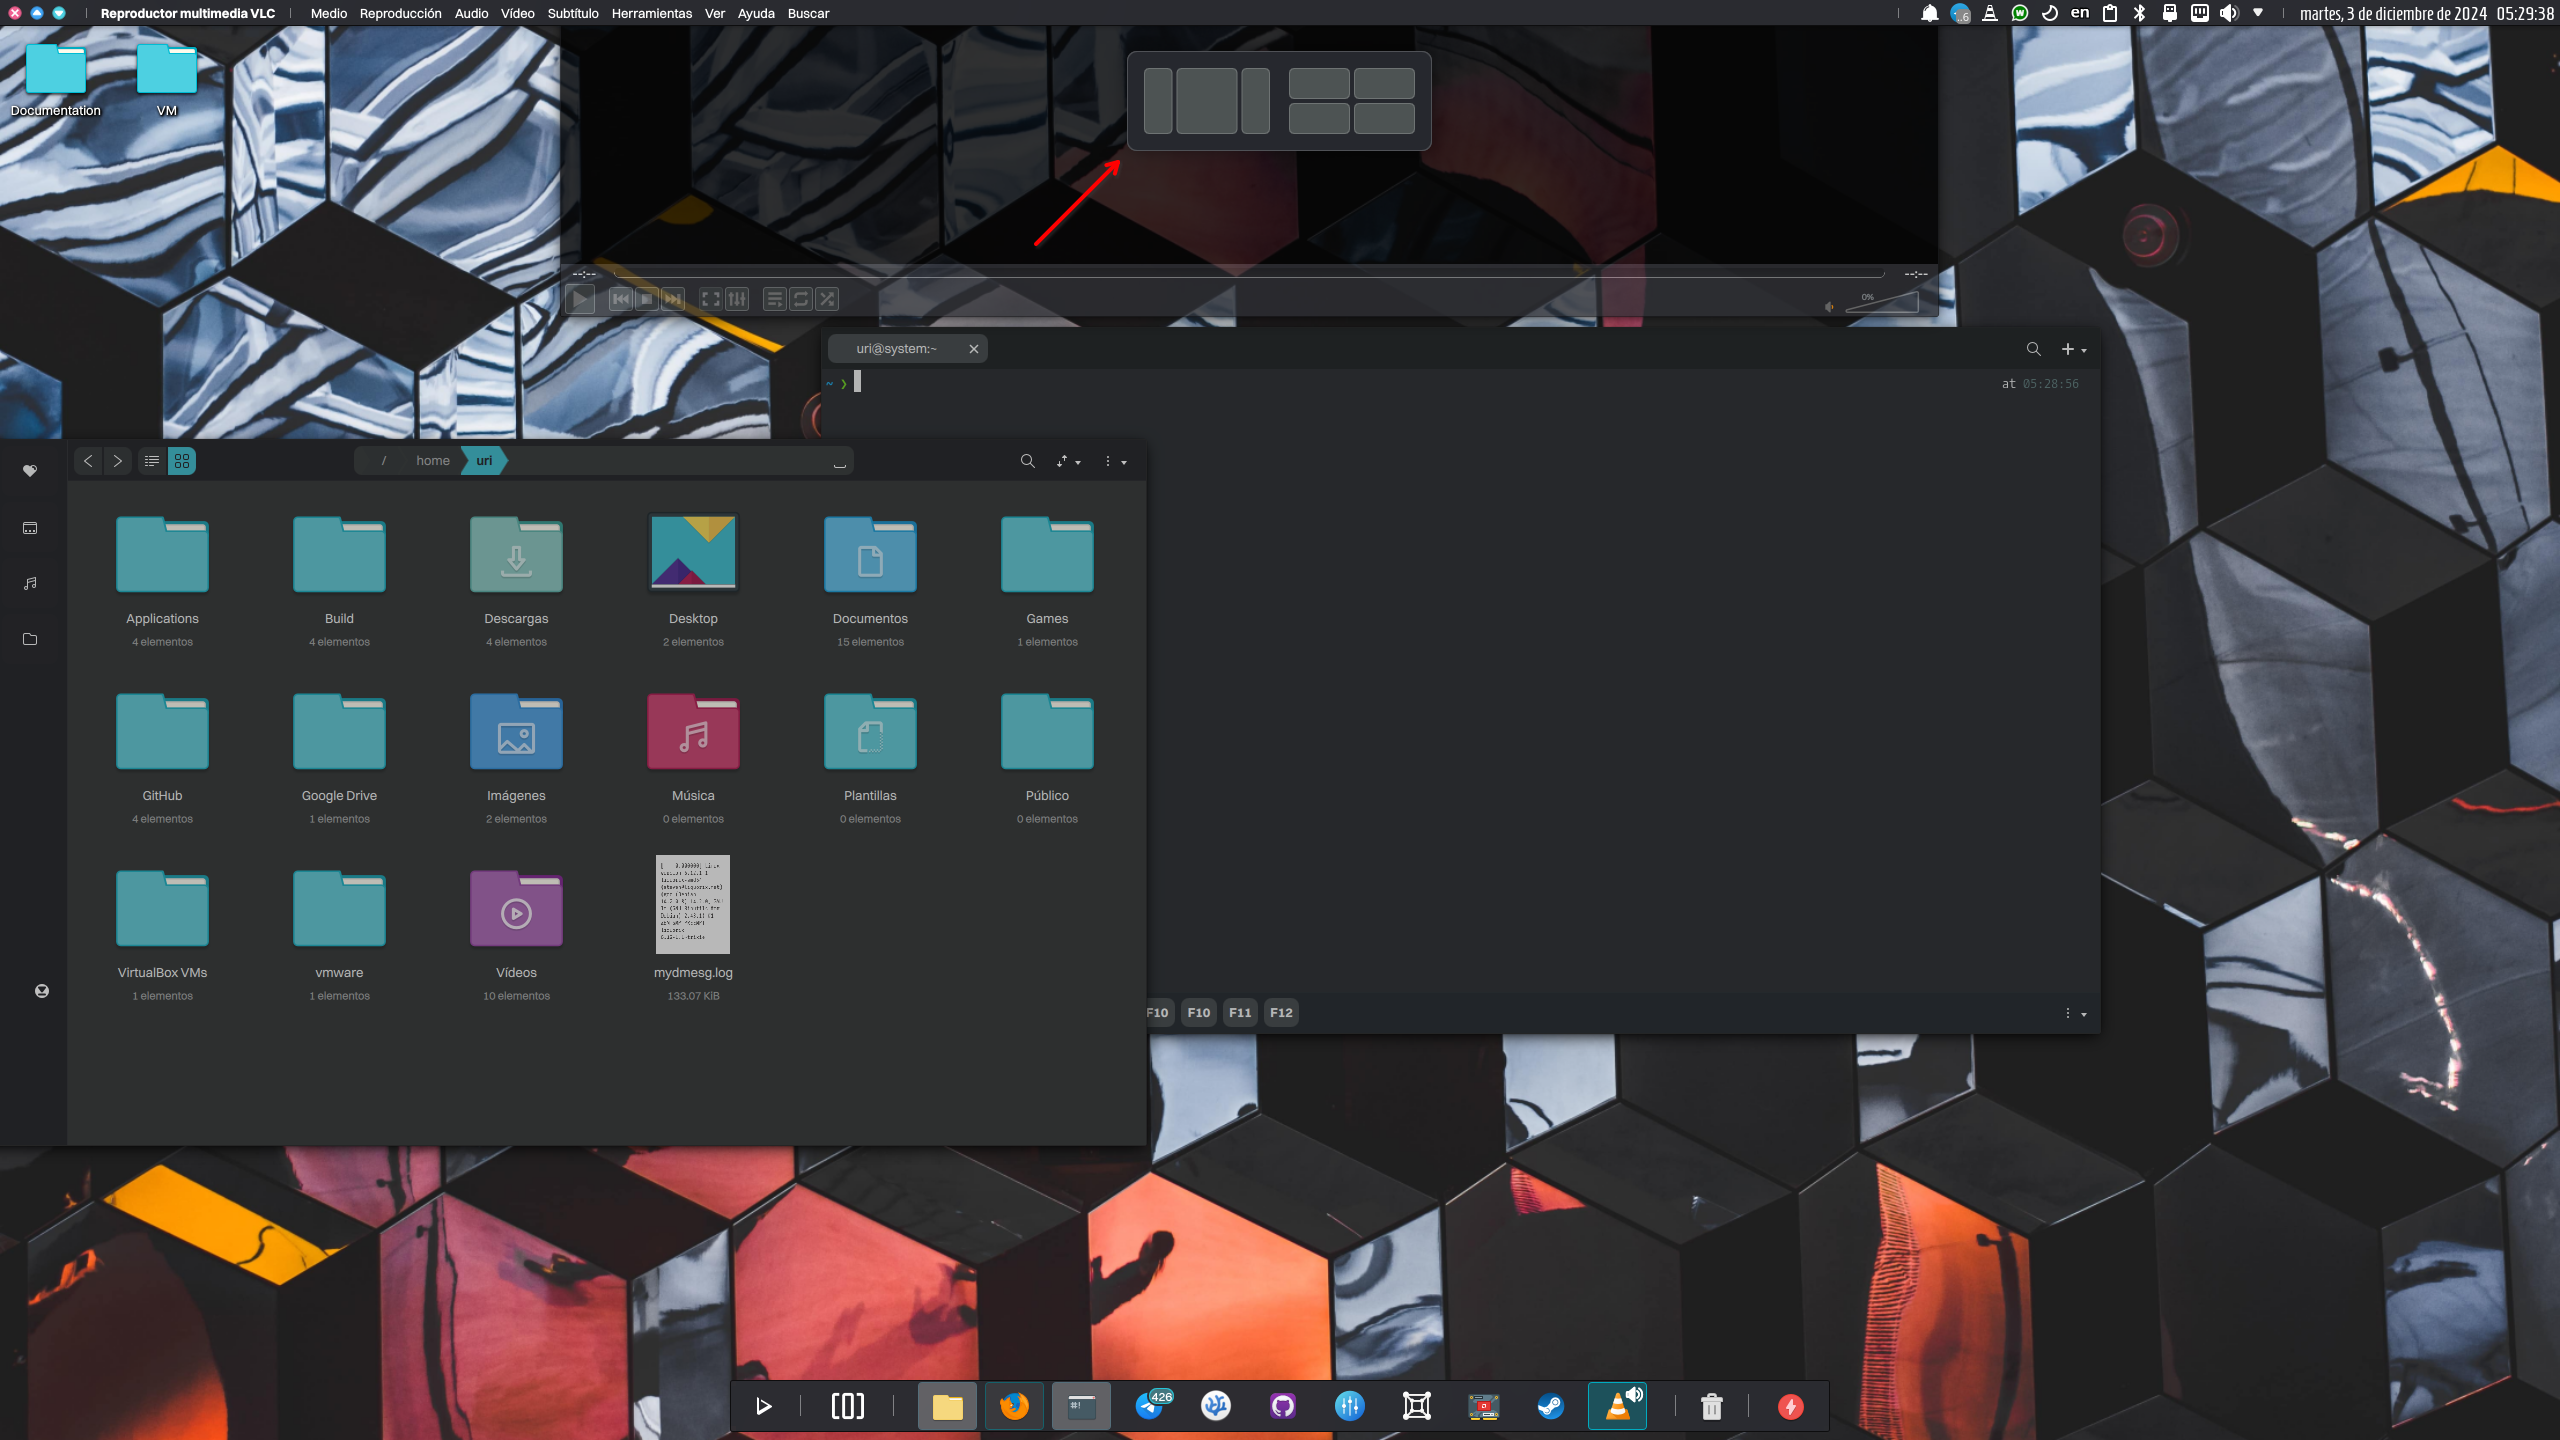
Drag a window to the top to alternate layouts and select between the default arrangements.
Complementary addons in NX Desktop
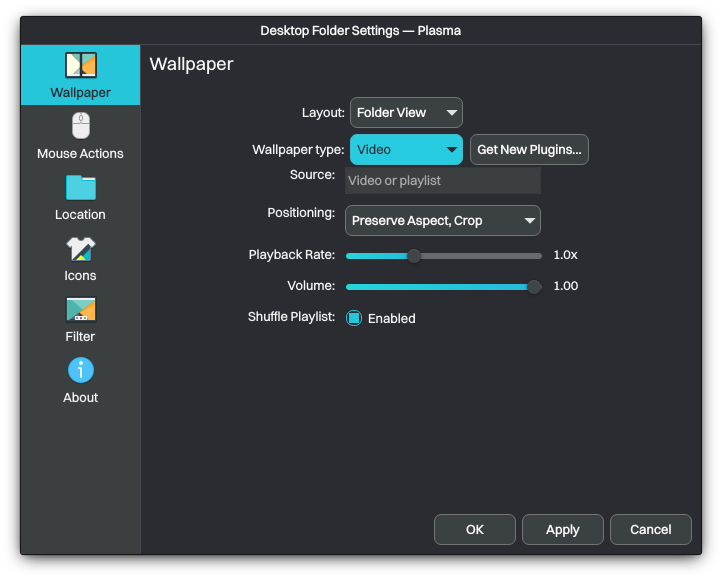
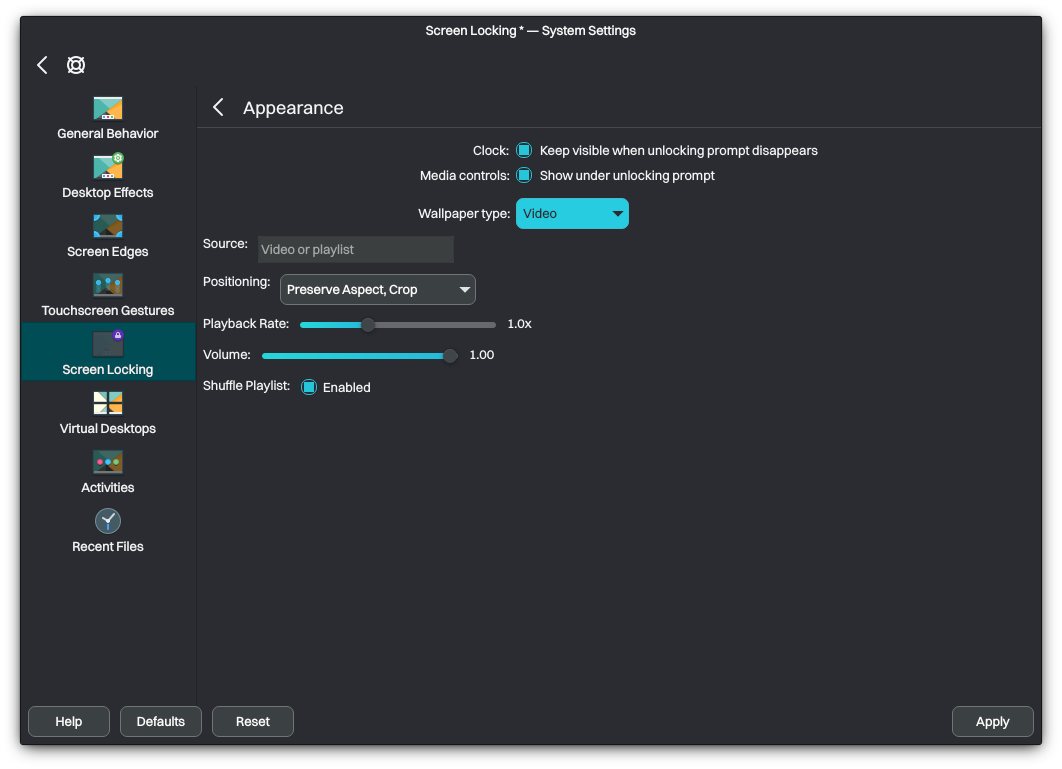
In addition to the changes described earlier, we include other complements, such as setting a video as the wallpaper and a video as the background in the lock screen. The default option in both instances is to use an image.
Connecting to Bluetooth Devices in NX Desktop
To connect a Bluetooth device in Nitrux, do the following steps:
- Open System Settings→Bluetooth or right-click the icon in the system tray, then left-click “Configure Bluetooth…”.
- Before connecting to a Bluetooth device, click the “Add new device” button, open the window, and click the “Configure” button.
- In the Bluetooth preferences, change the name of your computer, uncheck the box “Activated” if Bluetooth is already active, and do the same for the box “Visible.” Then enable the box “Visible” if pairing with a phone or only the box “Activated” if pairing with a speaker or headset. Do not close the Bluetooth preferences window.
- Switch focus to the “Add Bluetooth device” window and find the Bluetooth device you want to pair.
- Where applicable, accept the pin in both devices to pair them.
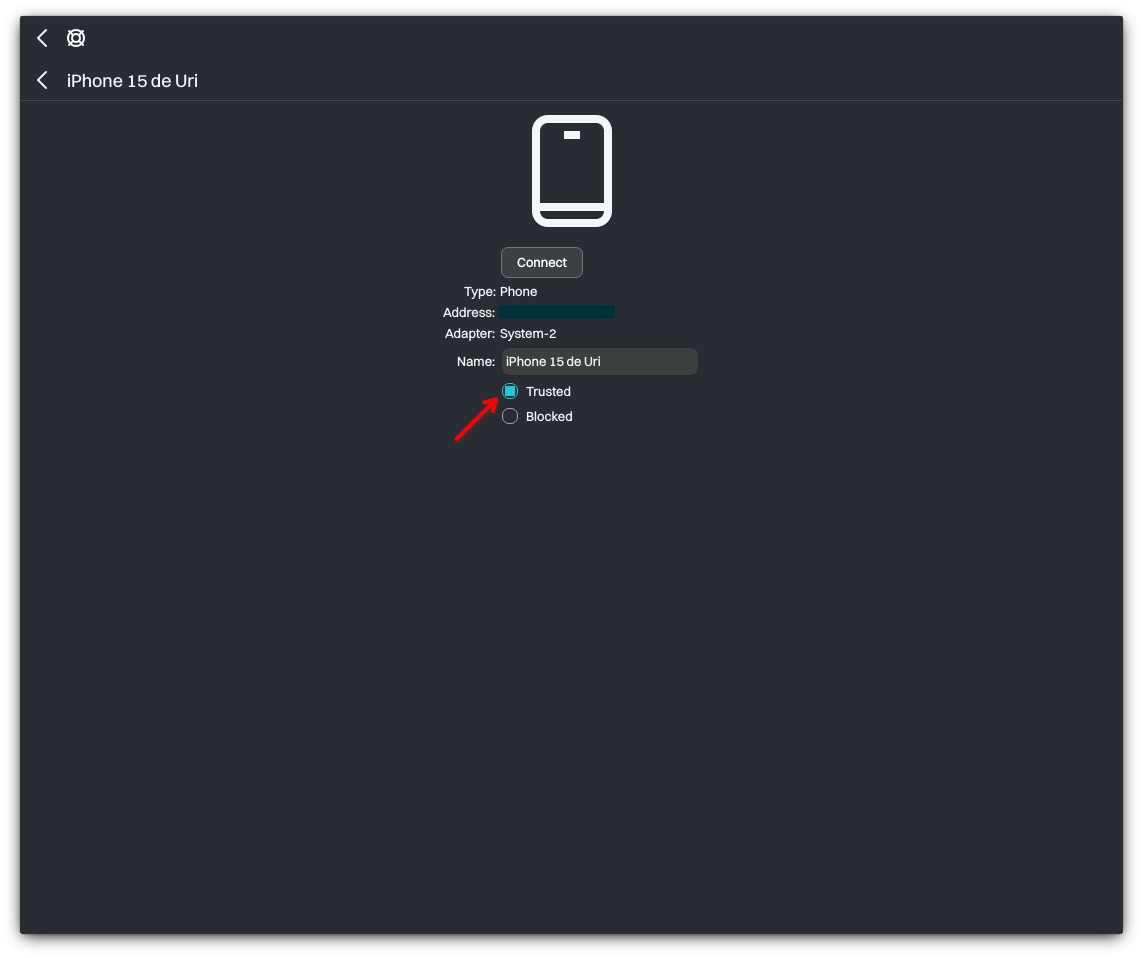
- 🔰 Information: Optionally, trust the newly paired device for faster reconnection.
Additionally, we recommend that after connecting a Bluetooth audio device, depending on the codecs the device supports, select SBC-XQ as the audio codec instead of the default SBC.
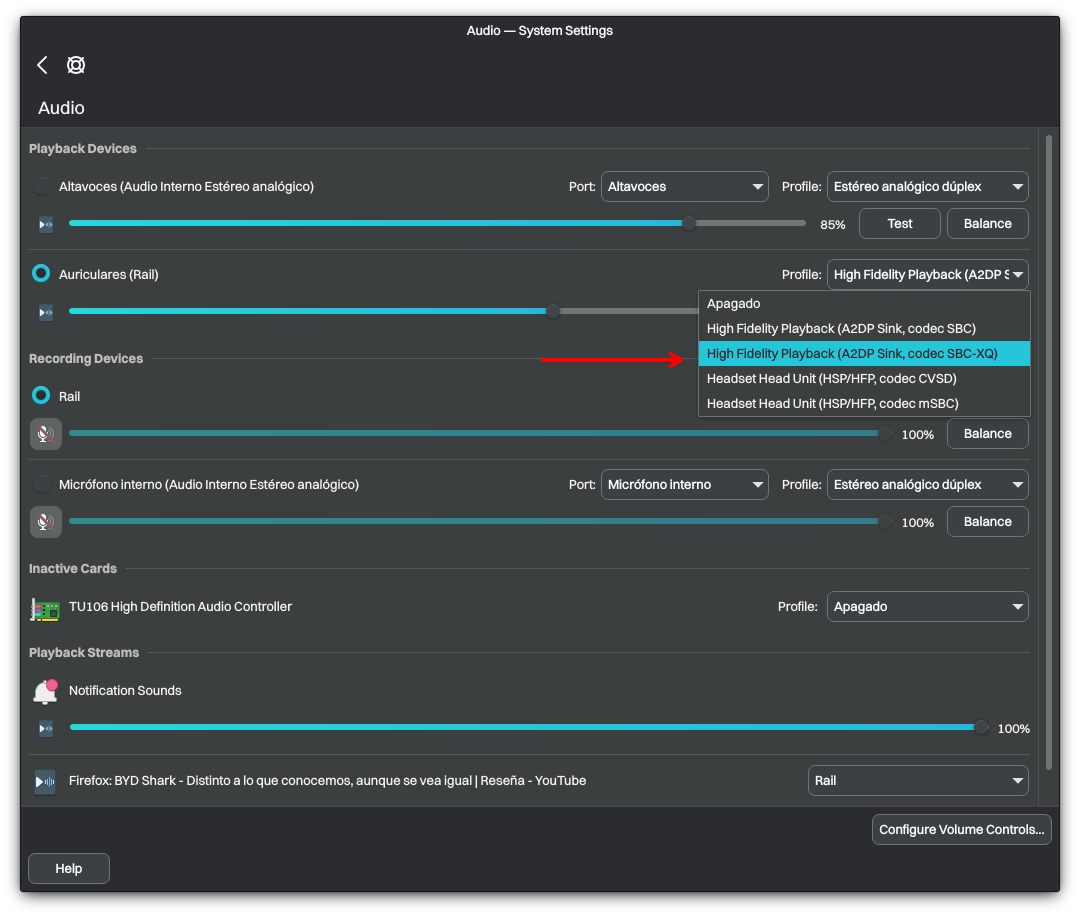
Audio Settings. Image for reference.
Enabling the Maliit Virtual Keyboard
Since Nitrux 2.8.0, we’ve included the Maliit Keyboard (not enabled by default) for better integration with touch devices. To use the virtual keyboard, go to System Settings→Input Devices→Virtual Keyboard→Maliit, and click “Apply”.
- ⚠️ Important: The Maliit Keyboard is only available in Wayland and is displayed only when a touchscreen is detected. However, it will not be displayed in a Live session. We recommend installing Onboard in a container and exporting it to have a virtual keyboard in X11 if a touchscreen is unavailable or when using a Live session.
- 🔰 Information: We recommend using Distrobox to install software in a container; see How to use Distrobox in Nitrux.
- ⚠️ Important: Using the Maliit Keyboard to type commands in the terminal is possible; however, the keyboard does not initially detect the terminal as input. To work around this, tap or left-click the search button in Station and then tap or left-click the terminal input.
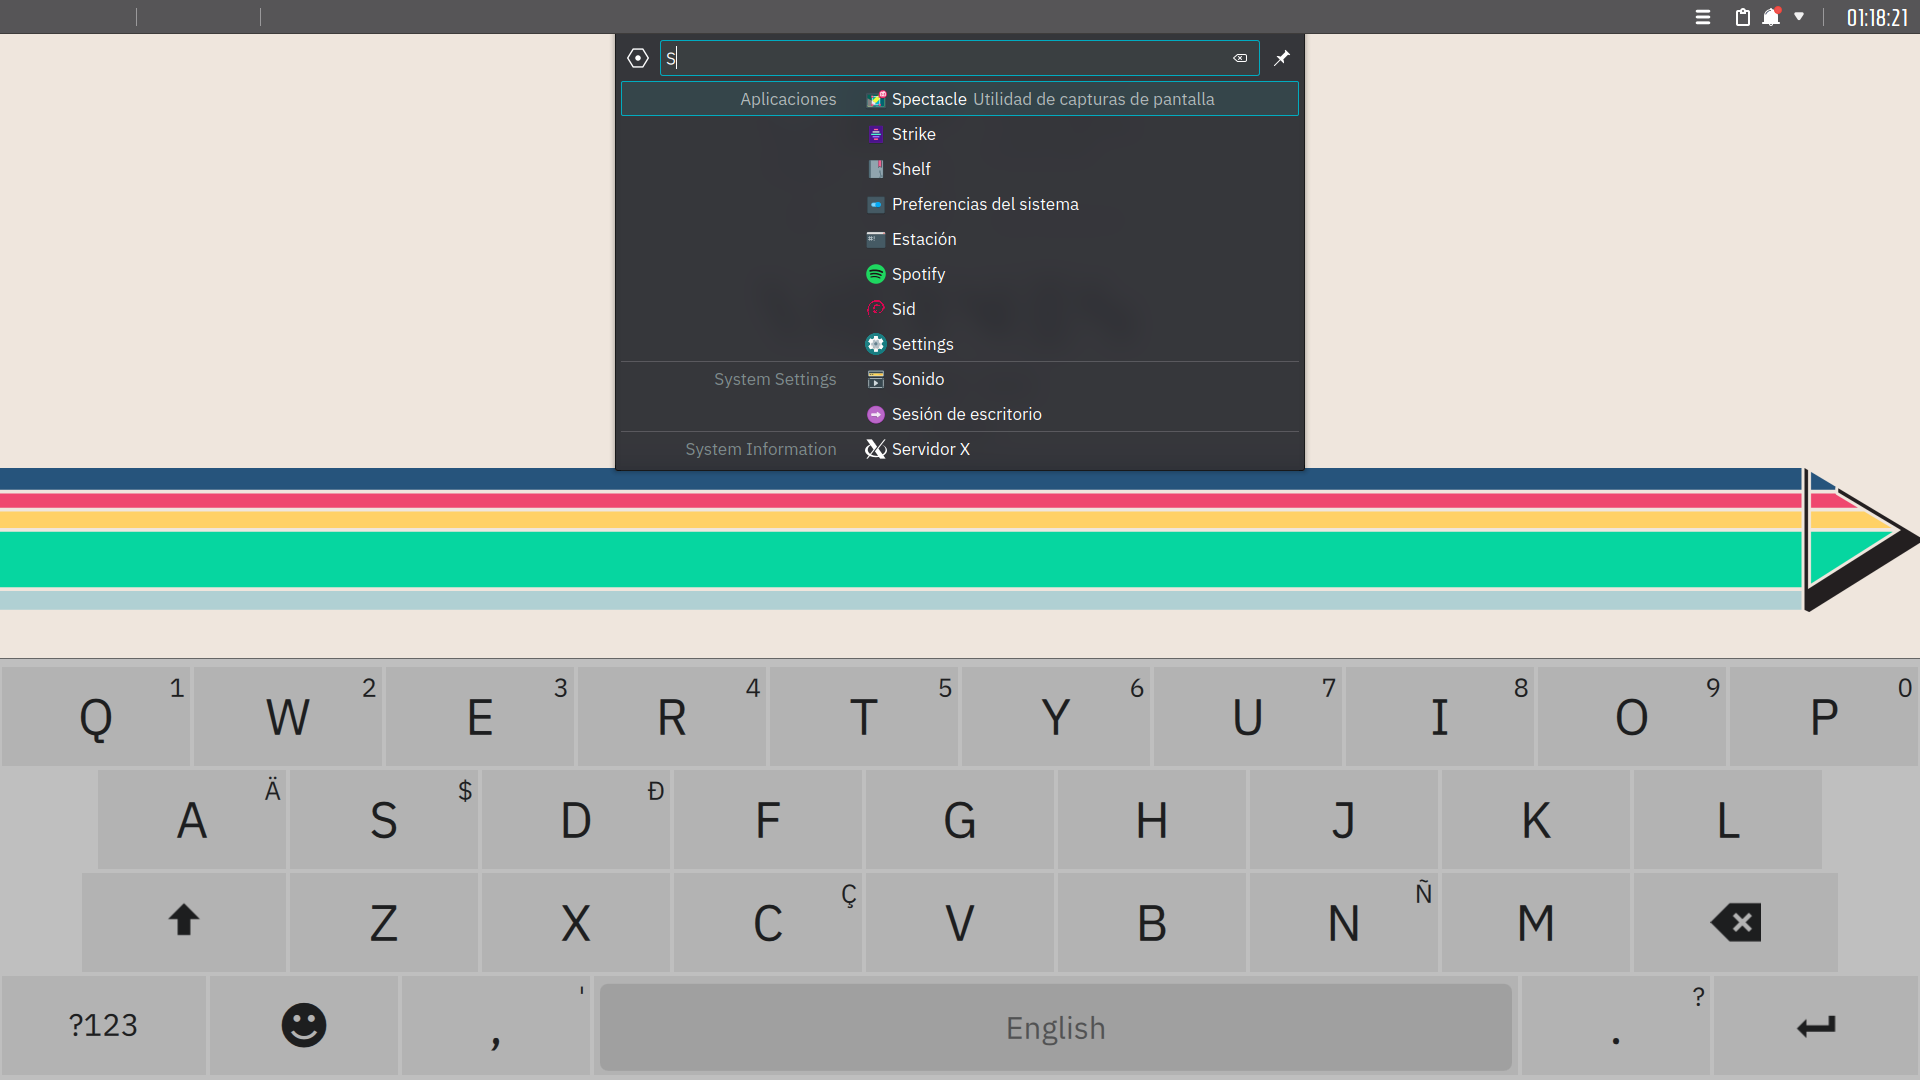
Maliit virtual keyboard.
Disclaimer: We have not developed the Maliit keyboard or framework. Please create issues at its bug tracker here to request features or report problems.
Troubleshooting
We include a command-line tool called desktop-config, which handles the following.
- Ensure that Plasma, i.e., plasmashell, is started when the user logs in, even if it crashes (at this point).
- Ensure that Fcitx5 is started when the user logs in, even if it crashes(at this point).
- Ensure that Powerdevil, i.e., KDE’s power management utility, is started when the user logs in, even if it crashes (at this point).
- Ensure that plasma-hud, i.e., the HUD utility, is started when the user logs in, even if it crashes (at this point).
- Ensure that the KDE PolicyKit Authentication Agent, i.e., KDE’s PolicyKit integration, is started when the user logs in, even if it crashes (at this point).
- Easily restart the Plasma Desktop manually at any point while the session is active.
- Create a log containing helpful information about these processes and their background activity.
> desktop-config --help

NX Desktop is our set of applied customizations to the Plasma 5 Desktop.

(c) 2024 Some Rights Reserved. Made by Nitrux Latinoamericana S.C.

Usage: desktop-config [--restart-desktop] [--restart-wm] [--show-window-titlebar] [--hide-window-titlebar] [--help]

  --restart-desktop          Restart KDE Plasma
  --restart-desktop-debug    Restart KDE Plasma and write the console output to a log file
  --restart-wm-x11           Restart KWin X11
  --show-window-titlebar     Show the window titlebar
  --hide-window-titlebar     Don't show the window titlebar
  --enable-double-click      Use double-click to open directories in Maui Apps (default)
  --disable-double-click     Don't use double-click to open directories in Maui Apps
  --help                     Display this help message
To report issues with desktop-config, go here: https://github.com/Nitrux/nitrux-bug-tracker.
Restarting the Plasma Desktop after process crashes
Use KRunner to launch Station or run the command desktop-config --restart-desktop if the Plasma Desktop is unavailable; see Using Plasma KRunner.
- 🔰 Information: Since Nitrux 3.6.0, we’ve added a monitoring utility to keep the Plasma Desktop process (plasmashell) alive no matter what, i.e., if the process terminates, it will be automatically restarted.
That’s it; this concludes today’s tutorial.