
In today’s tutorial, we’ll check how easy it is to install the distribution.
Difficulty: ★☆☆☆☆
📜 Table of Contents
- System Requirements
- Virtualizing Nitrux
- Downloading the ISO
- Verify the ISO Integrity and Authenticity
- Flashing the ISO to the USB
- Installing Nitrux
- Nitrux Installation Process Information
- Using Secure Boot with Nitrux
- Automated Partitioning Options
- Non-automated Partitioning Options
- Full-disk Encryption in Nitrux
- Single-booting Nitrux
- Dual-booting Nitrux with Windows or other Linux distributions
- Triple-booting Nitrux, Windows, and other Linux distributions
- Troubleshooting
- Can’t Install due to MBR Partitions Limit
- Can’t Install due to Mounted Swap Partitions
- Failure to Install due to an Issue with rsync error code 11
- Failure to Install GRUB on Legacy BIOS computer with multiple storage devices and using MBR Partition Table
- Installation is Successful, but User Data isn’t Persistent
- Report Installation Bugs
System Requirements
To install Nitrux on your computer, check the hardware requirements below.
- 🔰 Information: As of June 2024, we only offer Nitrux as an installable x64 (or x86_64, or amd64) ISO file.
- 🔰 Information: The default user and password for the Live session is
nitrux.
The Minimum requirements indicate what we consider the necessary hardware setup to run Nitrux and still use it without harming the user experience.
- 🔰 Information: While it is possible to run the distribution on very low-end hardware, i.e., think an Asus Eee PC 1015, the user experience would not be what we consider usable; thus, we recommend better (if still older ca. 2011-2005) hardware; see Nitrux Hardware Testing Setups.
- ⚠️ Important: Please be aware that the root directory is immutable, and any directory within the root will be read-only. Do not use a single partition layout.
| HW Configuration | Minimum Requirements | |
|---|---|---|
| System | Motherboard, CPU, RAM | 4GB RAM. Any ~2.0 GHz x86_64 4C/4T. |
| EFI, UEFI Support w/o Secure Boot, or Legacy BIOS. | ||
| Motherboard with support for USB boot. | ||
| Screen | VRAM | 512MB VRAM. |
| 3D Acceleration | Any GPUs supported by the FOSS Linux drivers and MESA libraries are supported except those requiring Nouveau; see NVIDIA Proprietary Driver Information. | |
| Any GPUs supported by the NVIDIA proprietary driver are supported; see the latest changelog for the latest included version of the driver. | ||
| Storage | Type | Mechanical Hard Drives or NAND-based Drives. |
| Capacity | 64GB and at least 14.67GB free for root partition. | |
| Network | Internet connection | Optional for installation; required for updates. |
| Audio | Any audio device supported by the included version of the Linux kernel. | |
The Recommended requirements are to ensure that Nitrux’s user experience is optimal.
- 🔰 Information: As before, our recommendation is based on a “good enough” configuration to enjoy the distribution adequately; see Nitrux Hardware Testing Setups.
- ⚠️ Important: As mentioned, the root directory is immutable, and any directory within the root will be read-only. Do not use a single partition layout.
| HW Configuration | Recommended Requirements | |
|---|---|---|
| System | Motherboard, CPU, RAM | 8GB RAM or better. Any ~2.0 GHz x86_64 4C/8T or better. |
| EFI, UEFI Support w/ or w/o Secure Boot; see Using Secure Boot with Nitrux. | ||
| Motherboard with support for USB boot. | ||
| Screen | VRAM | 2GB VRAM or better. |
| 3D Acceleration | Any GPUs supported by the FOSS Linux drivers and MESA libraries are supported except those requiring Nouveau; see NVIDIA Proprietary Driver Information. | |
| Any GPUs supported by the NVIDIA proprietary driver are supported; see the latest changelog for the latest included version of the driver. | ||
| Storage | Type | Mechanical Hard Drives w/ NAND-cache or NAND-based Drives, i.e., SATA or NVMe SSDs (preferred). |
| Capacity | 64GB or better and at least 14.67GB free for root partition. | |
| Network | Internet connection | Optional for installation; required for updates. |
| Audio | Any audio device supported by the included version of the Linux kernel. | |
Disclaimer: We do not develop, maintain, or package the Liquorix kernel. Please file bug reports at their bug tracker or ask for assistance on their forums.
Disclaimer: Nitrux is a Linux distribution comprised of various free and open-source software. Each program’s distribution terms are detailed in /usr/share/doc/*/copyright. Nitrux OS comes with NO WARRANTY, as permitted by law.
NVIDIA Proprietary Driver Information
Since Nitrux 2.5.0, the distribution includes the latest version of the current NVIDIA proprietary driver when we build and publish our ISO files. As mentioned above and explained below, this distribution does not use the Nouveau MESA driver.
- ⚠️ Important: The current versions of the NVIDIA proprietary driver support most hardware. However, users with unsupported hardware cannot boot into a graphical session, whether X11 or Wayland. Only TTY functionality will be available. The lack of support for older NVIDIA graphics processors in the latest NVIDIA proprietary driver versions is not a bug in Nitrux or caused by Nitrux.
- 🔰 Information: Run the following command to view the version of the installed NVIDIA proprietary driver; check the list of supported GPUs for the driver version included in the release.
nvidia-smi -q | grep Driver\ Version
- ⚠️ Important: We cannot include any NVIDIA Legacy drivers (version 470, 390, etc.) alongside the current version, as NVIDIA does not support installing two drivers simultaneously (see links 1 and 2). Additionally, NVIDIA drivers before version 470 (e.g., nvidia-390) do not support hardware-accelerated XWayland, causing non-Wayland-native applications to perform poorly in Wayland sessions.
- ⚠️ Important: Many bugs remain in Plasma Wayland, primarily if you use an NVIDIA GPU. These include, but are not limited to, applications that don’t work and missing features. We’ve listed some bugs we’ve found on the bug tracker; see Known Issues.
- ⚠️ Important: The NVIDIA proprietary driver cannot coexist with the Nouveau open-source driver user-space components; therefore, unsupported NVIDIA GPUs cannot use this driver.
- ⚠️ Important: Since NVIDIA introduced GBM support (version 495), many compositors (including Mutter and KWin) started using it by default. GBM is generally considered better with broader support. EGLStreams only had support because NVIDIA provided no alternative way to use their GPUs under Wayland with their proprietary drivers. Furthermore, KWin dropped support for EGLStreams after GBM was introduced into NVIDIA, meaning the default Plasma Wayland session and Maui Shell wouldn’t have worked if we included the Legacy Driver.
- 🔰 Information: As of July 18, 2024, NVIDIA has officially announced the transition to using an open-source driver. However, it does not support the same GPU architectures as the Nouveau MESA driver and isn’t entirely “open.”
- NVIDIA states: “For newer GPUs from the Turing, Ampere, Ada Lovelace, or Hopper architectures, we recommend switching to the open-source GPU kernel modules. For older GPUs from the Maxwell, Pascal, or Volta architectures, the open-source GPU kernel modules are not compatible with your platform. Continue to use the NVIDIA proprietary driver. For mixed deployments with older and newer GPUs in the same system, continue to use the proprietary driver.”
- Following NVIDIA’s recommendation, we will continue to use the proprietary driver until NVIDIA drops support for Volta or Pascal. As this NVIDIA developer indicated, pre-Turing microarchitectures lack a GSP (GPU System Processor), which is required to use their open-source driver.
- NVIDIA states: “For newer GPUs from the Turing, Ampere, Ada Lovelace, or Hopper architectures, we recommend switching to the open-source GPU kernel modules. For older GPUs from the Maxwell, Pascal, or Volta architectures, the open-source GPU kernel modules are not compatible with your platform. Continue to use the NVIDIA proprietary driver. For mixed deployments with older and newer GPUs in the same system, continue to use the proprietary driver.”
Disclaimer: We do not develop the NVIDIA proprietary driver. For issues with the NVIDIA driver, including bugs and adding support for graphics cards, please visit NVIDIA Support.
Virtualizing Nitrux
Installing Nitrux in a virtual machine is a simple matter. However, our releases do not target virtual machines for anything other than a basic overview of the functionality, such as booting the ISO file, installing the distribution, verifying that the included software is present and runs, debugging the boot process, or that newly added features are active. Users should understand the quirks and performance differences of virtualizing an operating system as it does not reflect bare-metal performance.
Having clarified that, please follow the recommendations below for an optimum experience when using Nitrux in a virtual machine.
Disclaimer: We do not develop VirtualBox, VMWare Workstation/Player, GNOME Boxes, QEMU, or Hyper-V. If you have issues with these hypervisors, such as graphical problems, please inform their developers at their respective bug trackers.
Using VirtualBox
We strongly recommend enabling the following options in the virtual machine settings.
- ⚠️ Important: Please DO NOT use the default settings when creating a new VM in VirtualBox.
- 🔰 Information: When using the default VM settings in VirtualBox, VMs boot using emulated Legacy BIOS, meaning CDROM and Floppy devices load before the virtual Hard Drives. After a successful installation, VirtualBox does not eject the ISO; if the user does not remove the ISO from the virtual CDROM device, upon reboot, VirtualBox will boot the ISO and not the virtual Hard Drive with the installed system; this is not a bug in Nitrux or caused by Nitrux.
- 🔰 Information: VirtualBox has poor support for KWin Wayland, as it tends to freeze the graphical session; this is not a bug in Nitrux or caused by Nitrux. We strongly recommend switching to the X11 session; see the latest Notes→Plasma X11 Session Information.
- 🔰 Information: To improve performance, deactivate some of the graphical effects or the compositor if you are using the X11 session.
- 🔰 Information: When creating a new virtual machine in VirtualBox, the graphics controller selected is VMSVGA; starting with VirtualBox 6.1.34, users can change the screen resolution in System Settings.
Virtual Machine settings for VirtualBox:
- Type: Linux.
- Version: Debian 12 (64-bit).
- Base Memory: 8000 MB.
- Boot Order: Uncheck Floppy.
- Chipset: ICH9.
- Extended Features:
- Enable I/O APIC.
- Enable EFI (special OSes only).
- Hardware clock in UTC.
- Processors: 4.
- Extended Features:
- Enabled Nested VT-x/AMD-V.
- Acceleration: KVM.
- Hardware Virtualization: Enable Nested Paging.
- Graphics Controller: VMSVGA.
- 🔰 Information: VirtualBox will freeze the graphical session if the display enters power-saving mode or suspends. To mitigate this issue, go to System Settings→Power Management→uncheck Screen Energy Saving and Suspend Session; this is not a bug in Nitrux or caused by Nitrux.
- Video Memory: >128 MB.
- Acceleration: Enable 3D Acceleration.
- 🔰 Information: Starting with Nitrux 3.5.0, 3D Acceleration is supported in VirtualBox (>=7.0.18 r162988). However, in VirtualBox 7.1.6 r167084, enabling 3D Acceleration causes VMs (not only Nitrux) not to boot; see this thread at the VirtualBox forums; this is not a bug in Nitrux or caused by Nitrux. We recommend using VirtualBox Version 7.1.4 r165100.
- Storage Devices: >64GB SATA or NVME.
- Attributes: Use host I/O Cache.
- Audio Controller: Intel HD Audio.
- Network: NAT.
- Adapter: PCnet-PCI II, PCnet-FAST III, Intel PRO 1000/MT Desktop, Intel PRO/1000 T Server, Intel PRO/1000 MT Server.
- Enable USB Controller: USB 3.0 (xHCI) Controller.
Using VMware Workstation and VMware Player
We strongly recommend enabling the following options in the virtual machine settings.
- ⚠️ Important: Do not install VMWare Tools from the menu Manage→Install VMWare Tools.
- ⚠️ Important: Please DO NOT use the default settings when creating a new VM in VMware Workstation or Player.
- 🔰 Information: Nitrux already includes the user-space programs and libraries essential for improving the user experience of VMware virtual machines, commonly known as Open VMware Tools for virtual VMware hosts.
Virtual Machine settings for VMware Workstation and VMware Player:
- OS: Debian 12 x 64-bit.
- Memory: 8000 MB.
- Processors: 1.
- Cores per Processor: 4.
- Storage: >64GB.
- Virtualization engine:
- Enable Virtualize Intel VT-x/EPT or AMD-V/RVI.
- Enable Virtualize CPU performance counters.
- ⚠️ Important: DO NOT enable this if your computer does not support this feature.
- USB Controller:
- Enable USB compatibility: USB 3.1
- Display:
- 3D graphics:
- Enable Accelerate 3D graphics.
- Monitors:
- Specify monitor settings: Use the VM settings to set the maximum resolution, e.g., 1600×1200. After logging in to the Live session, change the resolution in System Settings→Display Configuration to the specified resolution.
- ⚠️ Important: DO NOT change the resolution in System Settings→Display Configuration before specifying a maximum resolution in the VM settings; otherwise, KWin Wayland will crash after attempting to change the resolution. This is not a bug or issue with Nitrux or is caused by Nitrux.
- Specify monitor settings: Use the VM settings to set the maximum resolution, e.g., 1600×1200. After logging in to the Live session, change the resolution in System Settings→Display Configuration to the specified resolution.
- Graphics memory:
- VMWare’s recommended value depends on the amount of RAM allocated to the virtual machine. However, it must be 128 MB or more.
- 3D graphics:
- To enable EFI in a VMWare virtual machine, do the following.
- Open your virtual machines’ “. VMX” file in a text editor, then add
firmware = "efi"and save the “. VMX” file.
- Open your virtual machines’ “. VMX” file in a text editor, then add
Using GNOME Boxes (Flatpak)
We strongly recommend enabling the following options in the virtual machine settings.
- ⚠️ Important: Please DO NOT use the default settings when creating a new VM in GNOME Boxes.
Virtual Machine settings for GNOME Boxes:
- Open Boxes→Install from a file→Select the ISO file from the dialog window.
- Select Debian testing as the operating system.
- Select a Firmware option:
- BIOS.
- UEFI (Recommended).
- Select a Firmware option:
- Memory: 8.0GiB.
- Storage limit: 64.0 GiB.
For additional configuration, right-click the VM and select Preferences. In the Resources section, adjust the following settings to these recommended values.
- CPU: 4
- 3D Acceleration: Enabled.
- 🔰 Information: Starting with Nitrux 3.5.0, 3D Acceleration works in GNOME Boxes 46.0.
- 🔰 Information: Boxes will freeze the graphical session if the display enters power-saving mode or suspends. Go to System Settings→Power Management→uncheck Screen Energy Saving and Suspend Session to mitigate this issue.
- Allow foreground execution: Disabled.
For further integration with GNOME Boxes, enable the spice-vdagent service to use the SPICE agent for Linux in Nitrux.
Using Microsoft Hyper-V (Windows)
First, enable Hyper-V in Windows. Then, in Hyper-V Manager, go to Actions→Virtual Switch Manager→Create an external switch and pick your Wi-Fi or Ethernet adapter.
Virtual Machine settings for Hyper-V:
- Hyper-V Manager→Actions→New→VM; selecting this option will open the VM creation wizard.
- Name: Nitrux.
- ⚠️ Important: Select Generation 2 to use UEFI (Recommended).
- Memory: 8.0GB.
- Network: Select the virtual switch you’ve created.
- Storage limit: 64.0 GB.
- Select the ISO as the install media and click Finalize.
- Name: Nitrux.
- ⚠️ Important: Hyper-V does not support audio for Linux guests unless xrdp is available. This is not a bug or issue with Nitrux or is caused by Nitrux.
After creating the VM using the setup wizard, change the following options in the VM configuration.
- Disable secure boot in VM→Configuration→Security.
- Disable Virtual Machine Queue in VM→Configuration→Network adapter.
- Disable download of IPsec tasks in VM→Configuration→Network adapter.
- Enable MAC address spoofing with static address in VM→Configuration→Network adapter→Advanced features.
- Enable DHCP guard VM→Configuration→Network adapter.→Advanced features
- Enable router advertisement guard in VM→Configuration→Network adapter→Advanced features.
- Enable NIC teaming in VM→Configuration→Network adapter→Advanced features.
- Enable Device naming in VM→Configuration→Network adapter→Advanced features.
For further integration with Hyper-V, enable the services hv-vss-daemon and hv-kvp-daemon in Nitrux; see How to create service files in Nitrux pt. 1: OpenRC.
Downloading the ISO
Of course, we need to obtain the correct ISO file to install the distribution.
We offer users various ways to download our ISO files.
- Directly from our website.
- A torrent file from FOSSTorrents.com.
- Mirrors from Sourceforge.
Once we’ve downloaded the ISO file to our computer, we should check the file’s integrity. We do this by checking the checksum we provide.
Verify the ISO Integrity and Authenticity
We include links to the ISO checksum and signature files in the release announcement that we upload to Sourceforge.
Using the Terminal (*nix)
To verify the integrity of the ISO file, run the following command.
- Using MD5 (Nitrux 3.2.0 and older).
md5sum -c path_to_checksum_file.md5
- Using SHA512 (Nitrux 3.2.1 and newer).
sha512sum -c path_to_checksum_file.sha512
Using GtkHash (Linux)
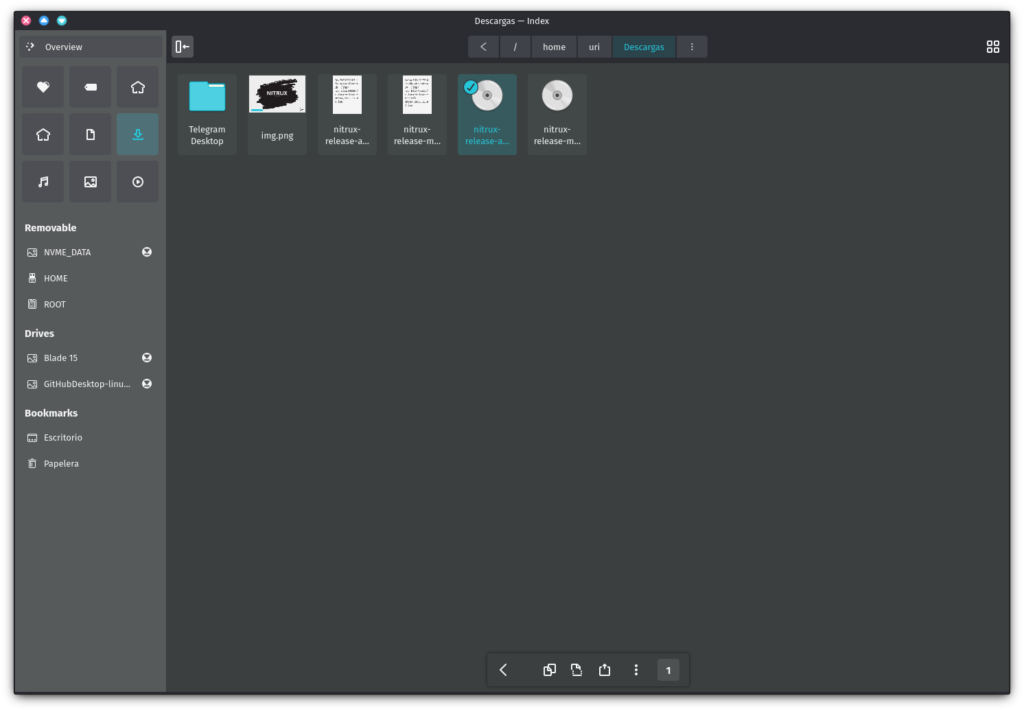
GtkHash is a graphical application available from Flathub. After installing the application, select the ISO file.
- 🔰 Information: Check out our tutorial about software management to learn how to obtain software from Flathub.
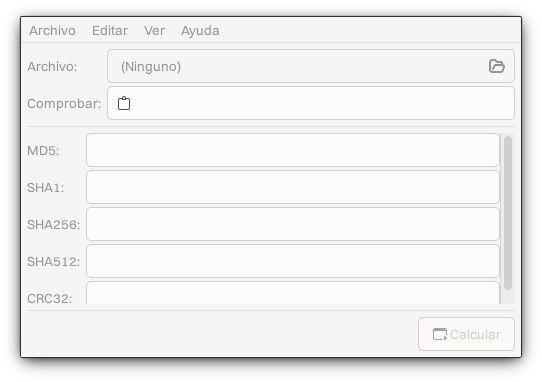
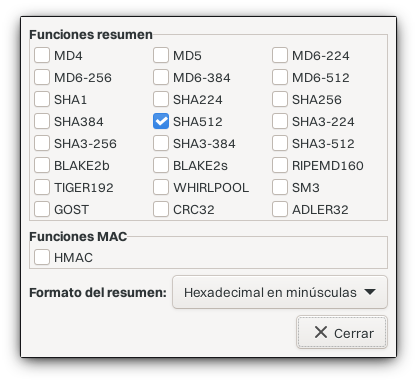
After selecting the ISO file, open the preferences and enable SHA512.
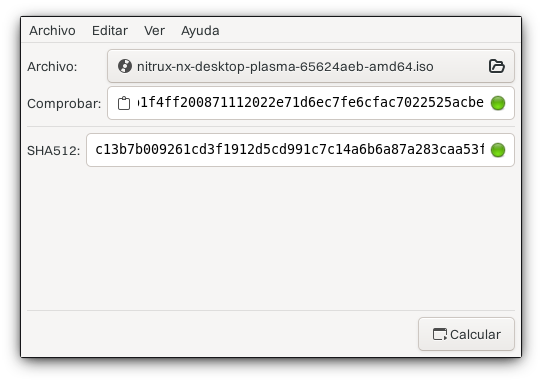
Then, after downloading the SHA512 checksum file, paste the checksum into GtkHash and click the “Calculate” button. The application will indicate whether the checksum matches.
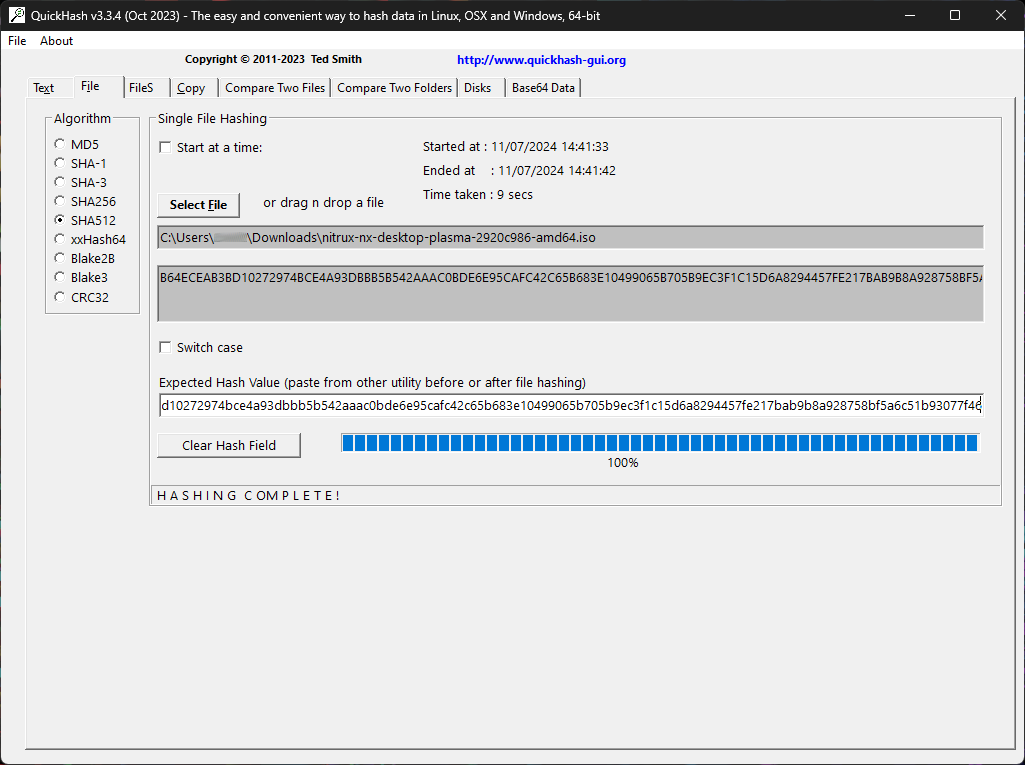
Using QuickHash-GUI (Windows)
If you’re on Windows, you can use a program like QuickHash-GUI. After installing the application, select SHA512 as the algorithm, left-click the tab “File,” click the “Select File” button, and navigate to the directory where the ISO was downloaded.
QuickHash-GUI will immediately start to check the sum of the file.
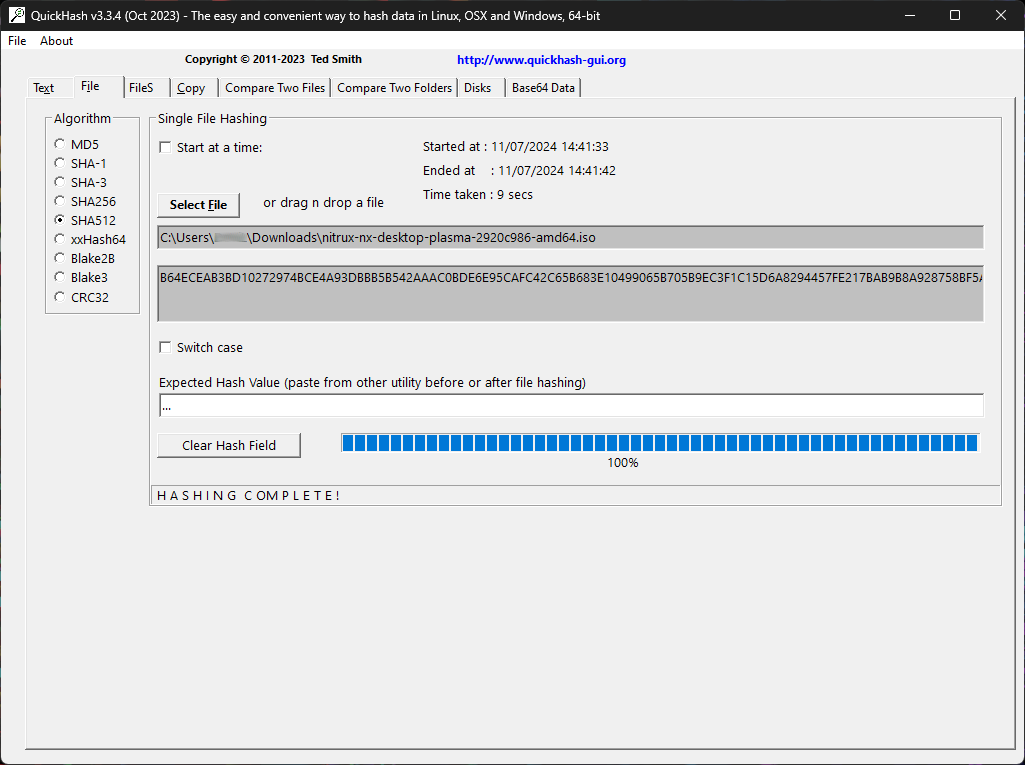
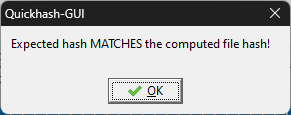
To verify that this sum matches, download the checksum file and open it using any text editor. Then, copy the sum and paste it into the field “Expected Hash Value.” QuickHash-GUI will automatically verify the sum and display a dialog message if successful.
Validate the ISO Authenticity using GPG
Since Nitrux 3.2.1, our ISO files are signed with a GPG key to ensure their authenticity. To verify the authenticity of the ISO using GPG, do the following.
- Download the ISO and the signature file.
- Import the latest public key in the latest changelog for a new release.
- Verify the signature using the command below.
gpg --verify path_to_sig_file.sig path_to_iso_file.iso
Once the integrity and authenticity of the ISO file have been verified, flash it to a USB.
Flashing the ISO to a USB
These instructions will walk you through creating a bootable Nitrux USB stick on Windows or Linux. You can use a USB stick to boot and test out or install Nitrux on any computer that supports booting from USB. The list of software to flash the ISO below is not in any particular order of preference.
We do not recommend you use the following programs to flash the Nitrux ISO file to a USB. Issues reported caused by the software listed below will be closed, including failed flash or write operations and an unbootable Live session.
- balenaEtcher. balenaEtcher performs an unknown test at the end of the flashing process, which constantly fails despite no errors in writing the image to the USB device. Additionally, its users have reported severe privacy concerns about the application as it sends user data to multiple third parties.
- Unetbootin. Unetbootin does not write the image; it copies it to the USB. However, unlike Ventoy, the ISO file does not boot with Unetbootin.
- KDE ISOImageWriter. ISOImageWriter fails to write the ISO image at 99%; this is a known application issue.
- Linux Mint mintstick. Mintstick fails to write the ISO image for the target device correctly.
On the other hand, we strongly recommend using the following programs to flash our ISO file to a USB.
Rufus (Windows)
If you are using Windows and Rufus, follow these steps:
- Download a Nitrux ISO file, and download and install Rufus.
- Insert the USB flash drive into the USB port and launch Rufus.
- Rufus will update the device within the ‘Device‘ field. If the ‘Device‘ selected is incorrect (perhaps you have multiple USB storage devices), select the correct one from the dropdown menu in the device field.
- Now, select the Boot selection. The choices will include Non-bootable, FreeDOS, Disk, or ISO image. Select “Disk or ISO image.”
- ⚠️ Important: Rufus 4.2.4070 Beta introduced a feature to the software to display a warning about revoked UEFI bootloaders, “Add detection and warning for UEFI revoked bootloaders (including ones revoked through SkuSiPolicy.p7b).” This will cause Rufus to display a warning message. Users can ignore this warning as the bootloader post-installation is signed; however, the bootloader in the ISO isn’t signed, nor the Liquorix kernel is signed, and the distribution will not boot with Secure Boot enabled; see System Requirements.
- See this issue at the Rufus repository for context about this warning.
- Also, see this reply in a Reddit thread of the Rufus developer about why that was implemented.
- ⚠️ Important: Rufus 4.2.4070 Beta introduced a feature to the software to display a warning about revoked UEFI bootloaders, “Add detection and warning for UEFI revoked bootloaders (including ones revoked through SkuSiPolicy.p7b).” This will cause Rufus to display a warning message. Users can ignore this warning as the bootloader post-installation is signed; however, the bootloader in the ISO isn’t signed, nor the Liquorix kernel is signed, and the distribution will not boot with Secure Boot enabled; see System Requirements.
- To select the Nitrux ISO file you downloaded previously, click SELECT to the right of “Boot selection.” If this is the only ISO file in the Downloads folder, you will see only one file listed. Select the appropriate ISO file and click on Open.
- The default selections for the Partition scheme (GPT) and Target system (UEFI (no CSM)) are appropriate (and are the only options available).
- Rufus will update the “Volume” label to reflect the ISO selected. Leave all other parameters with their default values and click START to initiate the writing process.
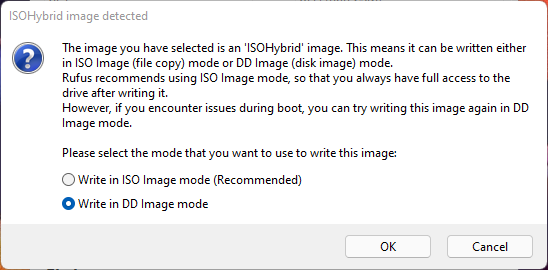
- When prompted to select which mode to write this image, choose to Write in DD Image mode.
- Rufus will now write the ISO to your USB stick, and the progress bar will indicate where you are. With a reasonably modern machine, this should take around 10 minutes. The total elapsed time is shown in the lower right corner of the Rufus window.
- When Rufus has finished writing the USB device, the Status bar will be green-filled, and the word READY will appear in the center. Select CLOSE to complete the writing process.
Ventoy (Windows/Linux)
If you are using Windows or Linux and Ventoy, follow these steps:
- Download a Nitrux ISO file, and install Ventoy and its GUI in the host operating system.
- ⚠️ Important: Ensure always to use the latest version available of Ventoy.
- ⚠️ Important: Ensure that Secure Boot is enabled in Option→Secure Boot Support.
- Using the Ventoy GUI, install Ventoy on the USB drive; this will delete all the data on the selected drive.
- Copy and paste, or cut and move, the Nitrux ISO file from the download location to the Ventoy directory on the USB drive. The directory will appear in the file manager’s sidebar.
- ⚠️ Important: Do not confuse this directory with VENTOYEFI.
- ⚠️ Important: When using Ventoy on Linux, run the command
syncto flush the USB write cache. In devices with little or no cache (like most USB thumb drives), the user must flush the cache before data is properly stored, and the kernel writes the data to the NAND flash. Ventoy does not implement any file verification method before or after the user copies or moves the ISO to the USB device. Always verify that the ISO file checksum is correct after copying or moving the ISO file to the Ventoy directory; see Verify the ISO Integrity and Authenticity. - ⚠️ Important: When booting our ISO file using Ventoy, if the computer has less than 4GB of RAM, select the GRUB 2 boot option in the menu; otherwise, there will be an “out of memory” error. For more information, see this issue at the Ventoy bug tracker. Additionally, check the Ventoy documentation about using the GRUB 2 boot mode.

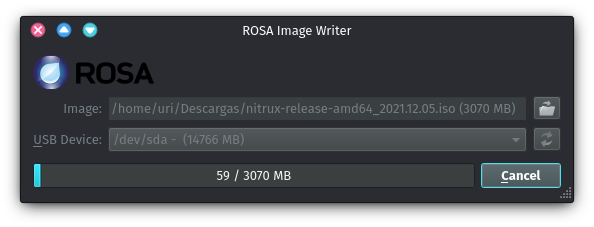
ROSA Image Writer (Windows/Linux)
If you are using Windows or Linux and ROSA Image Writer, follow these steps:
- Download a Nitrux ISO file, and install ROSA Image Writer.
- Insert the USB flash drive into the USB port and launch ROSA Image Writer.
- Click the folder icon to browse for the Nitrux ISO file, select it, and then select the USB device from the dropdown menu.
- Click Write to initiate the writing process.
dd (*nix)
If you are using Linux and the command ‘dd,’ follow these steps:
- Download a Nitrux ISO file.
- Insert the USB flash drive into the USB port and open a Terminal window.
- Enter the following command in the Terminal window and hit Enter.
- You must replace /dev/sdX with the correct device, such as /dev/sda or /dev/sdb or others.
sudo dd if=nitrux.iso of=/dev/sdX oflag=sync bs=4M status=progress
Installing Nitrux
Nitrux Installation Process Information
Below is the information we deem necessary for users to read and understand before installing this distribution.
- ⚠️ Important: When adding a username, i.e., “a name for the user,” do not include spaces, special characters, or numbers. Valid characters for hostnames are ASCII letters from a to z. A username may not start with a hyphen. Not following this rule will prevent the installation from continuing. This is not a bug or issue with Nitrux or is caused by Nitrux.
- ⚠️ Important: When adding a hostname, i.e., “a name for the computer,” do not include spaces or special characters. Valid characters for hostnames are ASCII letters from a to z, the digits from 0 to 9, and the hyphen (-). A hostname may not start with a hyphen. Not following this rule will prevent the installation from continuing. This is not a bug or issue with Nitrux or is caused by Nitrux.
- ⚠️ Important: Calamares is configured to enforce a stricter user password quality check by using libpwquality to increase user account security by default. When creating the main user account, i.e., the “system administrator,” users must use a password over eight characters long, including uppercase and lowercase letters, numbers, and symbols, with sufficient randomness during installation. Otherwise, the password quality check will be too low, and the installation will not continue.
- 🔰 Information: We recommend using a password generator application (mobile or desktop) or a website. Please avoid using simple passwords, such as 1234567890aB!, which will not pass the password quality checks (the password fails the dictionary check). Alternatively, run the following command to generate a usable password directly from the Terminal.
pwgen -ys 15 1
-
-
- ⚠️ Important: We want to emphasize that users can still use insecure user passwords by turning off the password quality check using the checkbox “Enable password strength validation” or changing the password of the primary user account post-installation; however, we strongly recommend leaving the checkbox enabled for security reasons. Please be aware that turning off the password strength validation in Calamares will not affect other user accounts created post-installation; it will only affect the account created by Calamares.
-
- 🔰 Information: To view Calamares’s verbose output during installation, click the icon next to the progress bar or start Calamares from the Terminal. To start Calamares from the Terminal, run the following command.
sudo -E start-calamares
Using Secure Boot with Nitrux
When Secure Boot is enabled, we strongly recommend using Ventoy to boot the ISO. Ventoy provides documentation to enroll their key in the computer’s MOKManager. After enrolling the key and rebooting, select our ISO and use GRUB 2 Boot mode. However, the installed system will not boot if Secure Boot remains enabled since the kernel is not signed.
- ⚠️ Important: If Secure Boot is enabled and the kernel is not signed, booting will fail with an error like “Secure Boot Violation.” Some distributions, like Ubuntu, have their bootloader (shim) signed by Microsoft’s UEFI CA, allowing them to trust their kernel without manual enrollment. Given our past interactions with Microsoft and its partners, we’re unwilling to pay Microsoft for their signing service. Users can freely generate and enroll their Machine Owner Keys (MOKs) to locally sign and boot custom kernels.
To boot the installed system using our default kernel, Liquorix, users must sign it with a user-generated MOK using Nitrux SB Manager post-installation.
First, disable Secure Boot and boot Nitrux, then proceed to sign the kernel. Nitrux SB Manager will provide the necessary information to complete the key enrollment. Then, after enrolling the user-generated key, re-enable Secure Boot and boot Nitrux.
Alternatively, users can boot another kernel post-installation using Kernel Boot that will work with Secure Boot without additional key enrollment, such as the vanilla Debian-signed kernel; see How to use Kernel Boot.
Automated Partitioning Options
Users can select the automated partition options, such as Install alongside, Erase disk, and Replace partition. When using these options, Calamares will use our custom partition layout and create three partitions in addition to the ESP and the Swap. Our partition layout uses percentages to assign the partition sizes, which scale according to the size of the storage device, unallocated space, or the selected partition to replace. The percentages target a device with a minimum of 64GiB of storage; for example, we assign a size of 22% for the root directory, which means the assigned space would be 14.08GiB, and there would be enough space for the root.
- The
/partition (NX_ROOT) will occupy 22%.- This partition will use the XFS filesystem. This XFS-formatted partition will use the following additional filesystem features (enabled by Nitrux™).
- Allow inodes to be placed at any location on the filesystem. Storing an inode in the exact location as the file’s data improves performance.
- ⚠️ Important: When installing the distribution, the installation will fail if the root partition does not have enough storage space. This is neither a bug caused by Nitrux nor a bug in Calamares. It is possible that in Legacy BIOS devices, Calamares does not display an error when that scenario occurs; in that case, it is a bug in Calamares (not to display the error), as it does display an error message when the device uses EFI.
- ⚠️ Important: Please be aware that the root directory is immutable, and any directory within the root will be read-only. Our custom partition layout separates user-managed directories from the root.
- Allow inodes to be placed at any location on the filesystem. Storing an inode in the exact location as the file’s data improves performance.
- This partition will use the XFS filesystem. This XFS-formatted partition will use the following additional filesystem features (enabled by Nitrux™).
- The
/homepartition (NX_HOME) will occupy 68% and the/var/libpartition (NX_VAR_LIB) will occupy 10%.- These partitions will use F2FS instead of XFS. These F2FS formatted partitions will also use the following additional filesystem features (enabled by Nitrux™).
- Compression using zstd with compression at level 6. The primary goal is reducing writes to extend the flash lifetime and potentially slightly increase performance; see Native File Compression in F2FS.
- Verification of compressed blocks using a checksum to avoid corruption.
- Enable a better garbage collector and asynchronous garbage collection.
- Avoid synchronously updating access or modification times, which improves I/O performance and flash durability.
- Native F2FS file encryption. Encryption is applied at the directory level, and different directories can use different encryption keys. To use F2FS’s native encryption support, see Native File Encryption in F2FS.
- This is different from dm-crypt, which is the block-device-level encryption used by Calamares during installation.
- These partitions will use F2FS instead of XFS. These F2FS formatted partitions will also use the following additional filesystem features (enabled by Nitrux™).
- The
/boot/efipartition (EFI System Partition) is a fixed size (300MB). - The
swappartition (SWAP) uses whatever space is left on the storage device that other partitions have not used.
Non-automated Partitioning Options
Users can also select Manual partitioning. However, we strongly recommend following our partition layout; otherwise, some functionality, such as upgrades and rollbacks using the Nitrux Update Tool System, will be lost.
- Select the mount point of all partitions and options (where applicable).
- We recommend adding labels to the partitions. Our recommended partition layout is below.
- Optionally, choose to encrypt the whole system (or each partition individually).
- ⚠️ Important: When creating the EFI System Partition for Legacy BIOS devices, the partition size must be 8MiB.
- 🔰 Information: Calamares will continue to display a popup window to the user despite creating the partition in this size and adding the required flag. This is not a bug or issue with Nitrux or is caused by Nitrux; this is a bug in Calamares.
- 🔰 Information: The tables below assume the target device is an x64 (x86-64, or amd64) computer using Legacy BIOS, EFI, or UEFI firmware and a GPT partition table.
- 🔰 Information: While the (new) layout below is our recommendation, users can add almost any directory they want as a separate partition. However, the root and home must be separate due to the root directory’s immutability.
- ⚠️ Important: Do not add the directory
/etcas a separate partition; otherwise, the system will be unbootable
- ⚠️ Important: Do not add the directory
- 🔰 Information: Please be aware that neither XFS nor F2FS partitions can’t be shrunk, only grown.
- ⚠️ Important: When creating the EFI System Partition for Legacy BIOS devices, the partition size must be 8MiB.
The table below defines our partition layout for EFI or UEFI firmware-type computers that use GPT storage devices (GUID Partition Table).
- ⚠️ Important: Please be aware that the root directory is immutable, and any directory within the root will be read-only. Do not use a single partition layout.
| Partition | Label | Mountpoint | Filesystem Type | Flags |
|---|---|---|---|---|
| EFI System Partition | ESP | /boot/efi | fat32 | boot |
| root | NX_ROOT | / | xfs | none |
| home | NX_HOME | /home | f2fs | none |
| /var/lib | NX_VAR_LIB | /var/lib | f2fs | none |
| swap | SWAP | none (automatically set up) | linuxswap | swap |
The table below defines our partition layout for Legacy BIOS firmware-type computers that are GPT storage devices GPT (GUID Partition Table).
- ⚠️ Important: Please be aware that the root directory is immutable, and any directory within the root will be read-only. Do not use a single partition layout.
| Partition | Label | Mountpoint | Filesystem Type | Flags |
|---|---|---|---|---|
| EFI System Partition | – | – | unformatted | bios-grub |
| root | NX_ROOT | / | xfs | none |
| home | NX_HOME | /home | f2fs | none |
| /var/lib | NX_VAR_LIB | /var/lib | f2fs | none |
| swap | SWAP | none (automatically set up) | linuxswap | swap |
Full-disk Encryption in Nitrux
We have added the ability for users to perform full-disk encryption using dm-crypt during installation when using either of the installation options in Calamares.
- During early boot, the system will ask the user for their passphrase, unlocking all encrypted partitions.
- Block-device encryption during installation is in addition to any userland tool (like fscrypt or Plasma Vaults); see File Encryption in Nitrux.
The checkbox to encrypt the installation is only visible when selecting the automated options in the partitions module, such as Install alongside, Erase disk, or Replace partition. When selecting Manual partitioning, the user must use a new partition—not edit an existing partition—to make the checkbox visible in the individual partition setup window.
Single-booting Nitrux
To install Nitrux as the single operating system, do the following steps:
- Disable Secure Boot using your device’s firmware, as noted in System Requirements.
- After disabling Secure Boot, select “Erase disk,” click the “Next” button, then confirm the installation when asked.
Below is a video of the installation process of Nitrux by Riba Linux. Once the distribution is installed in the target storage, you can reboot and log in to the installed system.
Dual-booting Nitrux with Windows or other Linux distributions
To install Nitrux alongside Windows, do the following steps:
- Disable Secure Boot using your device’s firmware, as noted in System Requirements.
- After disabling Secure Boot, do either of the following options:
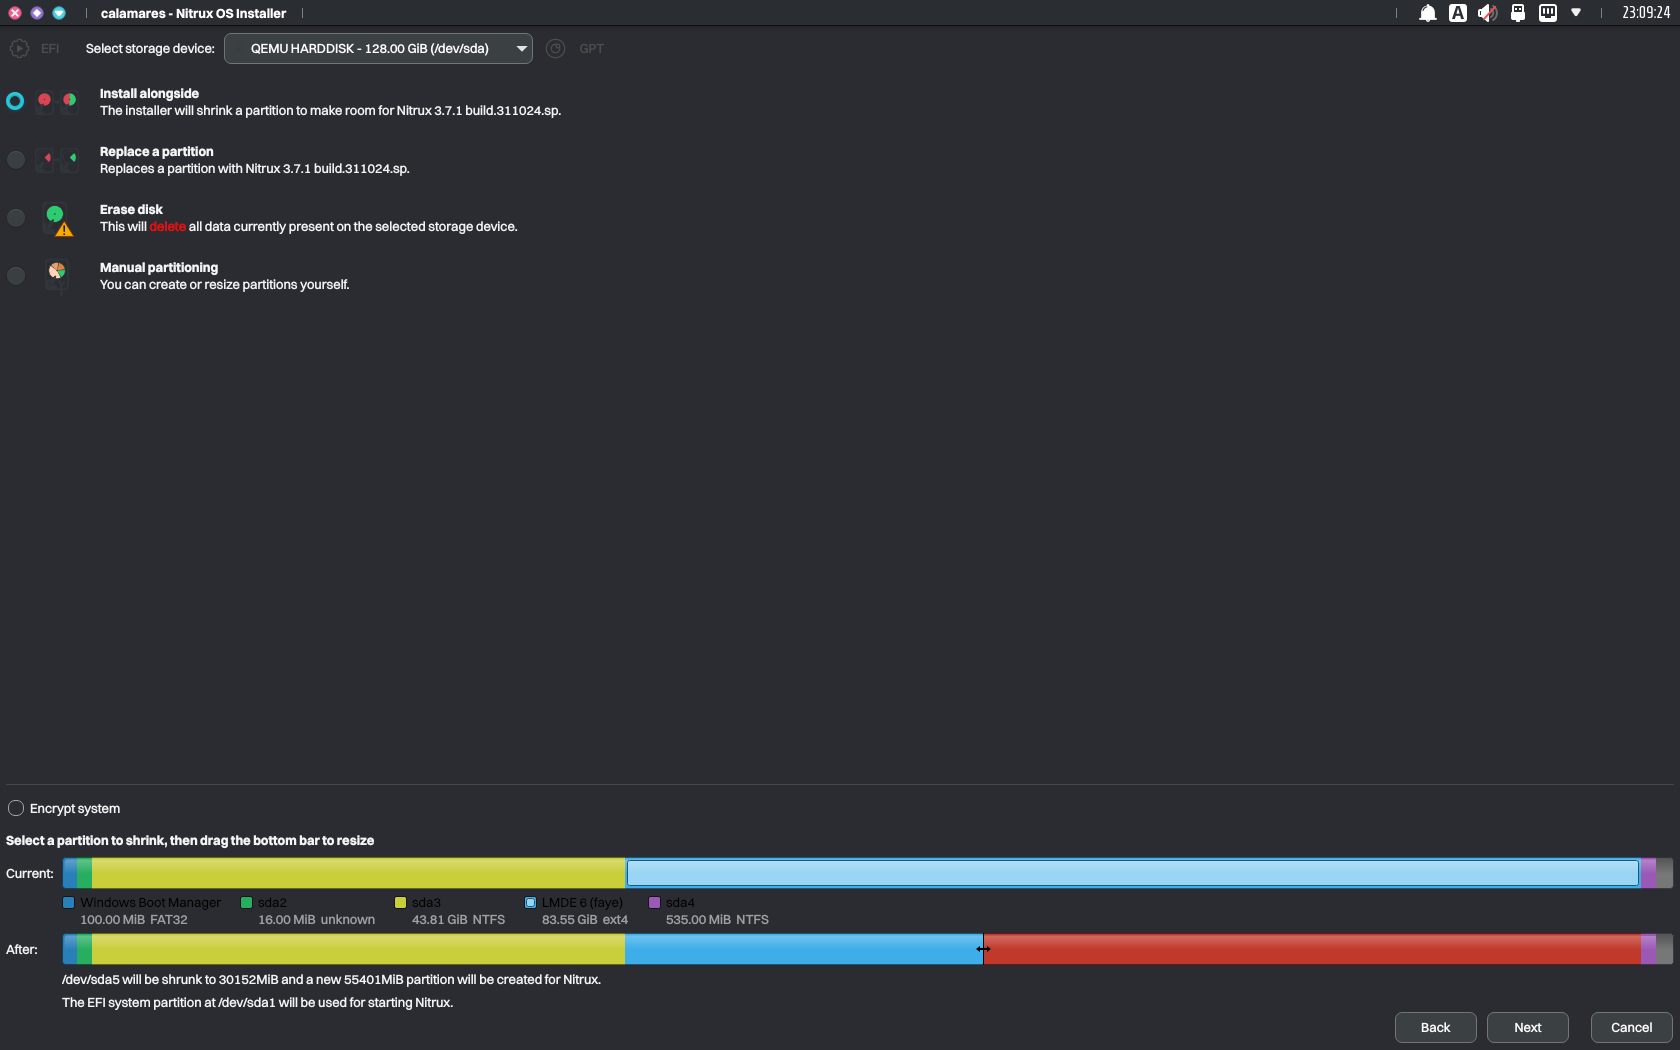
- Boot the Nitrux ISO, launch the installer, select “Install alongside,” and click an existing Windows NTFS partition with sufficient space. Adjust the slider to determine how much to allocate for Nitrux.
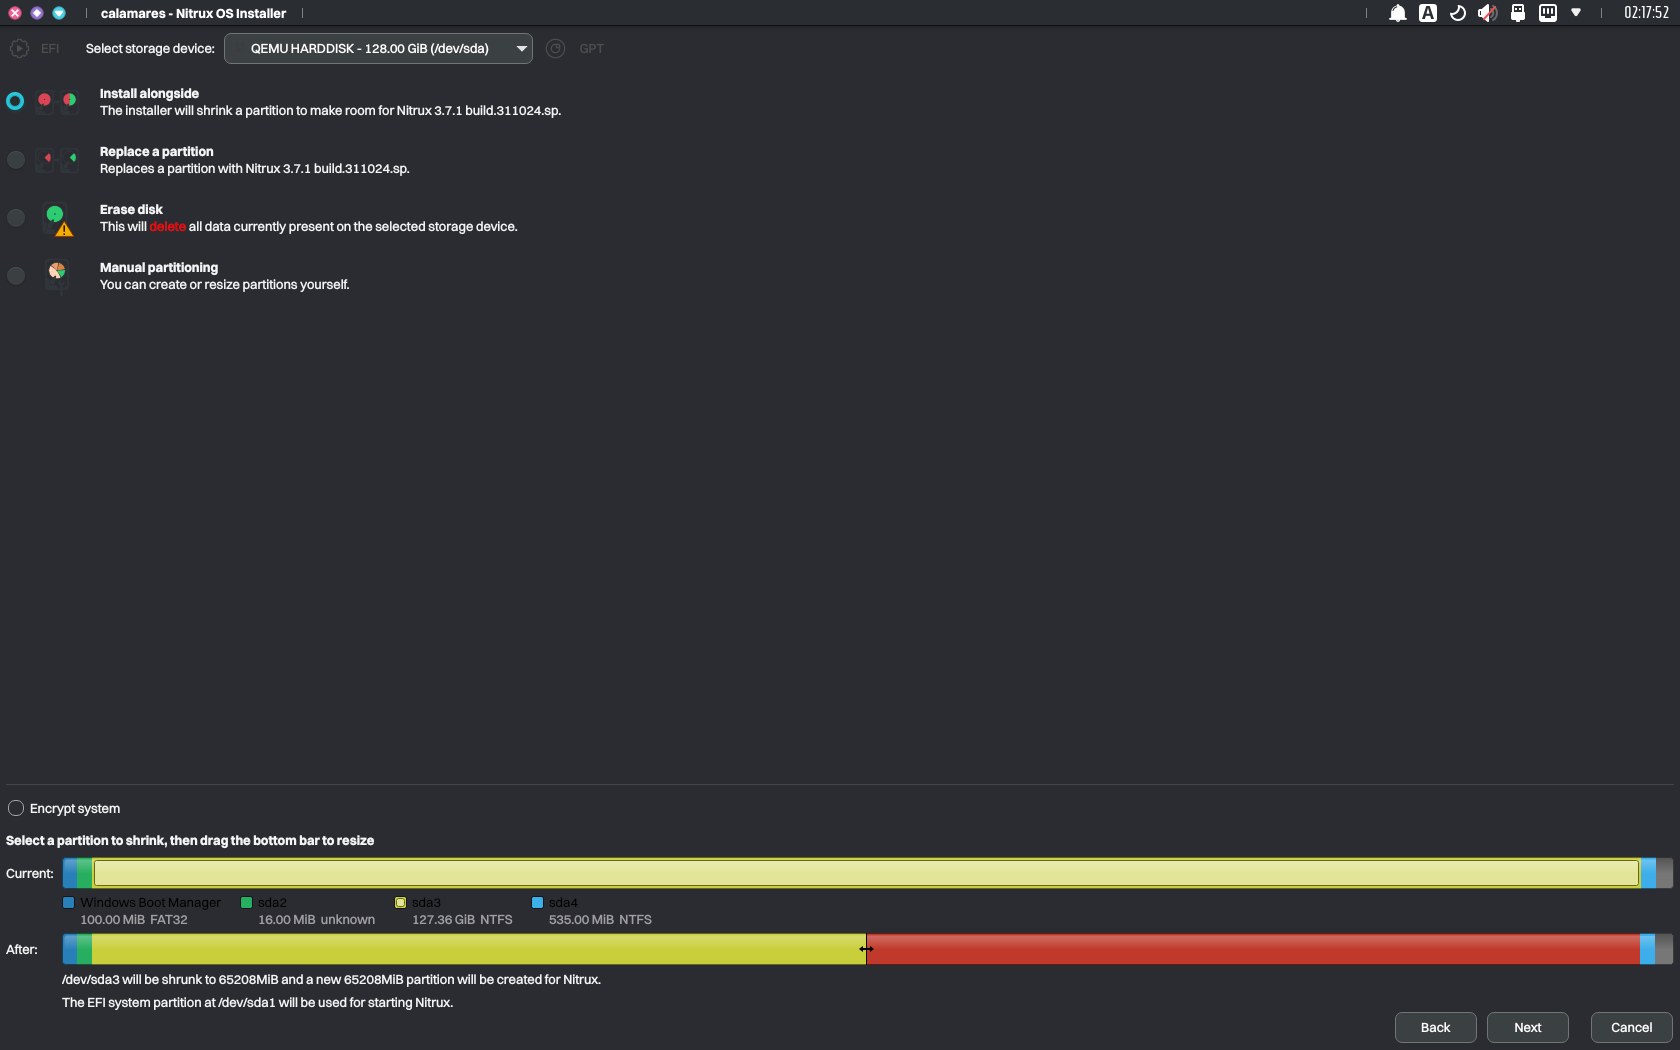
Allocating storage space to install Nitrux within Calamares. Image for reference.
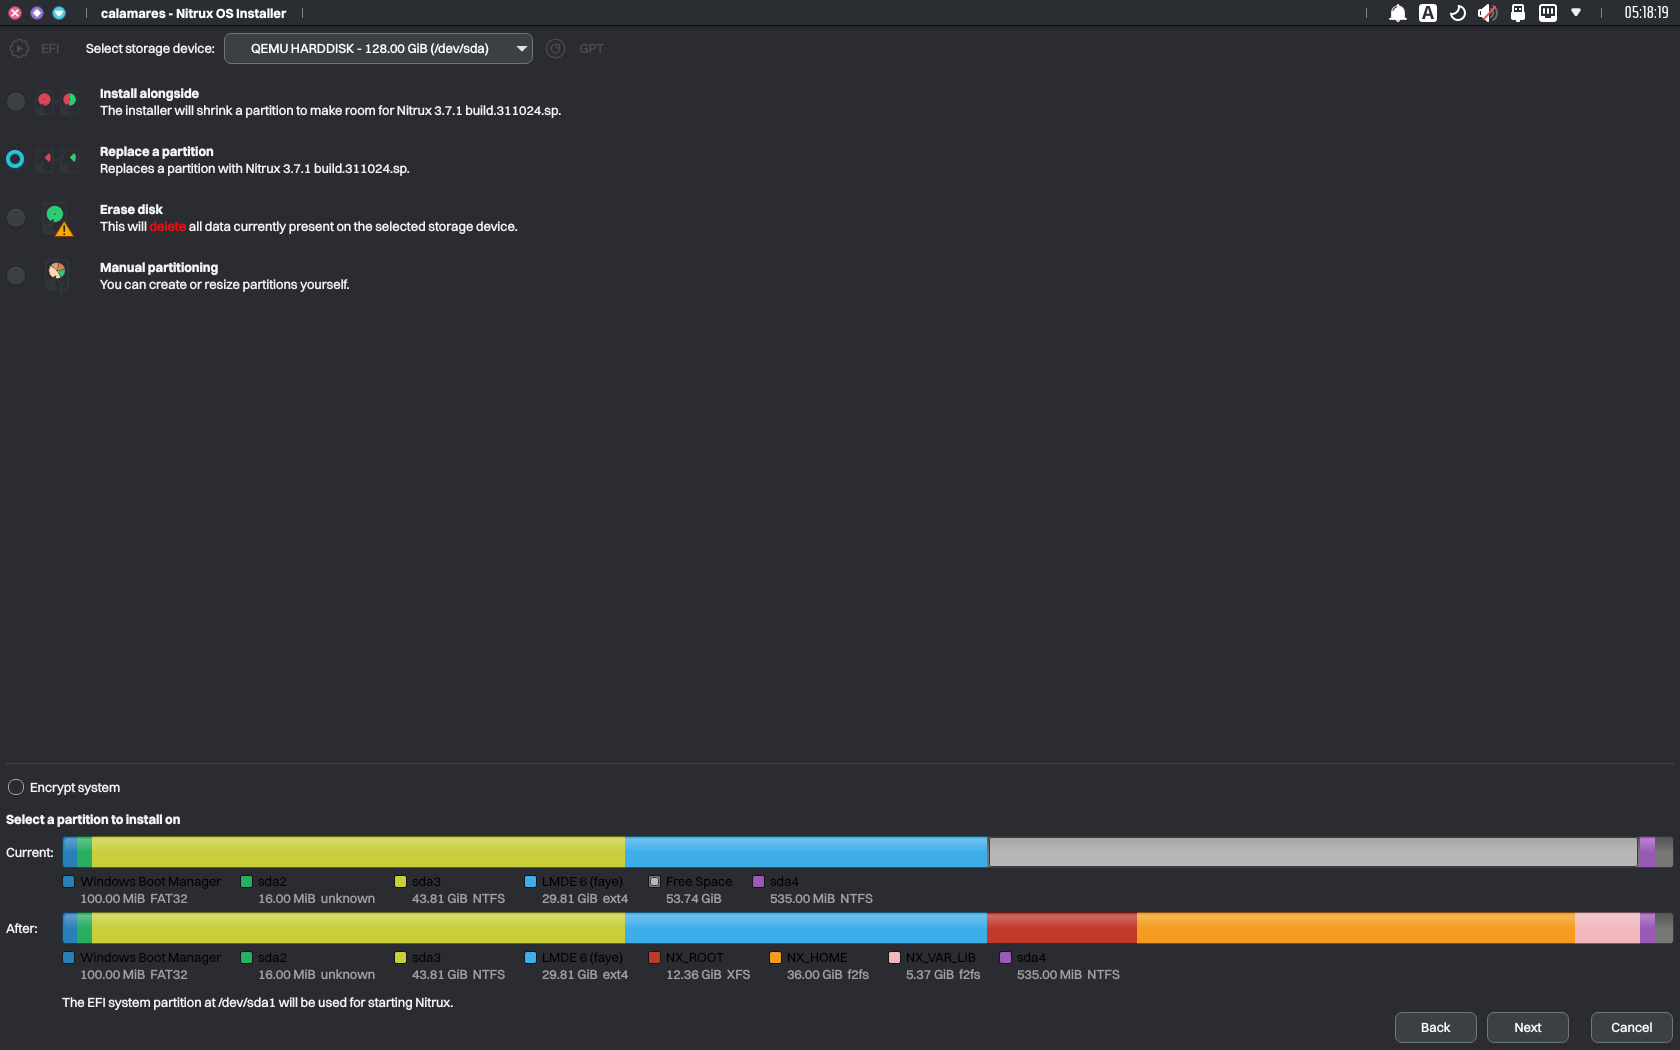
- Boot into Windows and use Disk Management to shrink a partition in your storage device to create unallocated space, or boot the Nitrux ISO, launch KDE Partition Manager, and shrink an existing partition to create unallocated space. Then, launch the installer, select “Replace partition,” and click the unallocated space.
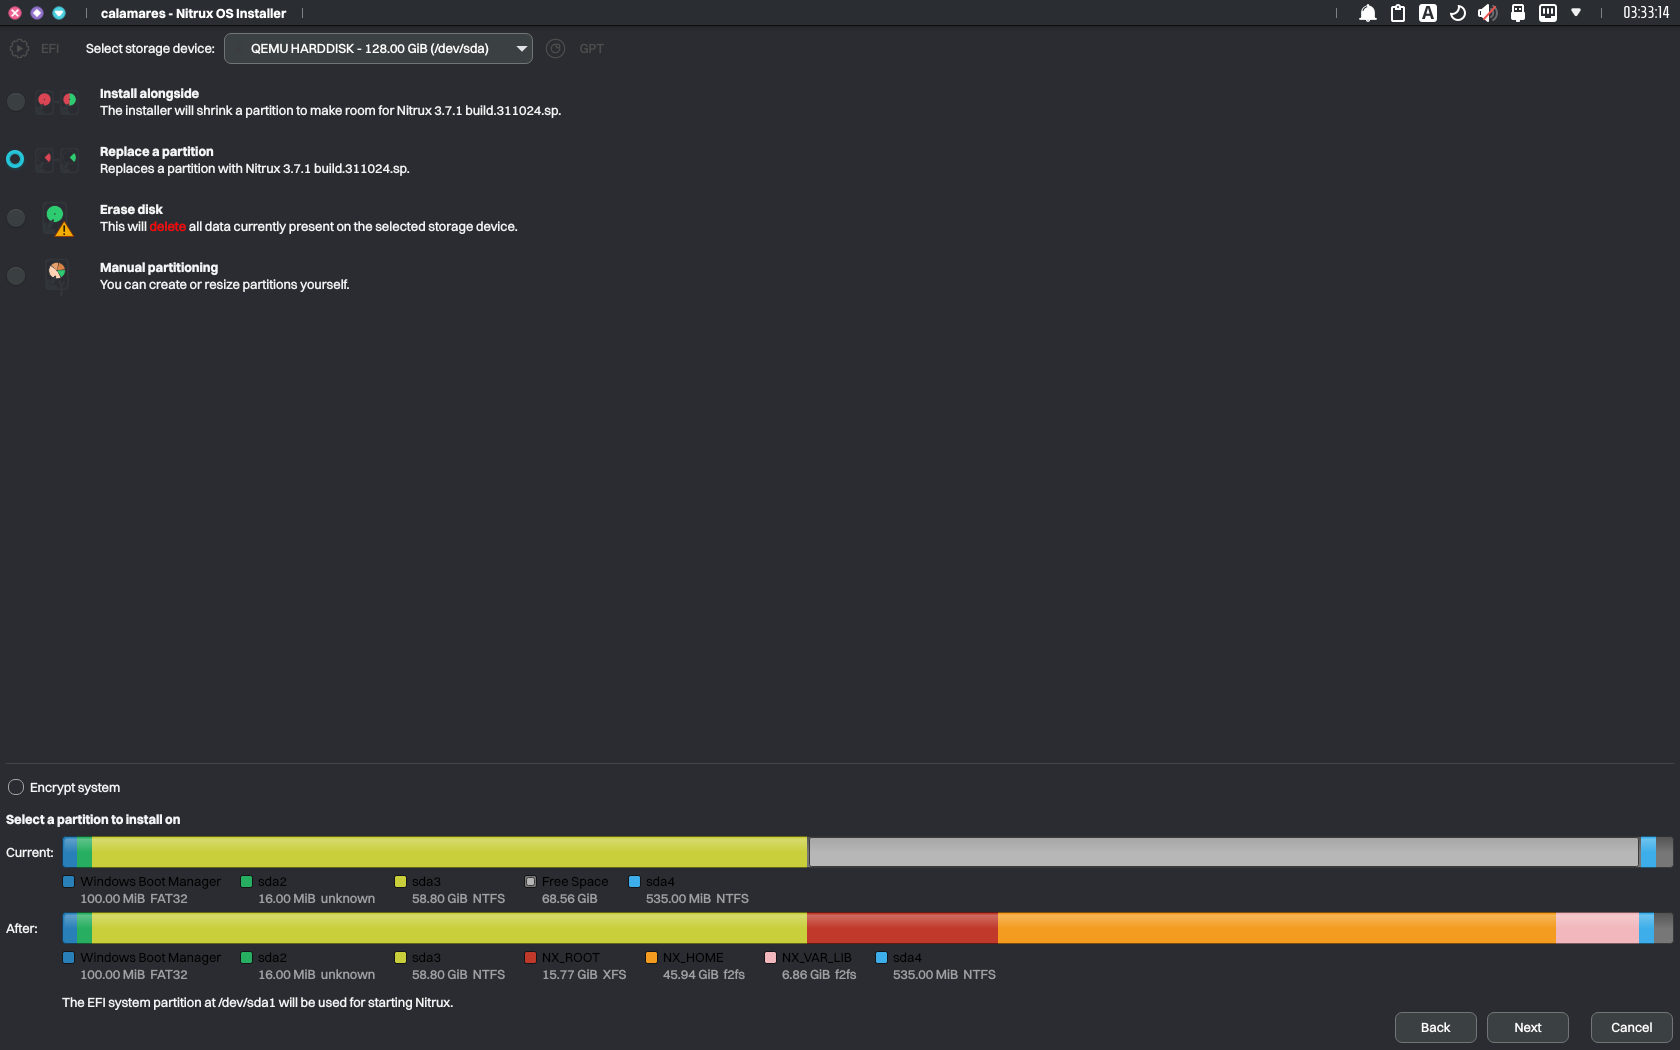
Using unallocated space to install Nitrux. Image for reference.
- Alternatively, select “Manual partitioning” and follow the partition layout table that best fits your device as described in Non-automated Partitioning Options.
- ⚠️ Important: Please be aware that the root directory is immutable, and any directory within the root will be read-only. Do not use a single partition layout.
Regardless of the selection, once the installation has been completed, GRUB will display entries to boot into Nitrux or Windows (Windows Boot Manager) upon rebooting.
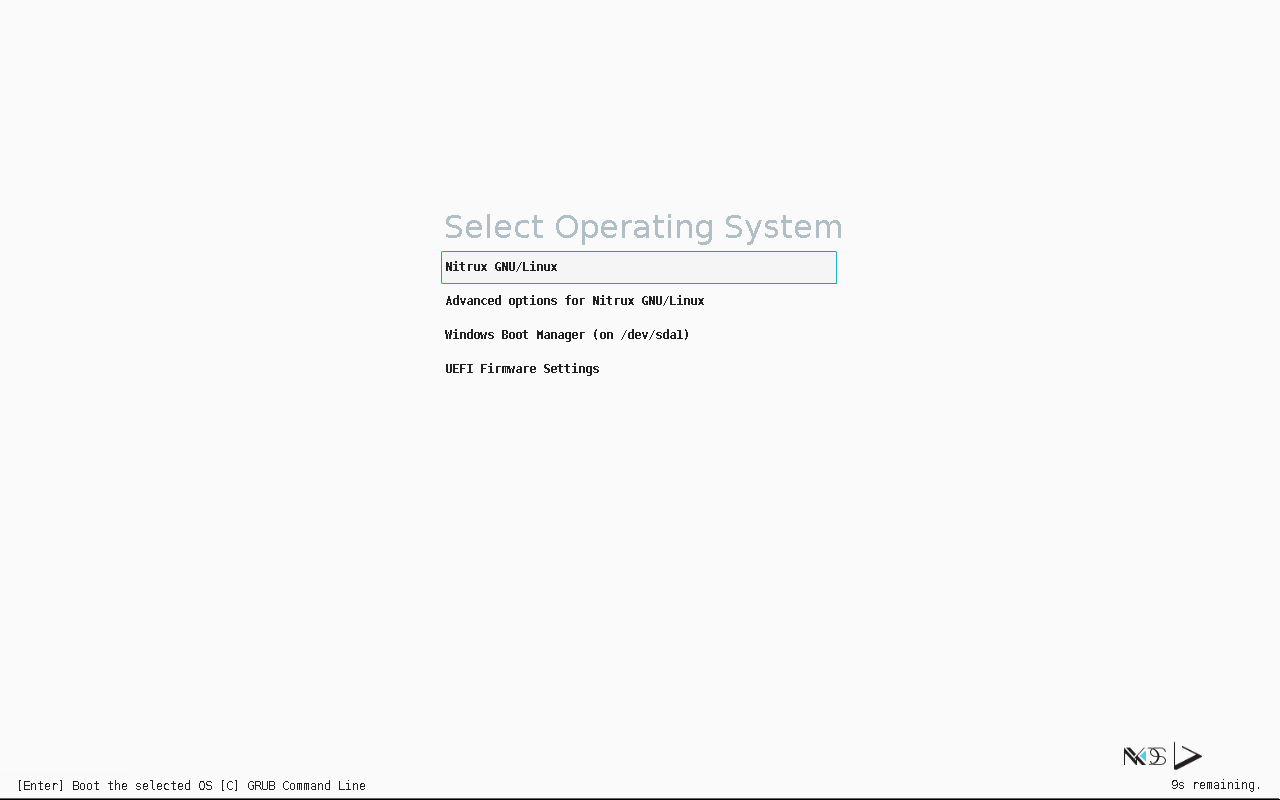
Upon rebooting, GRUB will display an entry for the Windows Boot Manager. Image for reference.
Installing Nitrux alongside other Linux distributions is precisely the same process as above.
- Disable Secure Boot using your device’s firmware, as noted in System Requirements.
- After disabling Secure Boot, do either of the following options:
- Boot the Nitrux ISO, launch the installer, select “Install alongside,” and click an existing partition with sufficient space. Adjust the slider to determine how much to allocate for Nitrux.
- Boot the Nitrux ISO, launch KDE Partition Manager, and shrink an existing partition to create unallocated space. Then, launch the installer, select “Replace partition,” and click the unallocated space.
- Alternatively, select “Manual partitioning” and follow the table that best fits your device as described in Non-automated Partitioning Options.
Regardless of the selection, once the installation has been completed, GRUB will display entries to boot into Nitrux or the other Linux distribution upon rebooting.
Triple-booting Nitrux, Windows, and other Linux distributions
Installing Nitrux alongside Windows and other Linux distributions follows the same process as above.
- Assuming Windows is installed first, install the other Linux distribution before installing Nitrux.
- Disable Secure Boot using your device’s firmware, as noted in System Requirements.
- After disabling Secure Boot, do either of the following options:
- Boot the Nitrux ISO, launch the installer, select “Install alongside,” and click an existing partition with sufficient space. Adjust the slider to determine how much to allocate for Nitrux.
As before, use the slider to allocate storage space to install Nitrux within Calamares. Image for reference.
-
- Boot the Nitrux ISO, launch KDE Partition Manager, and shrink an existing partition to create unallocated space. Then, launch the installer, select “Replace partition,” and click the unallocated space.
Using unallocated space to install Nitrux. Image for reference.
-
- Alternatively, select “Manual partitioning” and follow the partition layout table that best fits your device as described in Non-automated Partitioning Options.
- ⚠️ Important: Please be aware that the root directory is immutable, and any directory within the root will be read-only. Do not use a single partition layout.
- Alternatively, select “Manual partitioning” and follow the partition layout table that best fits your device as described in Non-automated Partitioning Options.
Regardless of the selection, once the installation has been completed, GRUB will display entries to boot into Nitrux, Windows (Windows Boot Manager), and the other Linux distributions upon rebooting.
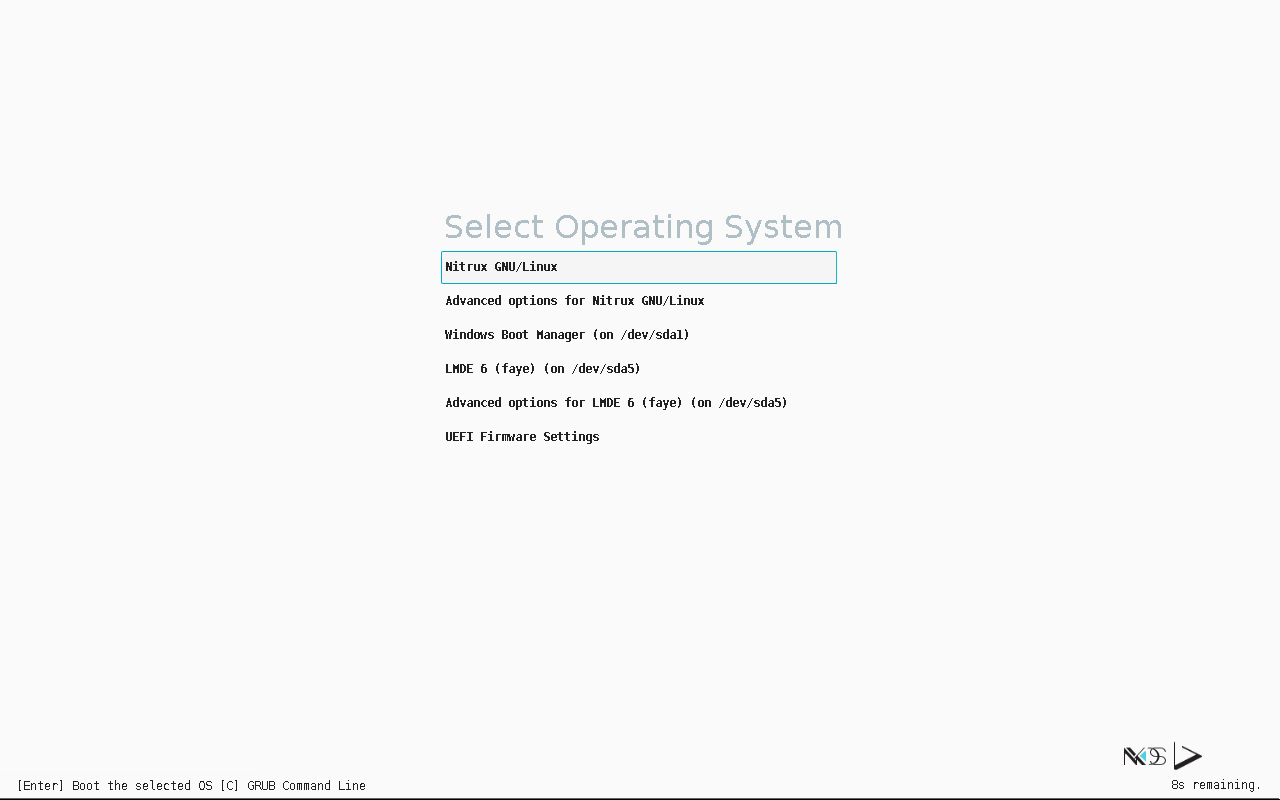
Upon rebooting, GRUB will display an entry for the available OSes. Image for reference.
Disclaimer: We do not develop the Calamares installer. To request features or report problems, please create issues at its bug tracker.
Troubleshooting
Can’t Install due to MBR Partitions Limit
We strongly discourage using an MBR (Master Boot Record) storage device when installing Nitrux due to the limitations of this type of partition table, i.e., MBR has a limit of four primary partitions, and Calamares won’t be able to continue with the installation. We strongly suggest using a different storage device to install Nitrux that does not use MBR, deleting the partition table, and using GPT (GUID Partition Table) instead. Alternatively, visit this link at AskUbuntu to learn how to convert the partition table from MBR to GPT without data loss. This is neither a bug caused by Nitrux nor a bug in Calamares.
As noted in the tables, Calamares fully supports using a GUID Partition Table for EFI/UEFI and Legacy BIOS firmware-type computers. Also, be aware that deleting the partition table will delete the data on the storage device.
Can’t Install due to Mounted Swap Partitions
In certain circumstances, Swap partitions are automatically mounted when using the Live session. Calamares does not unmount Swap partitions, so these partitions need to be unmounted manually; otherwise, Calamares won’t be able to continue with the installation. Run the following command to unmount all Swap partitions.
sudo swapoff -a
Failure to Install due to an Issue with rsync error code 11
As we have indicated numerous times in the Nitrux Installation Process Information section, Nitrux uses a custom partition layout with fixed percentages that scale according to the size of either the device or the allocated space. Failing to accommodate enough storage space for the root partition will prevent the installation from being finalized, as we mentioned in this issue at our bug tracker; this is neither a bug in Nitrux nor a bug in Calamares.
Failure to Install GRUB on Legacy BIOS computer with multiple storage devices and using MBR Partition Table
When installing Nitrux on a computer with multiple available storage devices and using an MBR disk as the installation target, Calamares may not select the same device, resulting in an error during the installation of GRUB. As mentioned, we strongly discourage using MBR storage devices since GPT is supported on Legacy BIOS computers.
Users choosing to continue the installation despite our recommendations must ensure that the disk where the MBR partition table is installed is the same as where Nitrux is being installed. Otherwise, Calamares will fail to install GRUB. This discrepancy in the target device selection is a bug in Calamares since this is not a configurable option.
Installation is Successful, but User Data isn’t Persistent
Users choosing to create partitions manually should understand the following to avoid an erroneous partitioning setup that will cause data persistence problems in user-managed directories.
⚠️ Important: The root directory is immutable; any directory within the root will be read-only. Do not use a single partition layout. Follow the partition layout table that best fits your device as described in Non-automated Partitioning Options.
This is neither a bug caused by Nitrux, an issue with Nitrux, nor a bug in Calamares.
Report Installation Bugs
To report problems with Calamares during installation, please use our bug tracker on GitHub and include the file ~/.cache/calamares/session.log in a bug report.
- 🔰 Information: This file is only available during the live session.
That’s it; this concludes today’s tutorial.