In today’s tutorial, we’ll see how to use Kernel Boot in Nitrux.
Difficulty: ★★☆☆☆
📜 Table of Contents
Introducing Kernel Boot
The Kernel Boot (kboot) utility uses kexec and is designed for Nitrux OS to make it easier to load other Linux kernels on the fly.
⚠️ Important: Kernel Boot works exclusively in Nitrux OS, and using this utility in other distributions will break them or not work at all. Please do not open issues regarding this use case; they will be closed.
Kernel Boot is designed for a particular purpose, making it easier to transition from the currently running kernel to a new kernel and avoiding the time-consuming hardware initialization and bootloader stages. It performs the following steps:
-
- Reads the settings in the specified configuration file.
- Then, it uses kexec to load the selected kernel using the parameters from the configuration file.
Introducing Kernel Boot.
What is Kernel Boot
- Minimalistic, focusing on necessary functionality.
- A CLI utility.
- 100% free and open-source software written entirely in a POSIX-compliant scripting language.
What Kernel Boot is not
- A bootloader.
- Kernel Boot uses a mechanism to load and execute a new kernel within an already running system, bypassing the entire boot process. In comparison, a bootloader such as GRUB is a full-featured bootloader responsible for the initial bootstrapping of the operating system. GRUB provides a menu to select the desired operating system or kernel.
- An init or service manager.
- Kernel Boot does not function as an init or replace an init. The init process is responsible for initializing the system, starting essential system services and daemons, and bringing up the user space environment. Kernel Boot does not perform these functions; Kernel Boot only loads a new kernel image.
- An initrd or initram generator.
- Kernel Boot does not replace or modify the existing initramfs generator. The initram generator tools like dracut or initramfs-tools are responsible for identifying and including the necessary modules, drivers, and scripts to correctly set up the root filesystem and handle any unique configurations (e.g., encrypted root, LVM, RAID, etc.). Kernel Boot loads a kernel and an existing initram, then transfers control to it.
- A container, virtual machine, Live USB creator, Linux distribution, Live/Recovery/Rescue/Emergency environment, system installer, desktop environment, firmware, or “proprietary software.”
- Note: We don’t know why anyone would think that, but one can never know, so let’s clarify that.
Using Kernel Boot in Nitrux
Kernel Boot is highly autonomous.
Commands:
Switch:
sudo kboot switch <config_file>
- It switches the kernel using the settings in the specified configuration file, for example,
/etc/kboot.d/debianor/etc/kboot.d/liquorix.- ⚠️ Important: This process involves stopping the currently running kernel and starting the new kernel from scratch. All running processes, including the graphical session, are terminated during this transition.
- ⚠️ Important: Kernel Boot is not a viable option for users of NVIDIA GPUs due to how the NVIDIA proprietary driver works with the Linux kernel.
Configuration:
Kernel Boot uses the /etc/kboot.d directory to load kernels.
- ⚠️ Important: The files in this directory must refer to a valid kernel (vmlinuz) and initram images (initrd.img) within the filesystem. We recommend placing kernel images other than the default kernel and initrd in the directory
/kbootfor better organization. In addition, to prevent polluting the GRUB menu.
Below is an example of a configuration file.
- ⚠️ Important: If your kernel parameters include:
BOOT_IMAGE=...Ensure it points to the new kernel path or remove the parameter entirely to avoid booting errors.
# Default values for booting a kernel with kboot
# 2023 (c) Nitrux Latinoamericana S.C.

# Define the path of vmlinuz and initrd to use with kexec.
# We suggest using the directory /kboot to organize kernels.
# Regular files and soft links are valid file types to use.
#
KEXEC_VMLINUZ=/kboot/example/vmlinuz
KEXEC_INITRD=/kboot/example/initrd.img

# Define the parameters used when loading the kernel.
# Kernel parameters go as a single line.
# NOTE: Do not use undeclared variables in the parameters. Doing so will prevent the kernel from loading.
# NOTE: Do not forget to include the root parameter. Otherwise, after running kboot, you will be staring at the initramfs.
# Use the command cat /proc/cmdline to view the UUID and the parameters. For example root=UUID=xxxxxxx-xxxx-xxxx-xxxx-xxxxxxxxxxxx
#
KERNEL_PARAMETERS=""
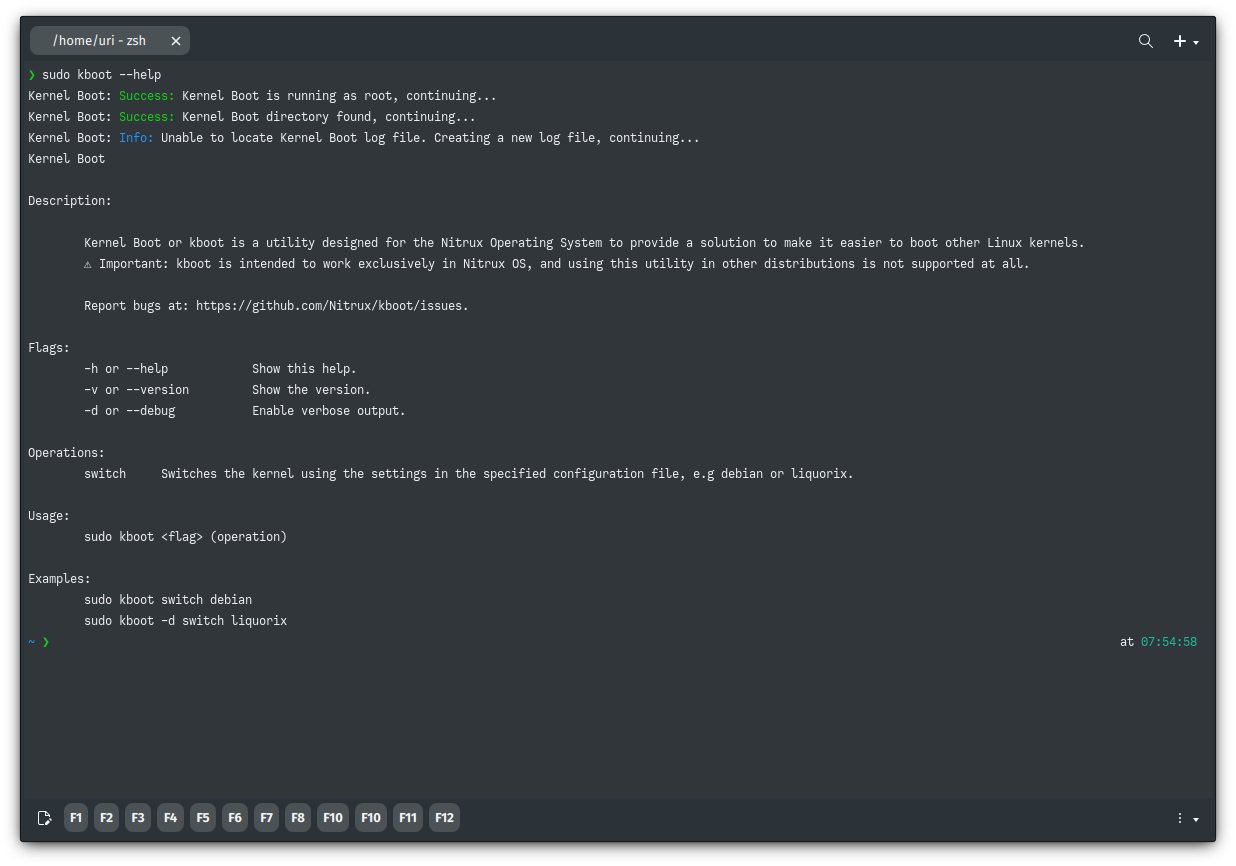
Options:
sudo kboot -h: Displays the help of kboot.
sudo kboot -d: Runs kboot in verbose mode.
sudo kboot -v: Displays the version of kboot.
Using Kernels from Distrobox containers
It is possible to install a Linux kernel on a Distrobox container and use it with Kernel Boot. To do this, we need to create a container using Distrobox. In this case, we recommend using a Debian-based container, as one of the differences between Linux distributions is the way modules are set up and configured for their specific system environments, e.g., initrd generation.
Let’s assume we use a container similar to the one in the Distrobox tutorial. To install the kernel package, run the following command.
- ⚠️ Important: We’re using the Debian kernel as an example; however, users can install other Debian-packaged kernels, such as the vanilla Ubuntu kernel or the Canonical Mainline kernel. Please be aware that these kernel packages might have different dependency requirements than the kernel package in this tutorial. Additionally, be aware that the directory names will differ, e.g., 6.4.0-060400-generic instead of 6.4.0-1-amd64. Also, it might be the case that the initramfs doesn’t exist when using these kernels; if that is the case, run update-initramfs -c -k all in the container.
distrobox enter -n debian-stable-distrobox -- sudo apt install linux-image-amd64 linux-headers-amd64 dkms initramfs-tools
Then, we copy only the respective kernel files and config files from the container’s /boot directory to any directory in our home, along with the modules for that kernel.
- 🔰 Information: Replace the version number of the files and directory accordingly; in the examples below, we installed the Debian kernel 6.4.0-1.
mkdir -p $HOME/boot/
mkdir -p $HOME/usr/lib/modules/
distrobox enter -n debian-stable-distrobox -- cp -r /boot/{vmlinuz,initrd.img,System.map,config}-6.4.0-1-amd64 $HOME/boot
distrobox enter -n debian-stable-distrobox -- cp -r /usr/lib/modules/6.4.0-1-amd64 $HOME/usr/lib/modules/
Next, since we’re using the Debian kernel, we will copy or move these files to the directory. /kboot/debian.
- ⚠️ Important: To copy, move, or edit files in the root directory, see System Management → NX Overlayroot → Usage.
- 🔰 Information: Run the following commands on a separate tab to avoid confusion. Replace $USER with your username.
sudo overlayroot-chroot

mount -t devtmpfs dev /dev

mount -t auto $(findfs LABEL=NX_HOME) /home

cp -r /home/$USER/boot/{vmlinuz,initrd.img,System.map,config}-6.4.0-1-amd64 /kboot/debian

cp -r /home/$USER/usr/lib/modules/6.4.0-1-amd64 /usr/lib/modules

sync

umount /home

exit
After copying the files, we can safely remove the temporary directories in our home.
rm -ri $HOME/usr $HOME/boot
Using kernels from Distrobox containers with LUKS
The steps for using another kernel differ slightly when encrypted partitions are present. We need to rebuild the kernel initram we’re adding so it knows there are encrypted partitions after copying the original initram file from the container. During installation, Calamares automatically does this for the default kernel.
To do this, run the following commands.
- ⚠️ Important: The commands below assume that the kernel and initramfs are already in /boot.
sudo overlayroot-chroot

mount -t devtmpfs dev /dev

update-initramfs -c -k 6.4.0-1-amd64

sync

umount /dev

exit
Additional and Misc. Information
Optionally, create soft links to /boot in the root directory so GRUB can add the kernel as a menu entry. If that is not wanted, don’t create the soft links; use Kernel Boot to switch the kernel.
- ⚠️ Important: To copy, move, or edit files in the root directory, see System Management → NX Overlayroot → Usage.
sudo overlayroot-chroot

mount -t devtmpfs dev /dev

ln -sv /kboot/debian/initrd.img-6.4.0-1-amd64 /boot/initrd.img-6.4.0-1-amd64

ln -sv /kboot/debian/vmlinuz-6.4.0-1-amd64 /boot/vmlinuz-6.4.0-1-amd64

ln -sv /kboot/debian/System.map-6.4.0-1-amd64 /boot/System.map-6.4.0-1-amd64

ln -sv /kboot/debian/config-6.4.0-1-amd64 /boot/config-6.4.0-1-amd64

update-grub

sync

umount /dev

exit
Alternative: Using Custom Kernels with NVIDIA GPUs
The steps below are necessary if the device uses NVIDIA hardware, since Kernel Boot will not work with it for the reasons we mentioned earlier (for more information, see this issue). First, we need to copy the kernel header files we intend to use to a directory our user can access, such as their home directory.
distrobox enter -n debian-stable-distrobox -- cp -r /usr/src/linux-headers-6.4.0-1-amd64 $HOME/usr/src/
Then, we copy the directory in $HOME/usr/src/ to /usr/src in our root directory. Finally, we run DKMS to build the driver for the specified kernel and then exit the overlay.
- ⚠️ Important: To copy, move, or edit files in the root directory, see System Management → NX Overlayroot → Usage.
- ⚠️ Important: DKMS will fail to build the NVIDIA proprietary driver’s modules if the kernel is too new; this is not a Nitrux bug.
- ⚠️ Important: DKMS will fail to build the NVIDIA proprietary driver modules when using the signed Debian kernel, which differs from the non-signed kernel used in this tutorial and the Liquorix kernel used by default (for more information, see this issue); this is not a Nitrux bug.
- 🔰 Information: Replace the version number of the NVIDIA driver accordingly.
sudo overlayroot-chroot

mount -t devtmpfs dev /dev

mount -t auto $(findfs LABEL=NX_HOME) /home

cp -r /home/$USER/usr/src/linux-headers-6.4.0-1-amd64 /usr/src

dkms install nvidia/545.29.06 -k 6.4.0-1-amd64

update-initramfs -c -k 6.4.0-1-amd64

sync

umount /dev /home

exit
To pass kernel parameters to the newly added kernel, edit the /etc/default/grub file, then run update-grub.
That’s it; this concludes today’s tutorial.