Update 13/01/26: Please note that the information below is aimed at an old release of this distribution and does not pertain to the current release.
In today’s tutorial, we’ll see how to use VMetal in Nitrux.
Difficulty: ★☆☆☆☆
📜 Table of Contents
Introducing Reintroducing VMetal
VMetal? Sounds familiar—You may wonder, and that’s because it is.
VMetal is a software project we made in 2019, which we stopped including in Nitrux approximately a few months later due to the intense backlash we received from people who did not understand how it worked, what it was, its exclusive availability in Nitrux, or that expected VMetal to make technological miracles, i.e., making VFIO “work” in Legacy BIOS, somehow “fix” IOMMU groups in closed-source proprietary firmware, or run out of the box in other distributions not configured to use it, etc.
Along with the equally controversial and long-dead znx, it was one of the three pillars of the then-planned Nitrux 2.0. We include it again because we’d prefer to include it than have it collecting dust, figuratively speaking. And because it’s useful for specific Windows software, including some games that don’t yet work in Proton.
VMetal allows users to run Windows in parallel to Nitrux, providing access to Windows software while allowing them to use their Linux desktops simultaneously. VMetal uses QEMU and KVM (Kernel-based Virtual Machine) on the software side and VFIO and IOMMU on the hardware side, meaning that Windows directly accesses the hardware it utilizes.
⚠️ Important: We made VMetal work exclusively on Nitrux OS, and using this utility on other distributions will not work as intended or at all. Please do not open issues regarding this use case; they will be closed.
Here’s a summary:
- VMetal is a CLI utility. It has no GUI and is non-configurable.
- VMetal does not function as a virtual machine manager, unlike hypervisors such as VirtualBox, VMware Workstation, or GNOME Boxes.
- VMetal creates a hardware-accelerated virtual machine, or, as most people know, a PCI passthrough VM.
- VMetal does not bind or rebind PCI Express devices, which would cause the host to present problems in the graphical session.
Requirements to use VMetal
Here’s the elephant in the room, as some say. Using VMetal isn’t just about opening the terminal and running the command. Multiple requirements must be present for the utility to work as intended. As much as we’d love all hardware to work out of the box, that is not possible, as VMetal is pretty much subject to the hardware limitations where it will be running, given its purpose.
Let’s list these requirements below—take a deep breath.
- As VMetal creates a virtual machine, we expect users to run this software on a computer with sufficient hardware resources in all areas: CPU, RAM, GPUs, and storage. We recommend meeting at least the requirements listed in System Requirements.
- VMetal will create two RAW Image Disk files: 50GB for the C:\ drive and 100GB for the D:\ drive.
- VMetal requires UEFI. To use VMetal, the motherboard must use UEFI; EFI is insufficient. Also, the GPUs (that’s, indeed, plural) need to support UEFI.
- VMetal under Legacy BIOS effectively never occurs due to the hardware limitations of this firmware.
- VMetal requires the CPU to support virtualization extensions. We can’t stress enough that VMetal creates a virtual machine (hence the name), so VT-x, VT-d, or AMD-V support is a primary requirement.
- VMetal requires the motherboard to support IOMMU. IOMMU is required for VMetal to perform PCI passthrough successfully.
- VMetal is dependent on IOMMU grouping. For VMetal to perform the PCI passthrough successfully, the motherboard’s firmware must provide GPUs in separate IOMMU groups. These groups must only contain the GPU and the embedded audio device.
- UEFI firmware updates are known to change the IOMMU groups.
- ⚠️ Important: This is not a VMetal bug, an issue with Nitrux, or caused by Nitrux.
- We’re aware of kernel patches such as the ACS patch. However, the ACS patch is also known to be a significant security issue, so we won’t suggest using it.
- UEFI firmware updates are known to change the IOMMU groups.
- VMetal requires two individual GPUs (Graphics Processing Units). The primary use of VMetal is for multi-GPU desktop computers, regardless of manufacturer, including combinations of integrated and discrete GPUs. One of the GPUs (primary) is used for the host, and the other (secondary) is used for the hardware-accelerated virtual machine.
- VMetal does not use or set up a virtual GPU. If the computer has only one physical GPU, VMetal will not work.
- VMetal can also work on laptops with multiple GPUs that meet the above requirements. However, it is essential to understand that laptops usually group multiple devices in a few IOMMU groups, and this grouping isn’t always logical. Because of this, VMetal may correctly assign the secondary GPU to the virtual machine but not the keyboard or the touchpad, for example.
- ⚠️ Important: This is not a VMetal bug, an issue with Nitrux, or caused by Nitrux. As before, we won’t suggest using the ACS kernel patch.
- When using VMetal, the virtual machine’s output is displayed on the secondary GPU, so to interact with it, one of that GPU’s ports must be connected to a monitor.
- VMetal can also load firmware files, i.e., ROMs, for GPUs.
- VMetal does not work with the Nouveau driver. Therefore, the proprietary driver must support the GPU(s) when using NVIDIA hardware.
- VMetal does not include Windows in any way; users must install it and activate it.
- It is possible to create a RAW image file of a physical device with Windows installation and use it with VMetal; however, there is no guarantee that the image will boot.
- VMetal requires that the motherboard UEFI firmware allow selection of the Initial Display Output; other manufacturers may use a different name, e.g., Primary Display. This feature allows users to select which GPU to use as primary and secondary.
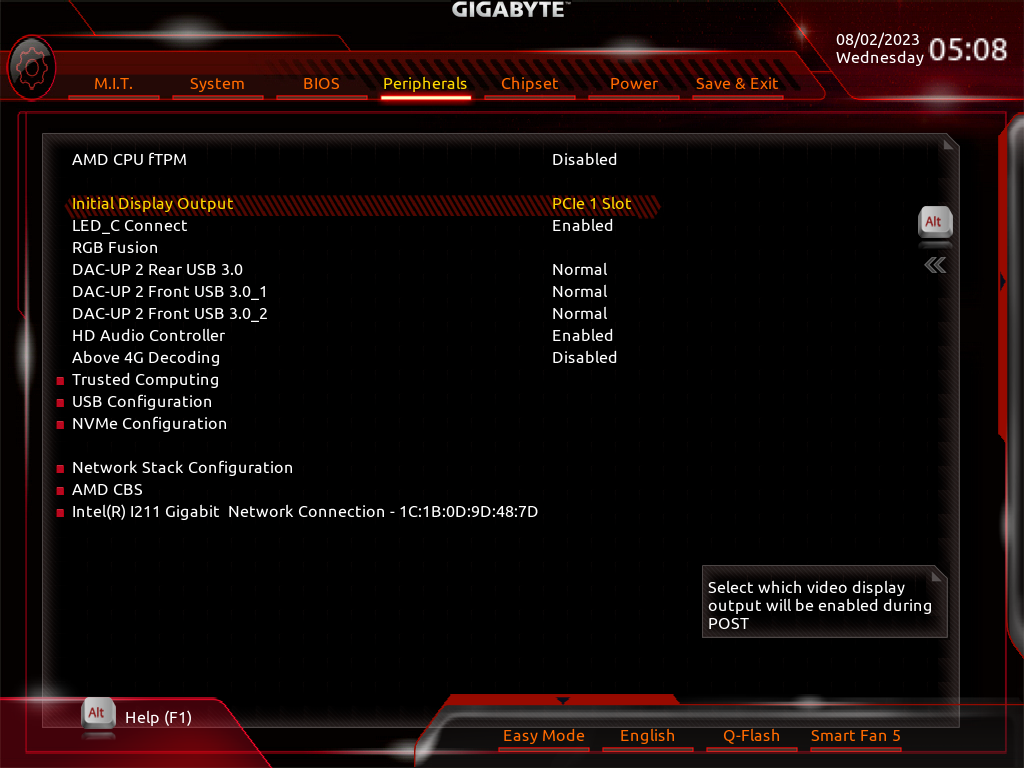
Initial Display Output. Image for reference.
- VMetal requires more than one USB Bus. When the virtual machine boots, VMetal will use USB Bus 1 and ports 1-7 to pass USB devices to the virtual machine.
- VMetal requires specific kernel parameters and kernel configuration. Nitrux includes and uses the Liquorix kernel by default; this kernel will work with VMetal. However, it’s up to the user to use Kernel Boot to pass the necessary kernel parameters for their particular setup. Additionally, the distribution has been configured accordingly in other areas.
- ⚠️ Important: VMetal will not work if the user does not use kernel parameters more appropriate for their hardware configuration.
- VMetal requires an active internet connection. VMetal will prompt the user to download a Windows ISO file, or the user can provide a local file. As with other OSes, an active connection is required to access the Internet, i.e., games from Steam, Epic, or other sources. VMetal also downloads an ISO file that provides multiple VirtIO drivers for Windows, or the user can provide a local file.
- VMetal does not use libvirt or Virt Manager.
- VMetal includes TPM support.
- VMetal is licensed under the BSD-3 clause.
- ⚠️ Important: VMetal does not require any “activation” or “license key” to function. We believe this to be evident, but we want to clarify it before a particular website claims otherwise.
- VMetal is not a fork of QEMU, Virt Manager, or other virtualization solutions.
Disclaimer: Due to the sheer number of possible hardware combinations and UEFI firmware versions, we can’t guarantee that a specific hardware combination will work out of the box with VMetal. We do not possess the means to test or acquire every consumer-available product to verify that it will work in VMetal. We have tested VMetal only on the computers we have access to that meet the criteria. Therefore, YMMV. If VMetal works in your hardware configuration, please use hw-probe to let us know what hardware you’ve used.
Using VMetal in Nitrux
Let’s assume the computer we want to use for VMetal meets those criteria; what then?
Check IOMMU groups
It is essential to check how the motherboard’s firmware groups all the devices. So, let’s list the devices. To do this, run the following command.
- 🔰 Information: We’re using a GA-AX370-Gaming 5 (rev.1.0) for reference.
find /sys/kernel/iommu_groups/ -type l -exec basename {} \; | xargs -I % lspci -nns % | sort -k 1,1
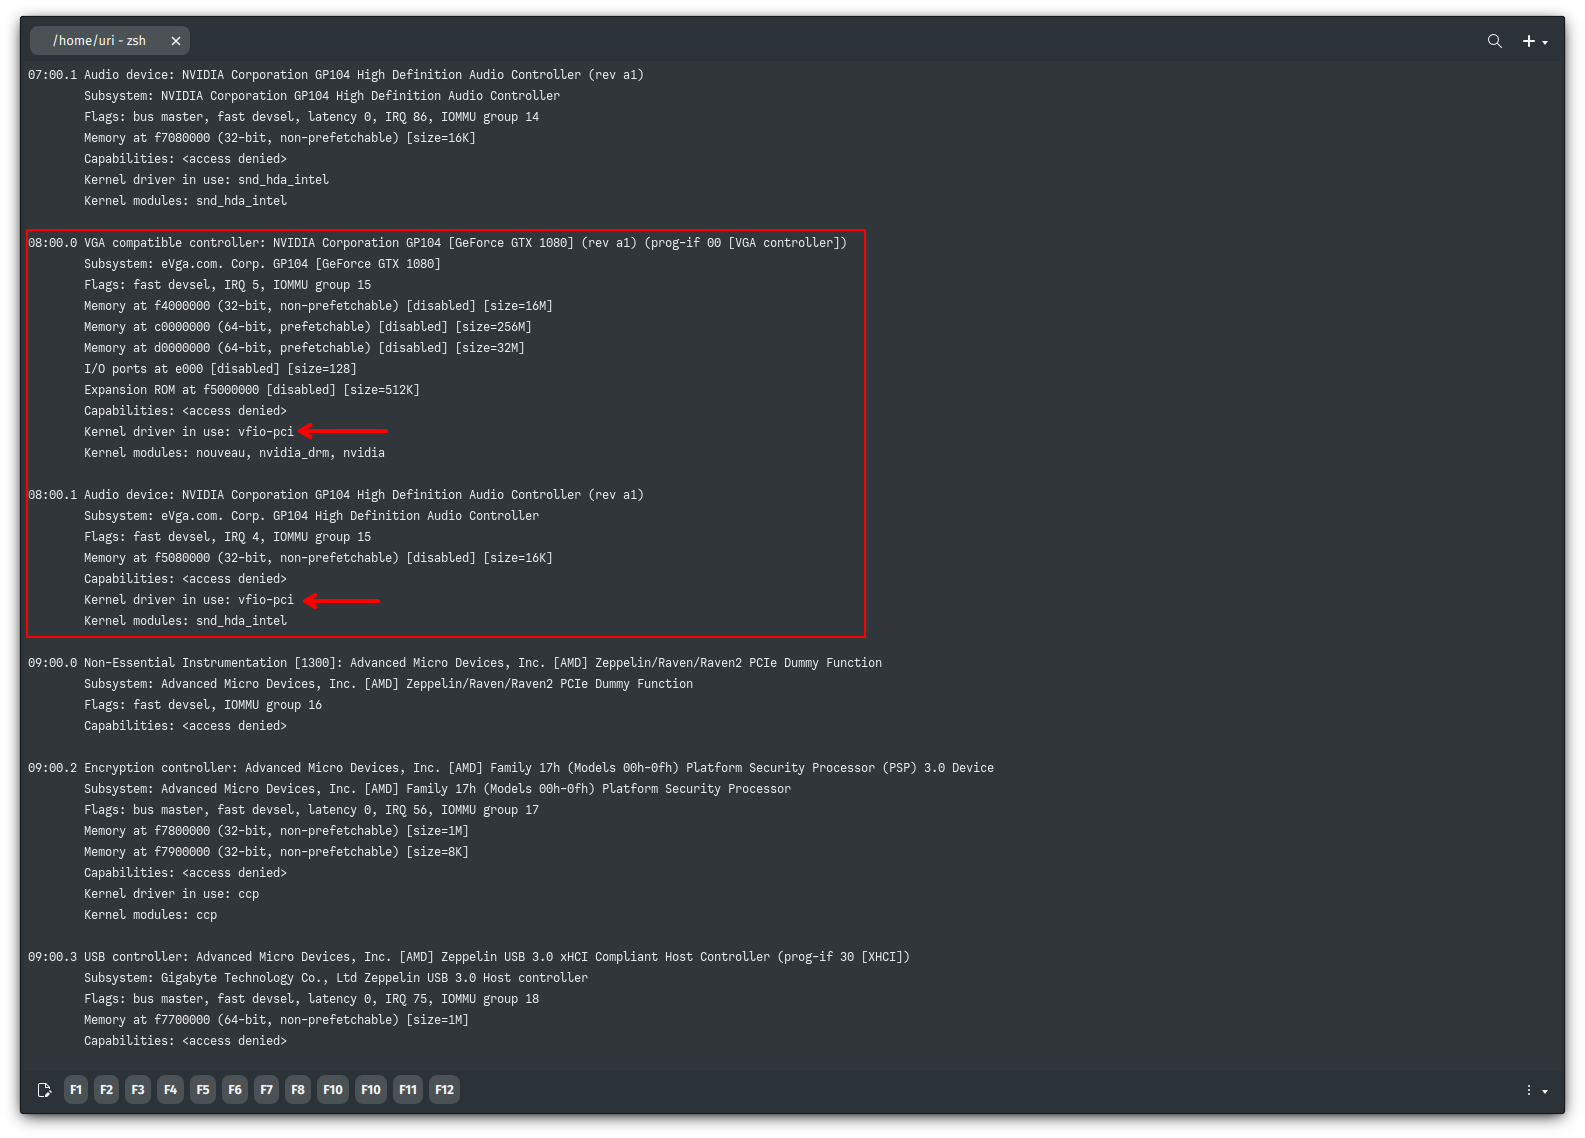
The output may look similar to the image below
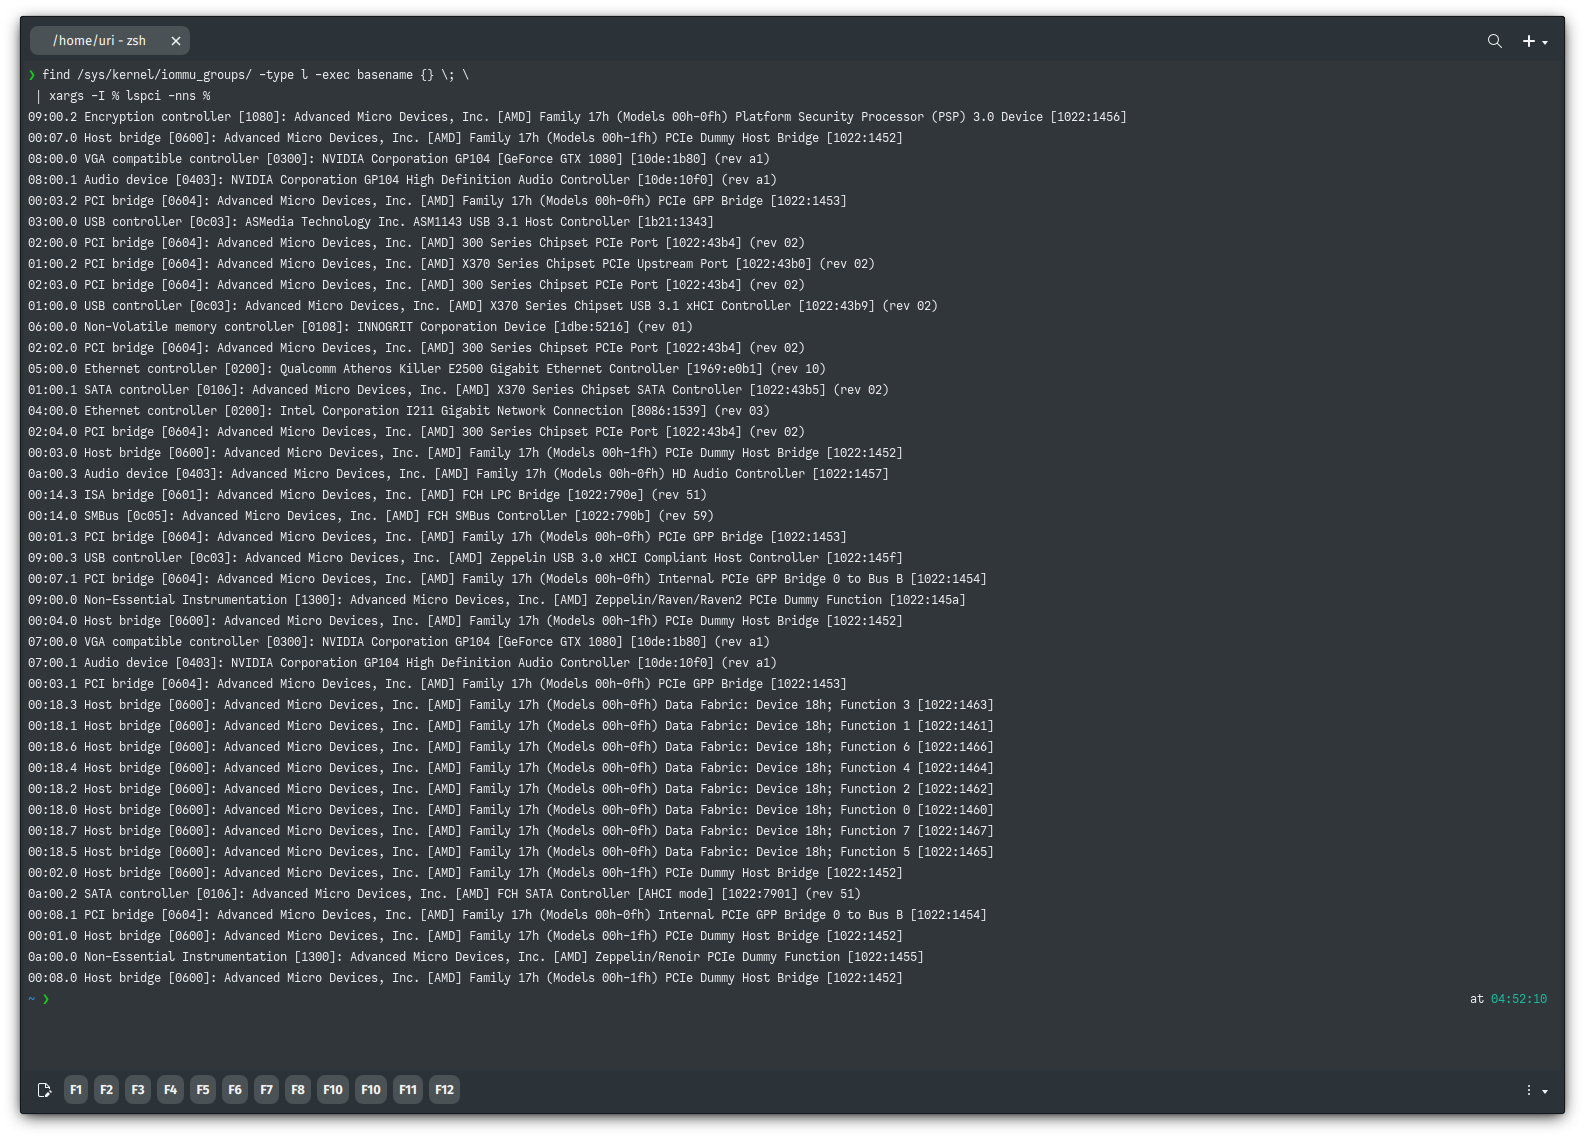
We’re interested in the devices listed as “VGA compatible controllers.” In our case, we have two GTX 1080s listed as follows.
07:00.0 VGA compatible controller [0300]: NVIDIA Corporation GP104 [GeForce GTX 1080] [10de:1b80] (rev a1)
07:00.1 Audio device [0403]: NVIDIA Corporation GP104 High Definition Audio Controller [10de:10f0] (rev a1)

08:00.0 VGA compatible controller [0300]: NVIDIA Corporation GP104 [GeForce GTX 1080] [10de:1b80] (rev a1)
08:00.1 Audio device [0403]: NVIDIA Corporation GP104 High Definition Audio Controller [10de:10f0] (rev a1)
We can cross-reference this data using the following command and visually confirm that each GPU is in a separate IOMMU group. To do this, run the following command.
sudo dmesg | egrep group | awk '{print $NF" "$0}' | sort -n
The output may look similar to the image below.
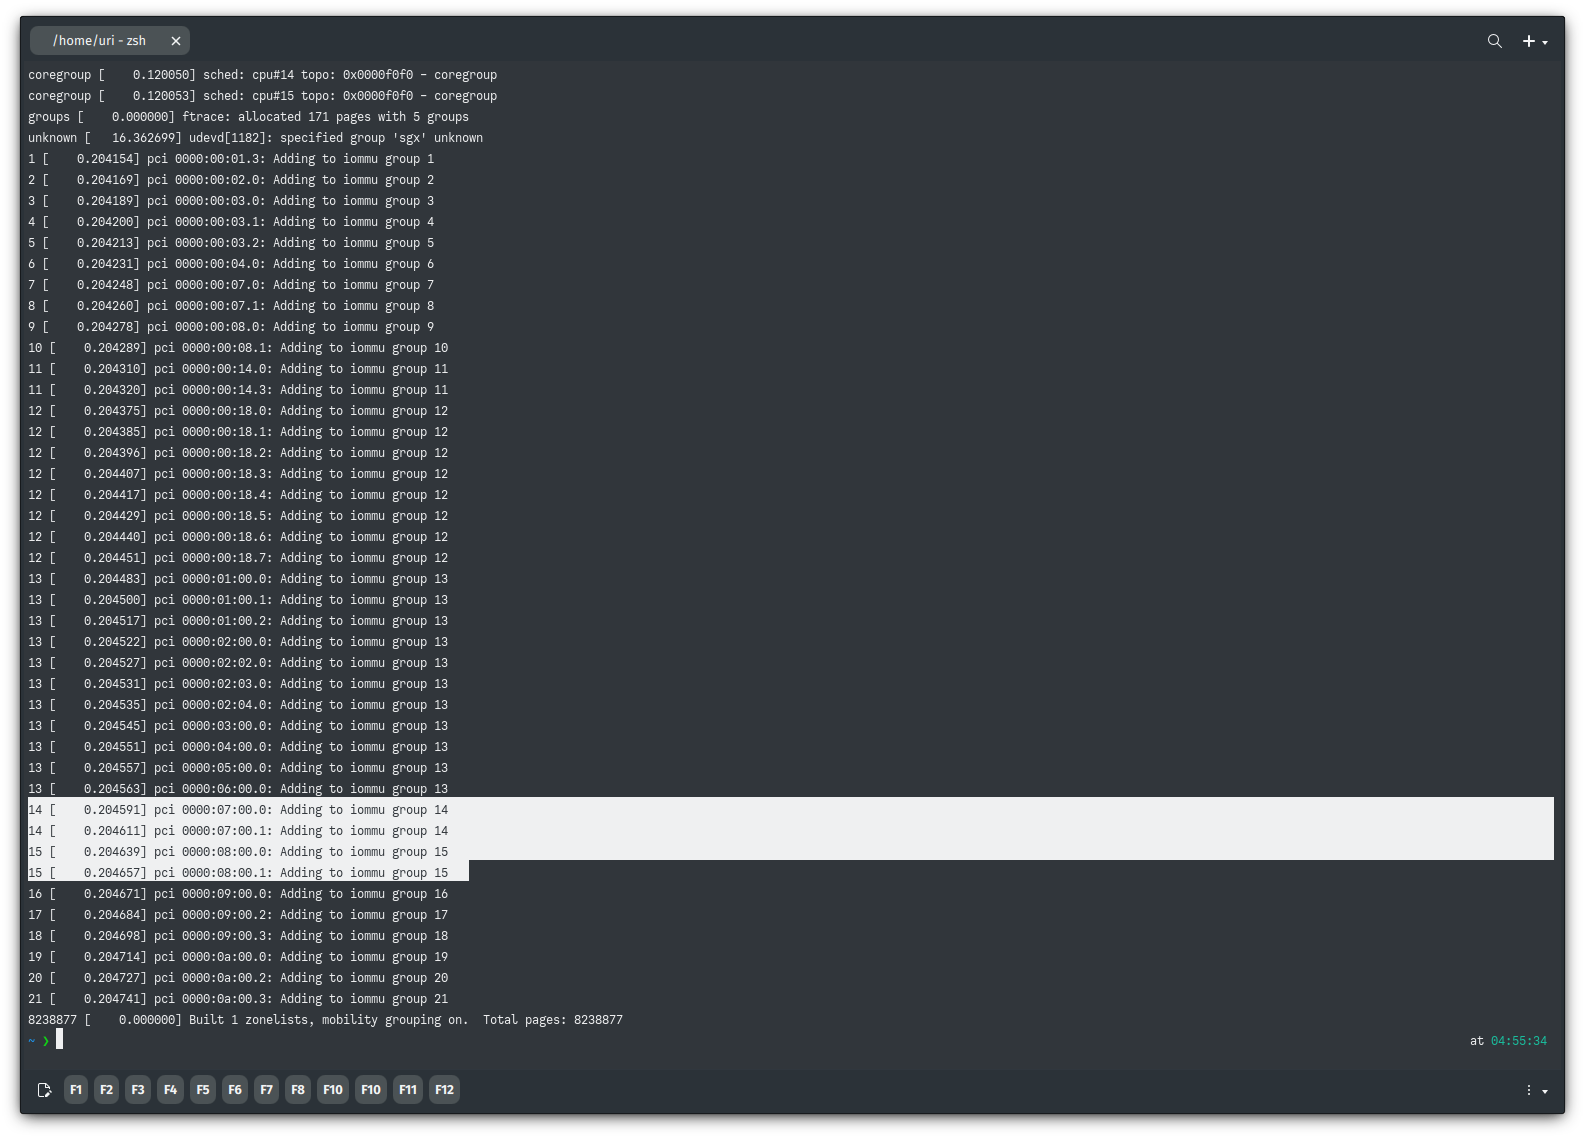
Luckily, this motherboard is doing a great job of putting the GPUs and their audio devices into separate IOMMU groups; in this case, we have two groups: 14 and 15. If the motherboard’s firmware were to add other devices to these groups, it would be game over instantly. We can’t separate the devices we need without the associated severe security risk of the ACS patch.
However, that’s not the case, so let’s continue.
Adding Kernel Parameters
Now, we need to add the necessary kernel parameters to use the adjustments in Nitrux. At this point, it’s essential to understand that which kernel parameters will work will depend on the hardware combination on each computer; since we can’t possibly test every consumer product out there, the best we can do is provide a list of parameters that we’ve tried and are known to work.
- 🔰 Information: Again, we can’t stress enough that we’ve tried these parameters only on computers we’ve had access to. Figuring out which ones will work for each specific use case is up to the user.
- ⚠️ Important: For AMD GPU users, we recommend using Kernel Boot to switch to a kernel with the necessary parameters; see How to use Kernel Boot in Nitrux.
- ⚠️ Important: For users of NVIDIA GPUs, using Kernel Boot is not a viable option due to how the NVIDIA proprietary driver works with the Linux kernel. Edit the file /etc/default/grub to add the necessary parameters to the default entry in the GRUB menu. To edit files in the root directory, see XFS Features and Root Immutability in Nitrux.
### List of Linux kernel parameters tested for VMetal

amdgpu.cik_support=1
amdgpu.si_support=1
cryptomgr.notests
intel_iommu=on
iommu=pt
modprobe.blacklist=amdgpu
modprobe.blacklist=nouveau
modprobe.blacklist=nvidia,nouveau
no_timer_check
page_alloc.shuffle=1
pcie_aspm=off
radeon.cik_support=0
radeon.cik_support=1
radeon.si_support=0
radeon.si_support=1
rcu_nocbs=0-64
tsc=reliable
The motherboard in this computer [GA-AX370-Gaming 5 (rev.1.0)] has an AMD chipset (X370); however, this computer also has NVIDIA hardware (x2 GTX 1080), so it falls in the latter category; thus, using Kernel Boot is not an option, so we must edit the GRUB configuration. Below is an example of the parameters used for this hardware combination.
(...)
GRUB_CMDLINE_LINUX_DEFAULT="quiet amd_iommu=pgtbl_v1 amd_iommu_intr=vapic apparmor=1 cryptomgr.notests elevator=noop iommu=pt modprobe.blacklist=nouveau no_timer_check nvidia_drm.modeset=1 nvme_core.multipath=Y overlayroot=tmpfs:swap=1,recurse=0 page_alloc.shuffle=1 rcu_nocbs=0-8 security=apparmor tsc=reliable zswap.compressor=lz4 zswap.enabled=1 zswap.max_pool_percent=20 zswap.zpool=z3fold"
(...)
Adding some of these kernel parameters will allow the VFIO driver to take over the secondary GPU; in this case, that’d be the PCI devices 08:00.0 and 08:00.1.
Then we can proceed to add the necessary files for VMetal, such as the Windows installation ISO and the VirtIO drivers ISO.
Files required for using VMetal
VMetal will use the directory ~/VMetal to store the virtual drives, which is also where the user must place the ISO files to install the guest OS (“win_install.iso“) and the drivers for the virtual machine (“virtio_drivers.iso“). As mentioned at the beginning of the tutorial, the size of the virtual C:\ drive (“win.img“) is 50GB, and the size of the virtual D:\ drive (“win_storage.img“) is 100GB. VMetal will automatically create the virtual drive files.
VMetal will automatically download the VirtIO ISO file, but prompt the user to download a Windows ISO from Microsoft.
Below is the directory structure for VMetal. If any of the files mentioned are missing (virtual drives, ISO files), VMetal will not start. As mentioned, VMetal can also load firmware files (i.e., ROMs) for GPUs. In this computer, the secondary GPU is an EVGA GTX 1080. The easiest method to obtain the ROM firmware files is to download them from TechPowerUp. VMetal will use the specific file (“vm_gpu.rom“).
### VMetal Directory Structure

VMetal
├── images
│   ├── win.img
│   └── win_storage.img
├── iso
│   ├── virtio_drivers.iso
│   └── win_install.iso
└── roms
    ├── EVGA.GTX1080.8192.160509.rom
    └── vm_gpu.rom -> /home/uri/VMetal/roms/EVGA.GTX1080.8192.160509.rom
Running VMetal in Nitrux
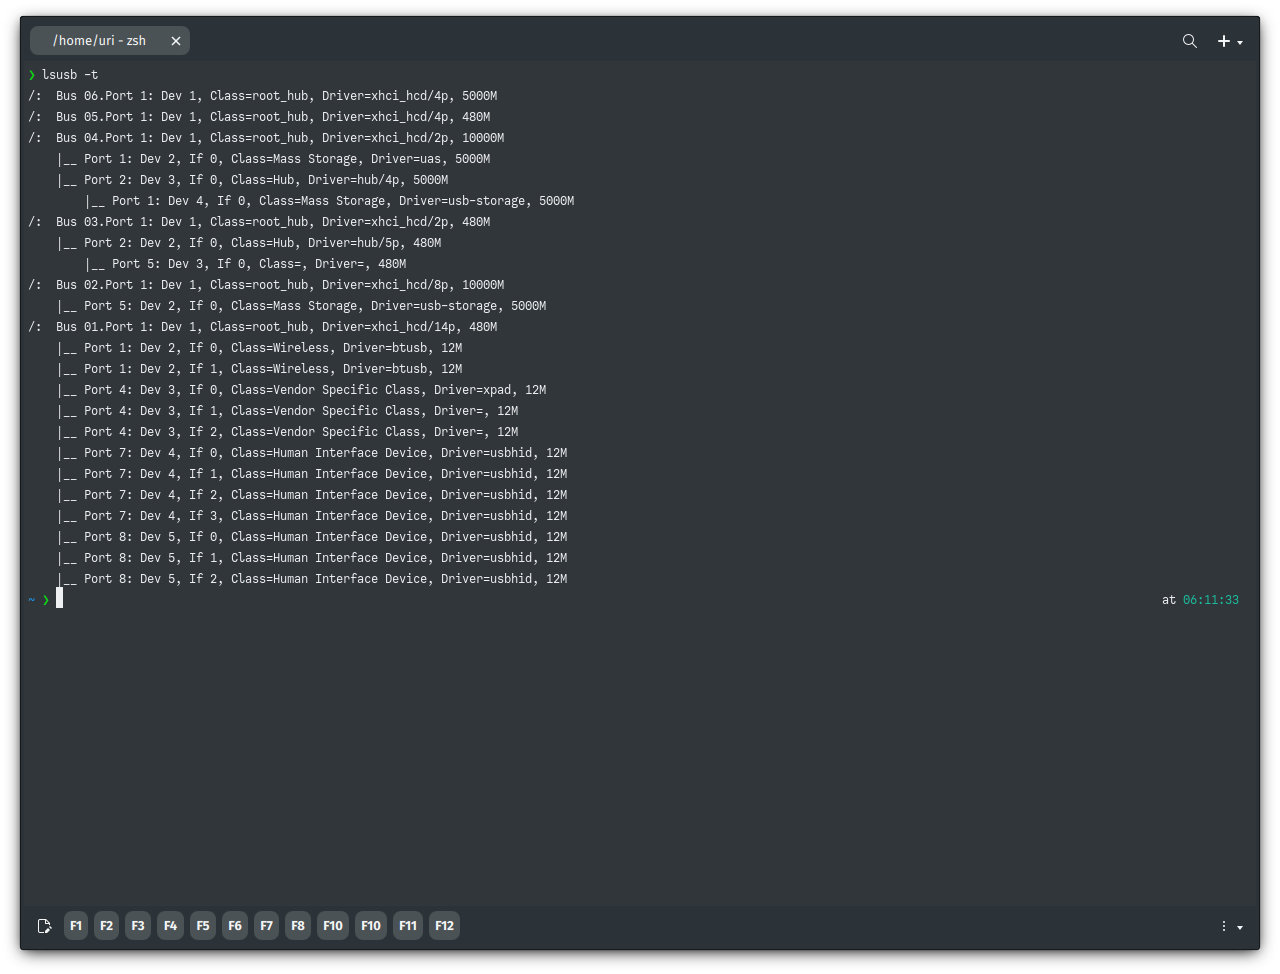
As we established earlier, when the virtual machine boots, VMetal uses USB Bus 1 and ports 1-7 to pass USB devices to the virtual machine. So, ensure that any input device, audio device, or other peripheral is connected to these ports. Run the following command to visualize which ports correspond to USB Bus 1.
lsusb -t
For the reference motherboard, USB Bus 1 has ports 1, 4, 7, and 8 assigned to it. So, devices connected to these ports will be used by the virtual machine and become unavailable to the host.
Next, because VMetal needs to run as root, we need to create a symbolic link from the root’s home to the VMetal directory in the user’s home. To do that, run the following commands.
- 🔰 Information: To edit files in the root directory, see XFS Features and Root Immutability in Nitrux.
### Replace $USER with your username

sudo -i
ln -sv /home/$USER/VMetal/ .
exit
And that’s about it. We can now plug the secondary GPU into an input on our monitor (it can be the same monitor connected to the primary GPU; it doesn’t matter) and proceed to install Windows.
To launch VMetal, run the following command.
sudo -Sk vmetal
- 🔰 Information: Installing Windows is not within the scope of this tutorial, nor is installing the VirtIO drivers for Windows.
Known Issues
Here are some known issues and other information regarding using VMetal.
- When graphics drivers are updated in Windows, the GPU may enter a power-down state known as D3; when the device attempts to resume, there’s no display output on the virtual machine. Rebooting the virtual machine resolves the problem. Nonetheless, it’s important to note that doing this before the driver installer finalizes will cause the driver installation to fail. We suggest installing or updating the driver before doing anything else, and leaving the virtual machine running for a few minutes to ensure the installer completes before the manual reboot.
- As mentioned initially, VMetal creates two virtual drives. To grow the size of these files, we recommend creating a container with Distrobox, installing QEMU, and resizing the files.
- Plugging and unplugging USB devices from the virtual machine can cause udev to freak out. We recommend plugging in the devices intended to be used with the virtual machine before booting it.
- The above includes input devices, audio devices, etc. For example, if a keyboard and mouse are used for the virtual machine, they will become unavailable to the host.
- For a device to work in the virtual machine, it must be detected by the Linux kernel, i.e., it must use a driver in the host.
- VMetal does not encrypt the virtual drive files. We suggest using one of the encryption methods available by default in the distribution; see File Encryption in Nitrux.
- VMetal does not create snapshots of the virtual drive files. We suggest using Kup to create backups; see How to create backups using Kup.
- VMetal does not compress the virtual drive files. We suggest using the native F2FS compression; see Native File Compression in F2FS.
That’s it; this concludes today’s tutorial.